Introducing EasyWaterscape for Unreal Engine 5
来源:C:\Users\shaotang\Desktop\temp\Introducing EasyWaterscape for Unreal Engine 5.mp4
提取时间:2026-07-08 13:45:28
📋 内容概述
本次演讲介绍了 Easy Waterscape,一款专为 Unreal Engine 5 设计的水模拟工具,旨在为开发者提供一个高效、用户友好、功能强大的水系统解决方案,适用于游戏开发和影视制作。
🔑 核心技术要点
- 提供 tile-free 水模拟,避免传统水系统中常见的重复和接缝问题。
- 支持 多种预设(preset),包括浮力、动态水面细节和自动海岸线生成。
- 通过 单个蓝图(Blueprint)实现所有功能,降低使用门槛和复杂度。
- 优化为 游戏性能,而非仅用于影视,支持 LOD(Level of Detail)调整以平衡画质与性能。
- 强调 用户友好性,所有参数均有清晰的描述和提示,减少学习成本。
- 支持 波浪方向性(wave directionality)和 波浪扩展(wave spread)控制,实现更自然的水面效果。
- 引入 动态泡沫生成(foam generation),基于波浪陡度和陡峭度(chopiness)模拟真实泡沫行为。
💡 研发经验与教训
- 避免过度复杂化:开发者应尽量减少用户对复杂材质或代码的依赖,将关键参数暴露在蓝图中,提升易用性。
- 清晰的参数说明:所有变量应附带描述性提示(tooltip),避免用户因缺乏文档而困惑。
- LOD 优化策略:LOD 0 和 1 适用于影视,而 LOD 2-4 更适合游戏开发,开发者应根据项目需求选择合适的 LOD。
- 避免默认设置陷阱:某些参数(如波浪方向性)若未正确设置,可能导致视觉效果不佳,建议用户在使用时参考推荐值(如 0.75-0.95)。
- 解决接缝问题:通过调整 tile breaking 的 offset 和 blend range,可显著减少水面接缝问题,但需注意默认值通常已足够使用。
- 泡沫生成需合理控制:泡沫的生成与波浪的陡峭度密切相关,开发者需根据场景需求调整 chopiness 值,以实现自然效果。
📊 关键数据与结论
- LOD 0:极高密度,仅适用于高端影视制作,不适合游戏。
- 推荐波浪方向性值:0.75-0.95,以实现自然的波浪方向性。
- 泡沫生成:与 chopiness 值正相关,值越高,泡沫越明显,更接近真实物理行为。
- tile breaking:通过设置 offset 为 -1500 和 blend range 为 1500,可有效减少接缝问题。
🎯 可借鉴的方法论
- 蓝图驱动开发:将所有关键参数暴露在蓝图中,减少用户对材质编辑器的依赖,提高开发效率。
- 预设系统设计:提供多种预设,帮助用户快速上手,同时允许用户解锁设置进行自定义调整。
- 参数说明标准化:为每个参数添加清晰的描述和提示,提升用户体验和学习效率。
- LOD 优化策略:根据项目需求选择合适的 LOD,平衡画质与性能。
- 可视化控制工具:如波浪方向控制的 gizmo,提升用户对参数的直观理解与操作体验。
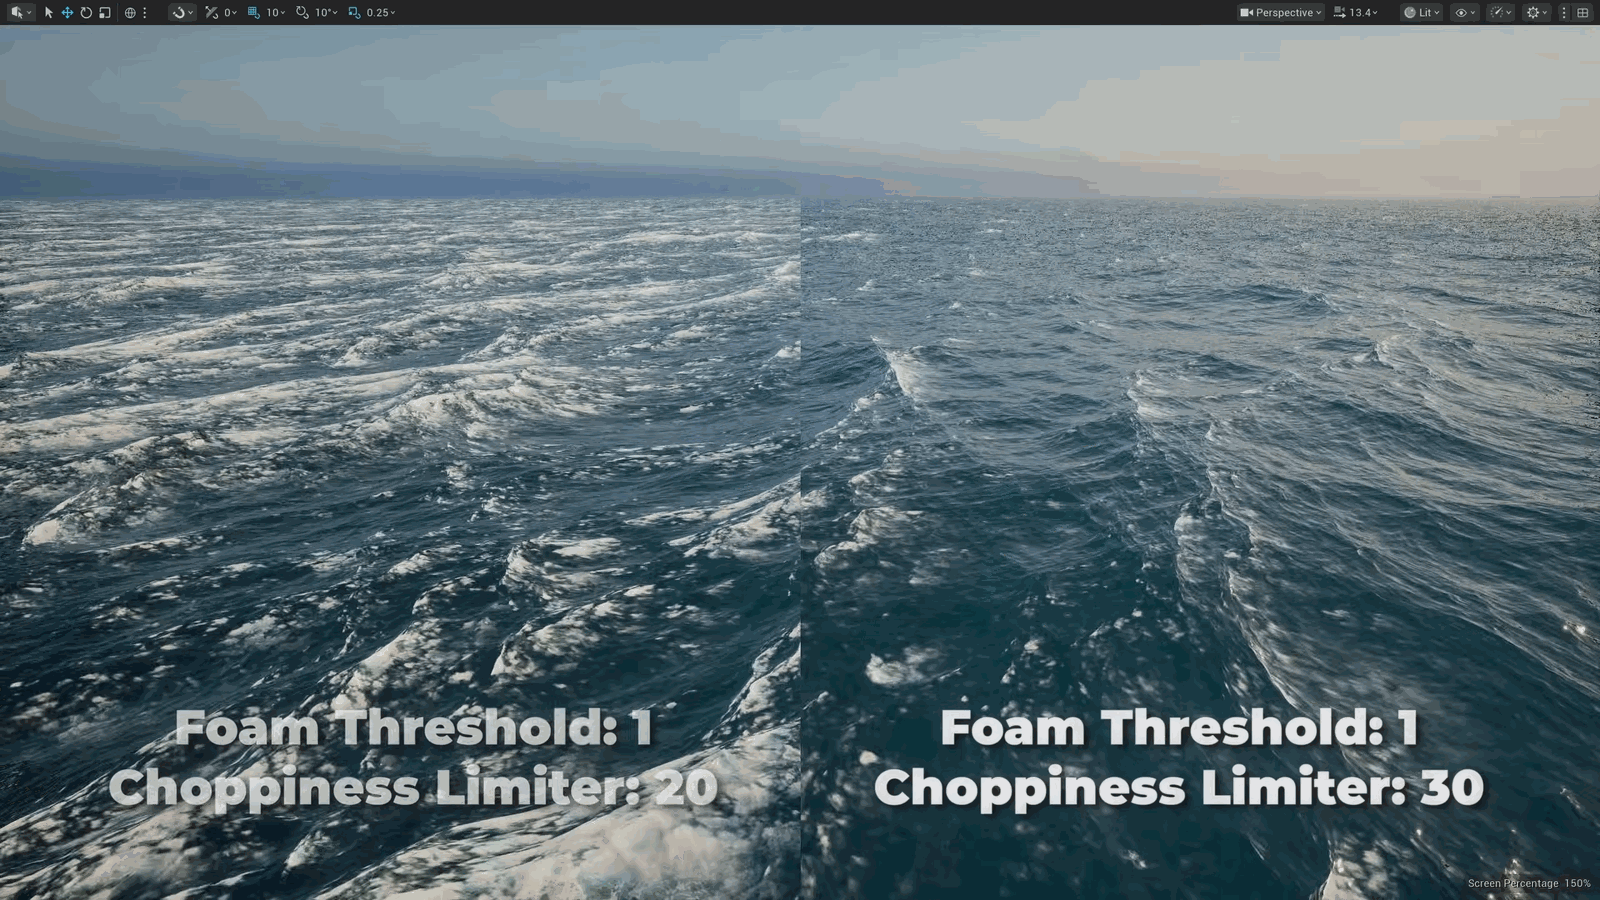
- 持续更新与反馈机制:通过 Discord 社区和视频教程,持续收集用户反馈并优化工具。
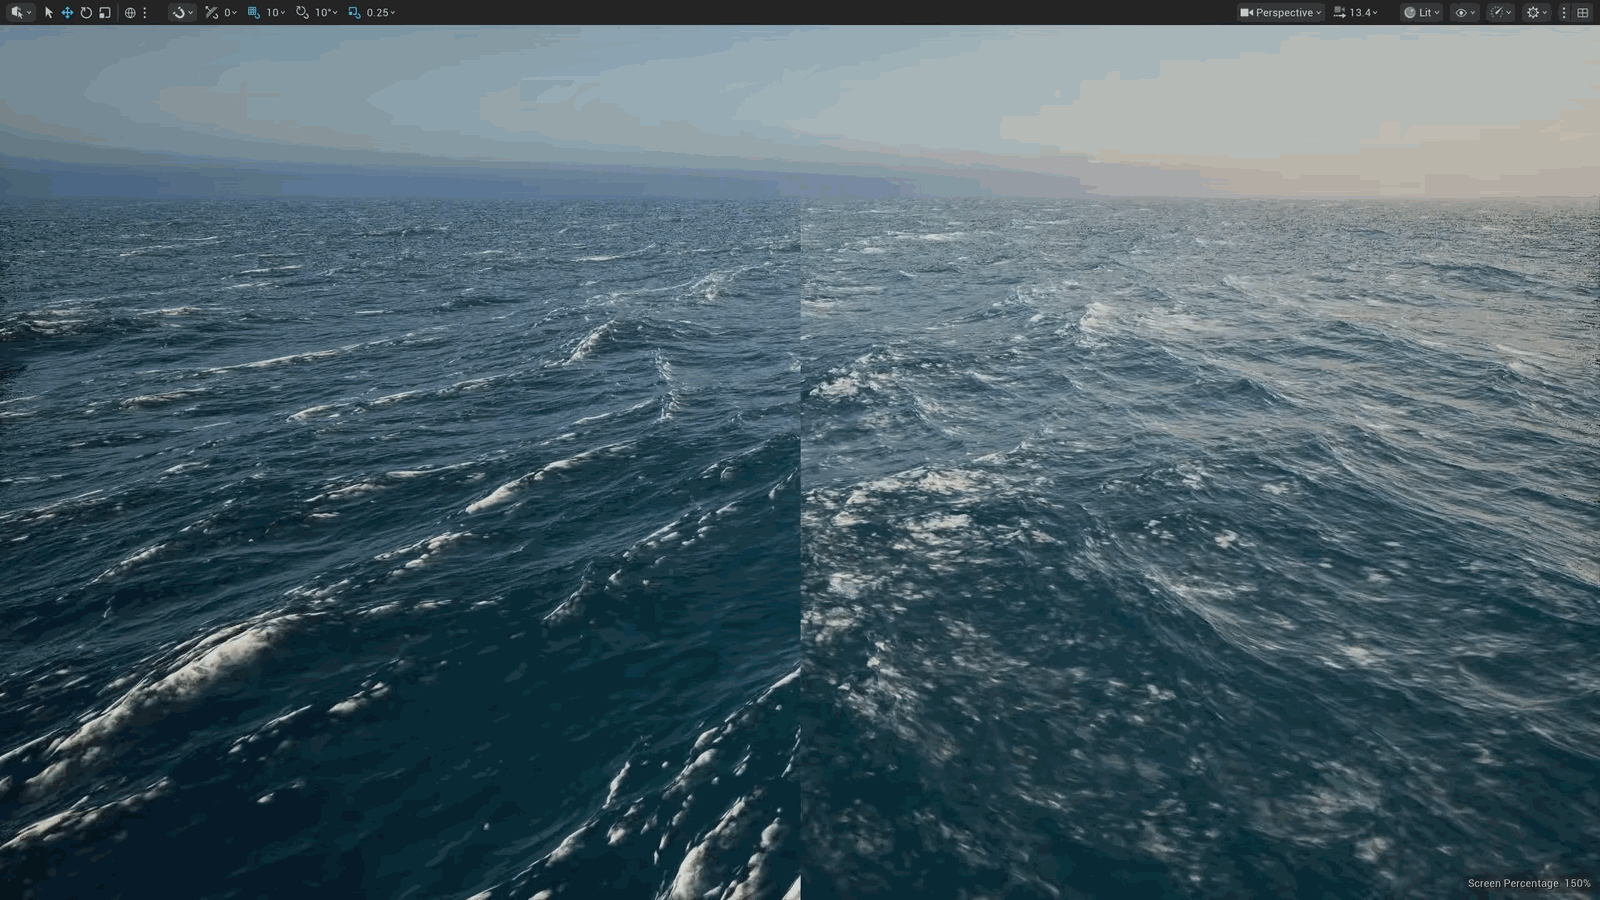
Slide 1 — 00:00:00

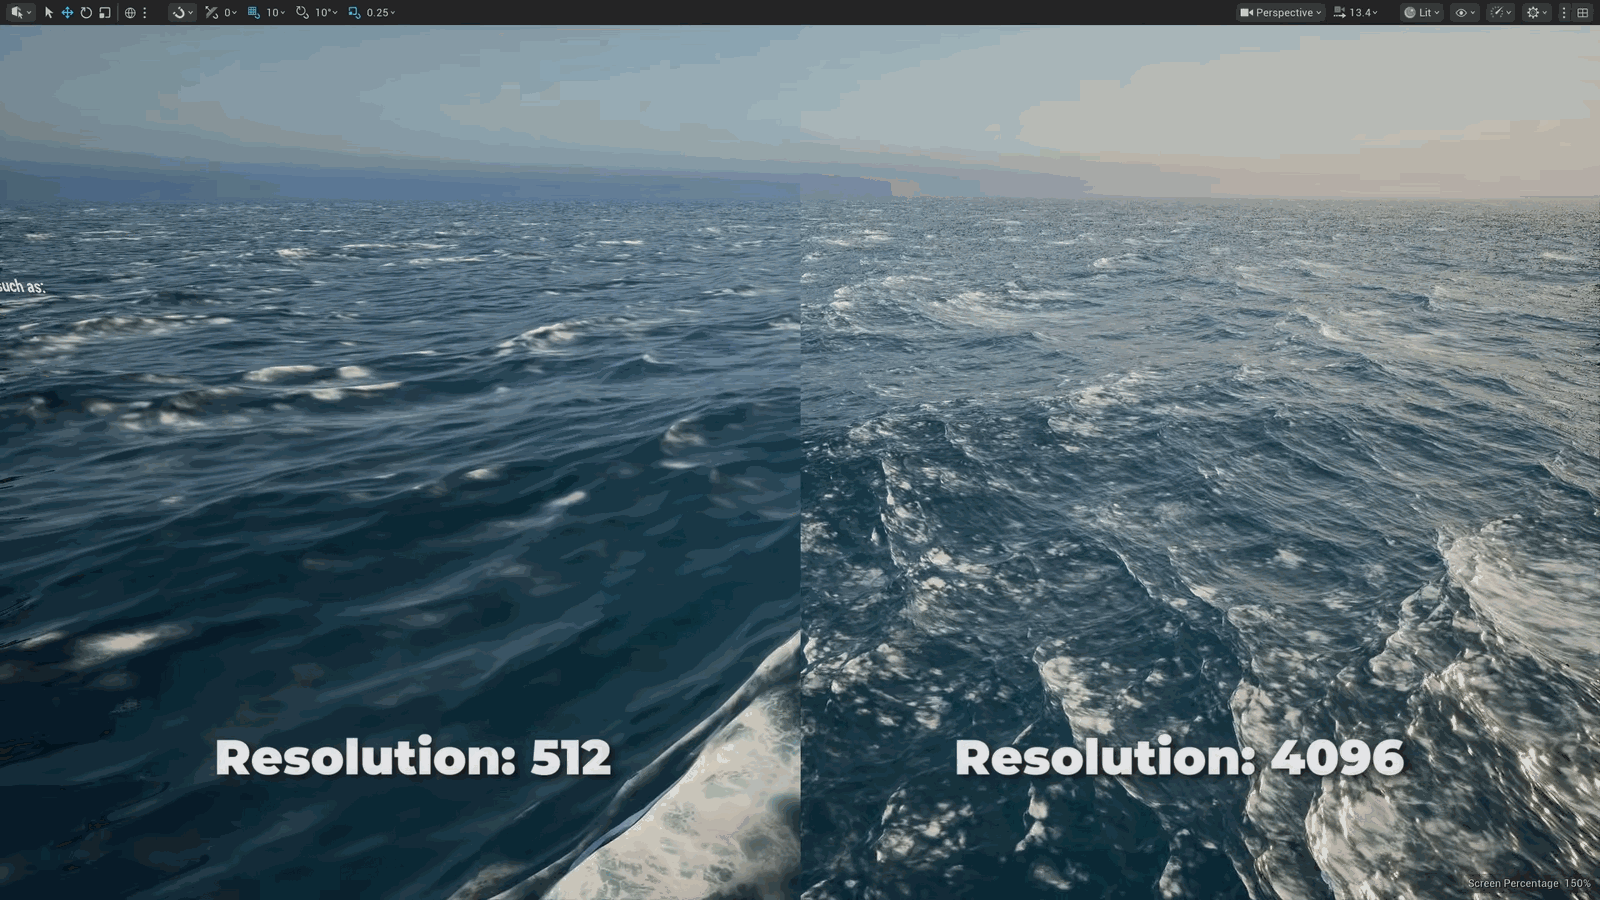
(该幻灯片时间段内未检测到语音内容)
Slide 2 — 00:00:11
(该幻灯片时间段内未检测到语音内容)
Slide 3 — 00:00:20
📌 要点汇总
- Easy Waterscape 是一款用于添加逼真、无瓷砖水体的必备工具。
Easy Waterscape is the must-have tool for adding realistic, tile-free water to your world.
Slide 4 — 00:00:30
📌 要点汇总
- (过渡内容,无关键要点)
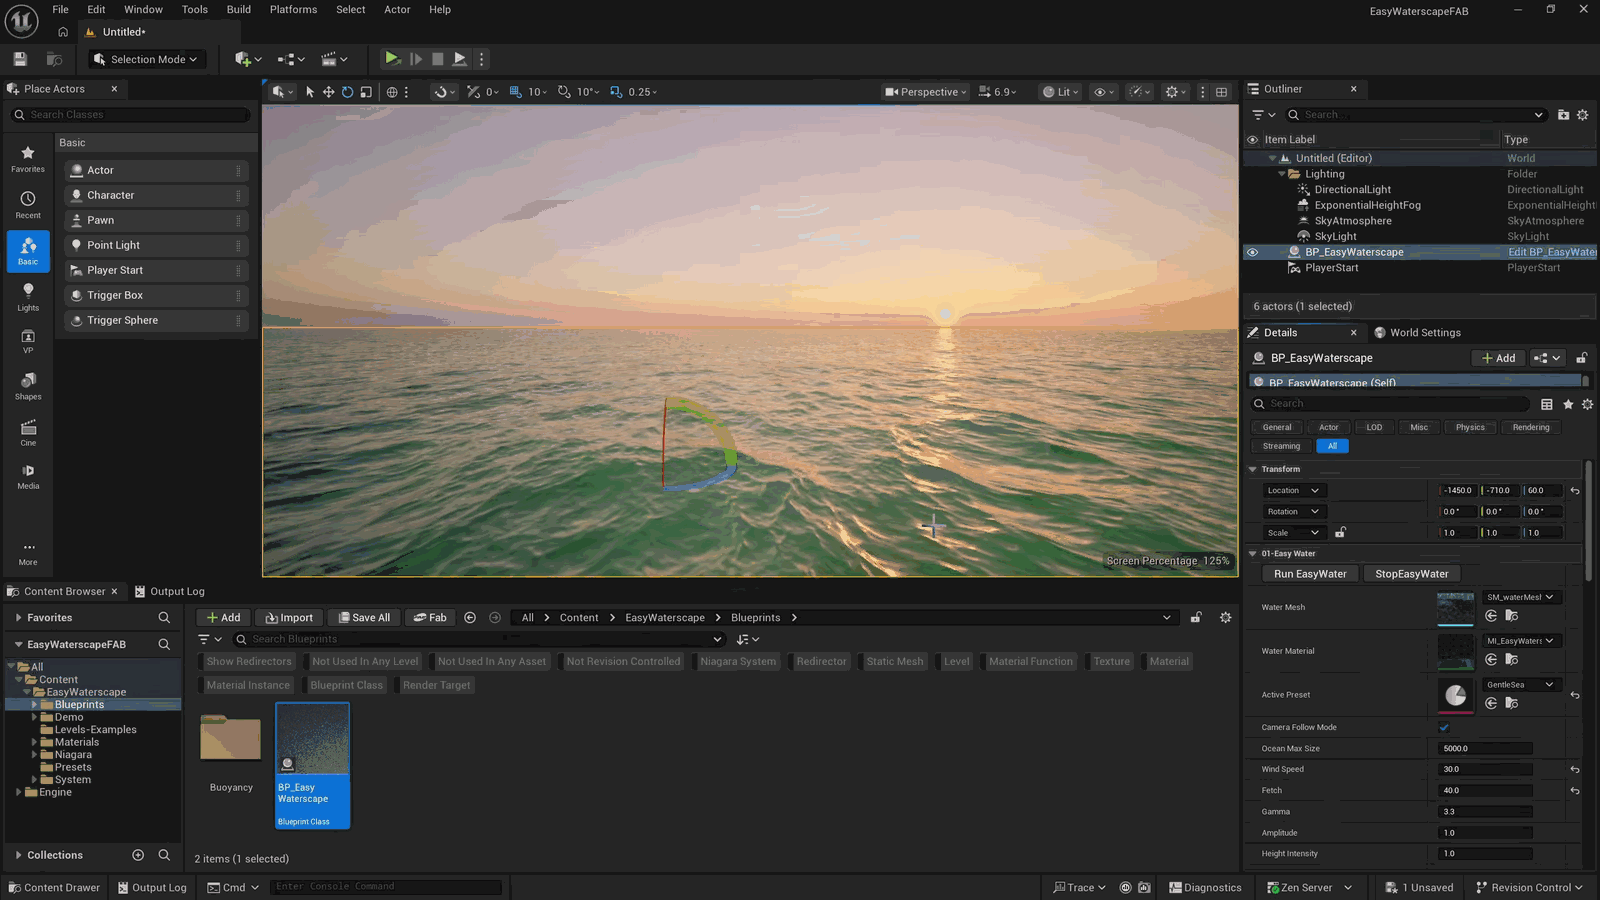
Calm lakes to rough seas. Drop it into your level, pick a preset, and you’re ready to art direct from there. Now, there’s a lot of water tools in Fab right now, so how?
Slide 5 — 00:00:39
📌 要点汇总
- 强调设计哲学:保持简洁、整洁和用户友好
- 询问是否与之前有所不同,暗示一致性重要性
This one any different? My whole design philosophy is to keep things as clean, tidy, and user-friendly.
Slide 6 — 00:00:45
📌 要点汇总
- 提供与市场上类似工具相比更具成本效益的解决方案
- 所有功能基于单一统一的蓝图运行
- 包含预设功能,如浮力、动态表面细节和自动处理海岸线的海岸生成器
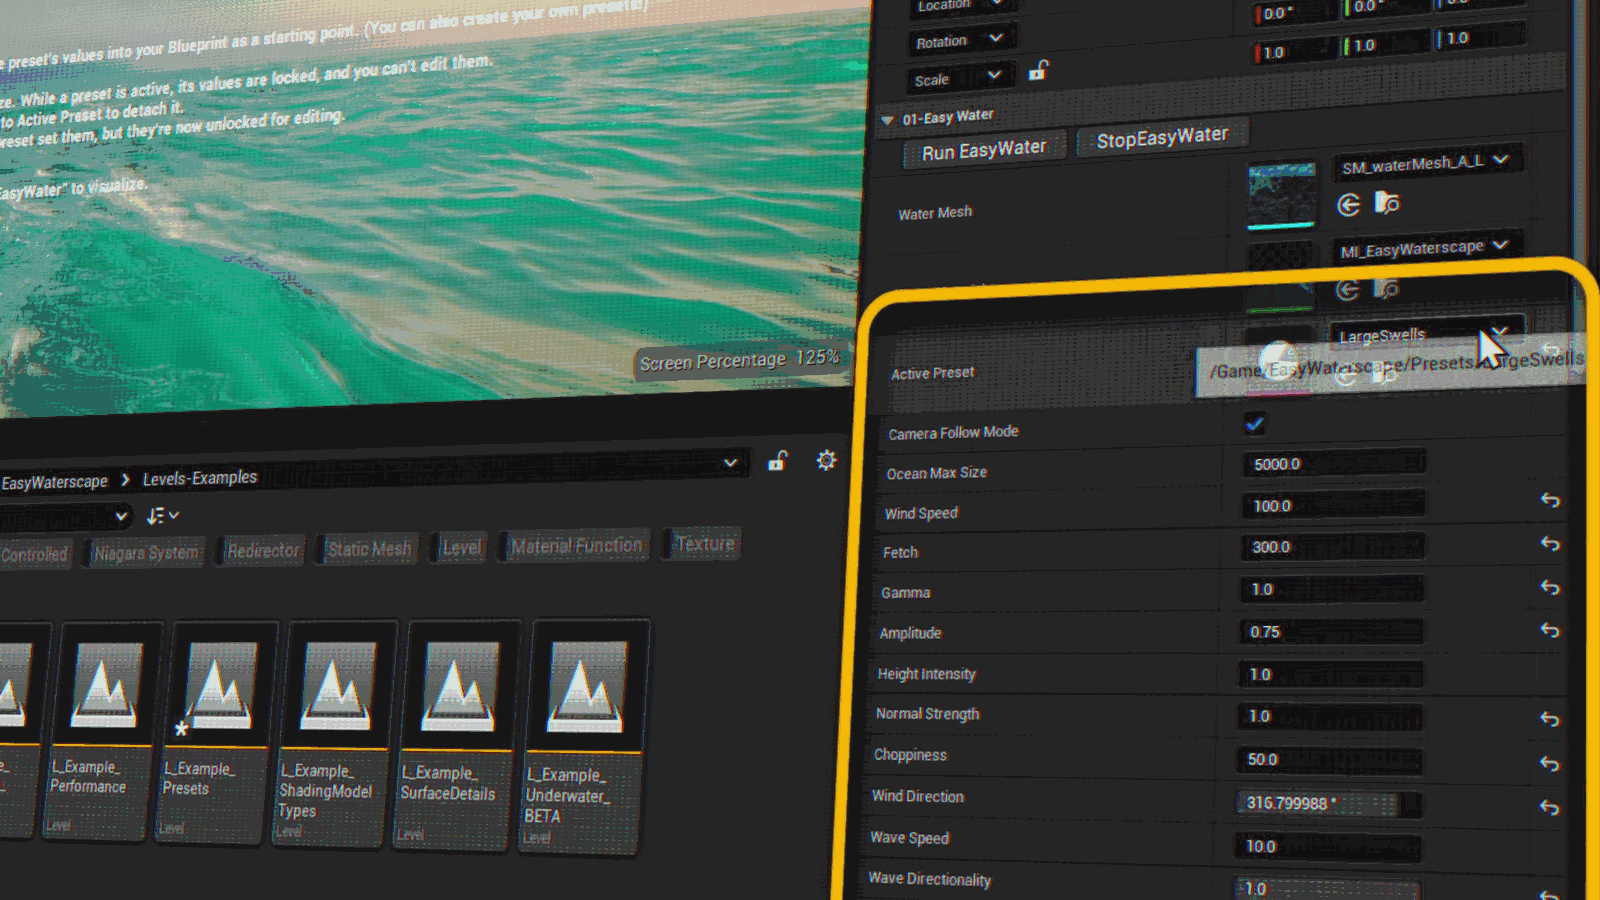
As affordable as possible compared to similar tools on the market, everything runs from a single organized blueprint. Presets are available to get you started, including buoyancy, dynamic surface detail, and a coast maker that handles your shorelines automatically.
Slide 7 — 00:00:59

📌 要点汇总
- 该工具专为游戏优化,而不仅仅是过场动画
- 提供示例关卡供学习参考
- 开发者认为这是行业中最干净的水模拟工具
It is optimized for games, not just cinematics, and I provide example levels for you to learn from. I might be a little biased, but I really think it’s the cleanest water tool in the industry.
Slide 8 — 00:01:08

📌 要点汇总
- (过渡内容,无关键要点)
Market and by far the easiest to use and get great results with. You’ll find Easy Waterscape on Fab, linked down below. Also, be sure to follow me.
Slide 9 — 00:01:16
📌 要点汇总
- 通过 Fab 下载 Easy Waterscape 并添加到项目中
- 在 Blueprint 文件夹中拖入并运行 Easy Water
- 通过 Details 面板中的 01 Easy Water 选项卡控制运行与停止
- 提供 underwater 和 lake mode 两个 Beta 功能
- 包含 coast maker、optimizations 和 troubleshooting 工具
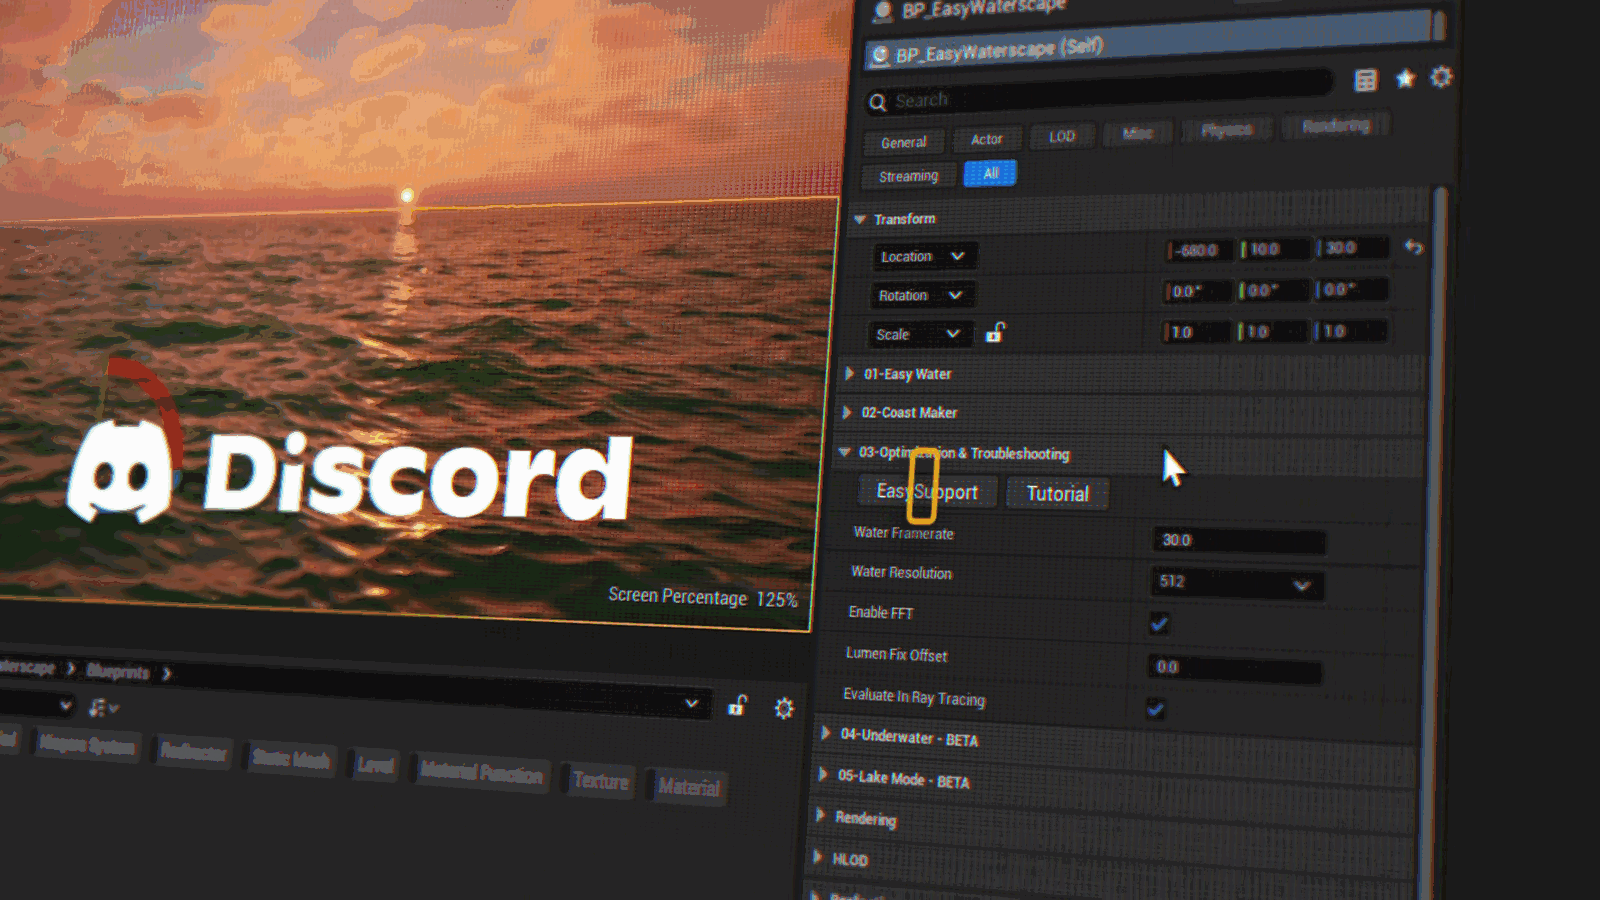
On social media, to keep up to date with all of the new features coming later. Let’s get right to it. Let me show you why it belongs in your toolbox and how to use it. Okay, let’s start with the basics. To use Easy Waterscape, download it on Fab and add it directly to your project. From here, navigate to the Blueprint folder here. Drag it into your level, and in the Details panel under the 01 Easy Water tab, click Run Easy Water. When you want to stop it, just click Stop Easy Water. Everything you need lives right here: easy water, coast maker, optimizations, and troubleshooting, and the two features in beta: underwater and lake mode. Right here, you have two buttons. One sends you directly to.
Slide 10 — 00:01:58
📌 要点汇总
- 提供 Discord 服务器用于问题和支持
- 其他链接直接跳转至该视频,便于获取帮助
- 不要被众多设置选项吓到
My Discord server for questions and support. The other sends you directly to this video, making it easier than ever to find the help that you need. Don’t be intimidated. It looks like there’s a whole ton of settings, and that can be scary.
Slide 11 — 00:02:11
📌 要点汇总
- 所有变量均带有描述性工具提示,明确说明其功能
- 作者特别强调了清晰标注的重要性,这是其主要关注点之一
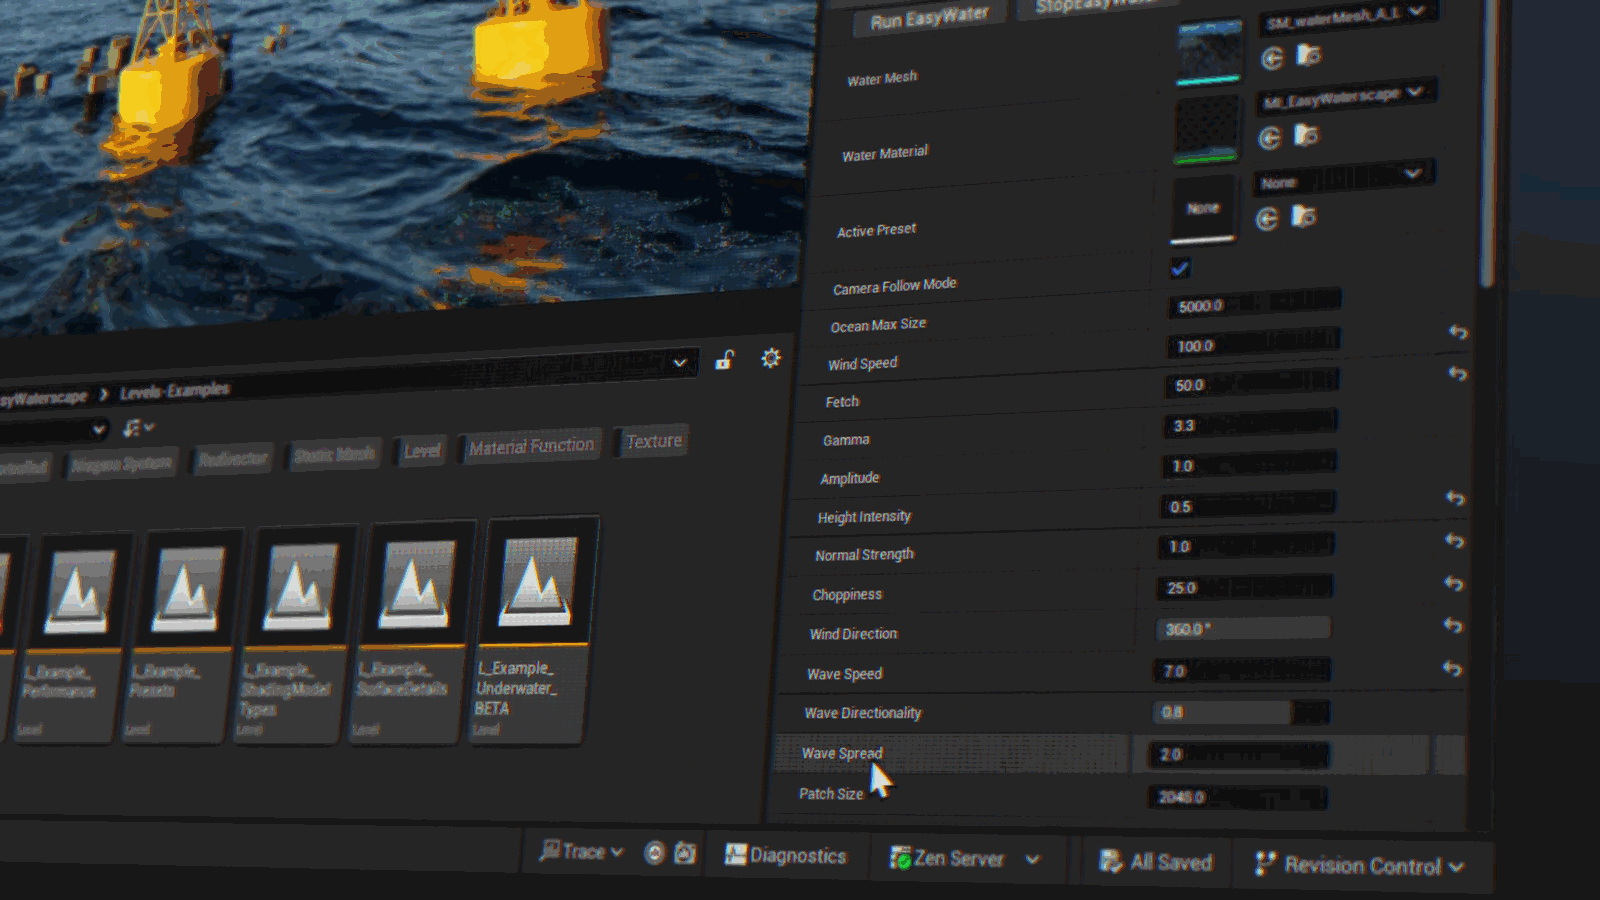
But don’t worry. Every single variable here is clearly labeled with a descriptive tooltip, telling you exactly what it does. One of my biggest pet peeves.
Slide 12 — 00:02:20
📌 要点汇总
- 开发者若懒得添加描述,会导致用户需要查阅教程或冗长文档才能理解滑块功能
- 用户应享有更清晰的使用体验,而非繁琐的说明
- 仅在处理高级参数时才需深入材料,其他重要设置已在蓝图中暴露
- 蓝图控制的参数均带有 BP 后缀,便于识别已处理内容
- 多数情况下无需直接编辑材料,除非涉及高级设置
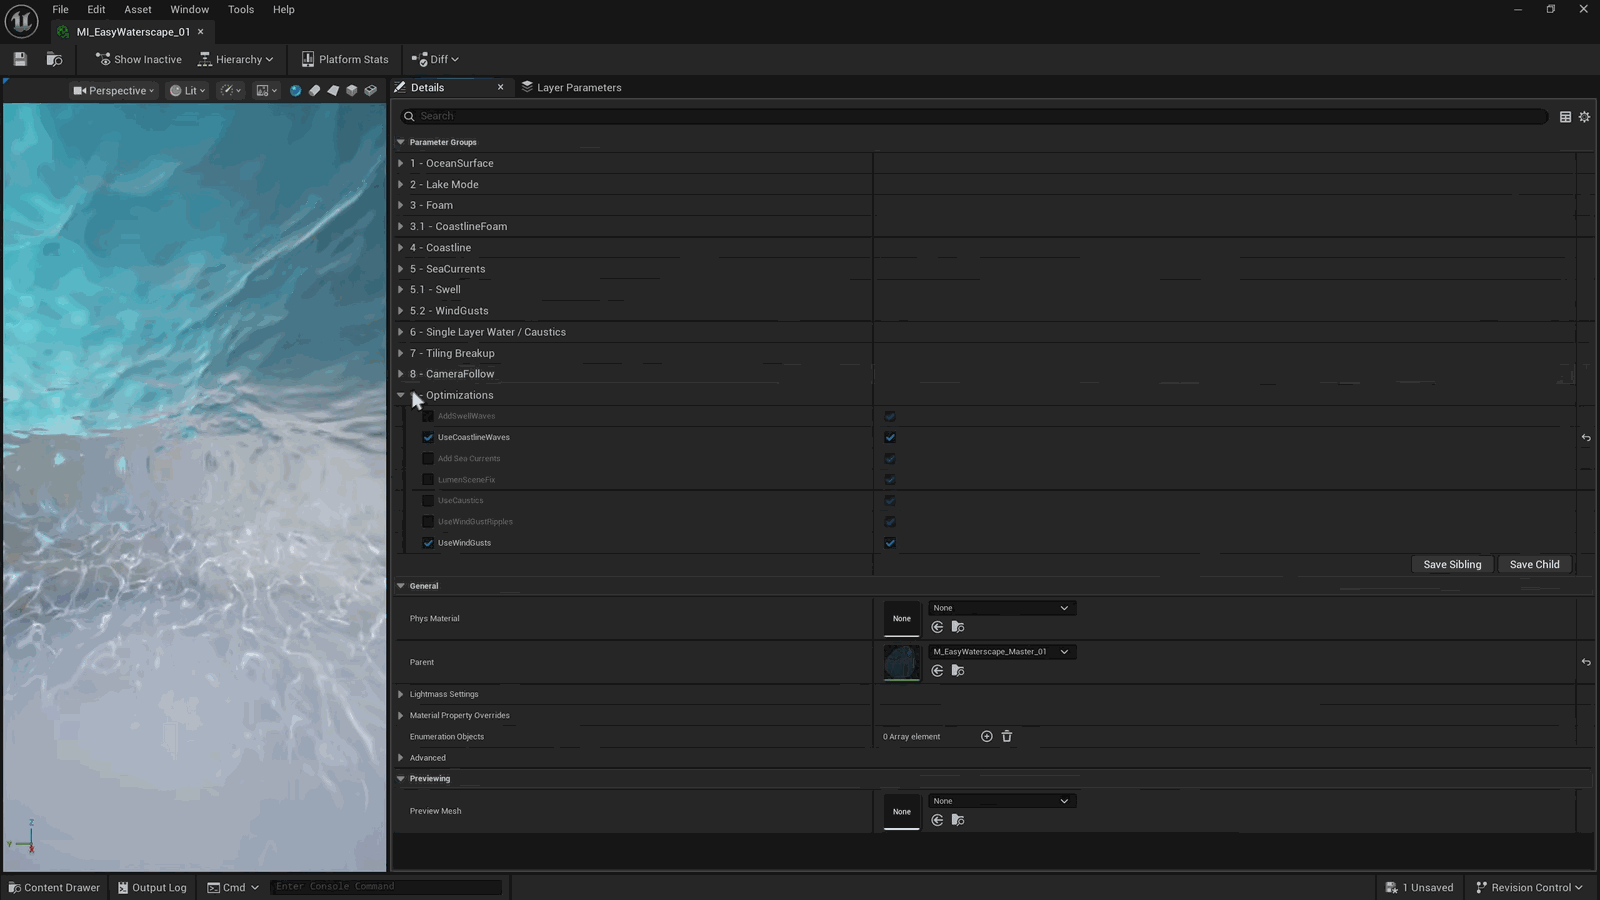
Is when a developer is too lazy to add descriptions. I shouldn’t have to dig through tutorials or tedious documentation just to figure out what one slider does, and neither should you. You deserve better. And one thing worth clearing up early: the only time you’ll ever have to dive into the material is for the more advanced parameters. I’ve exposed all of the important stuff in the blueprint, and when you do go in there, anything controlled by the blueprint is clearly labeled with a BP suffix, so you know it’s already handled. Everything else is edited in the material, but in most cases you won’t need to.
Slide 13 — 00:02:49
📌 要点汇总
- 提供示例关卡以帮助用户入门,并会随着新功能的添加持续更新
- “Easy Water” 部分是用户使用时间最多的区域,包含五级 LOD 设置
- LOD 0 和 1 用于电影级渲染,密度极高,仅适用于高端场景
- LOD 2 至 4 更适合游戏开发,平衡性能与视觉效果
- 提供预设选项,用户可通过下拉菜单选择合适的水系统配置
- 重要提示:选择预设是优化工作流程的关键步骤
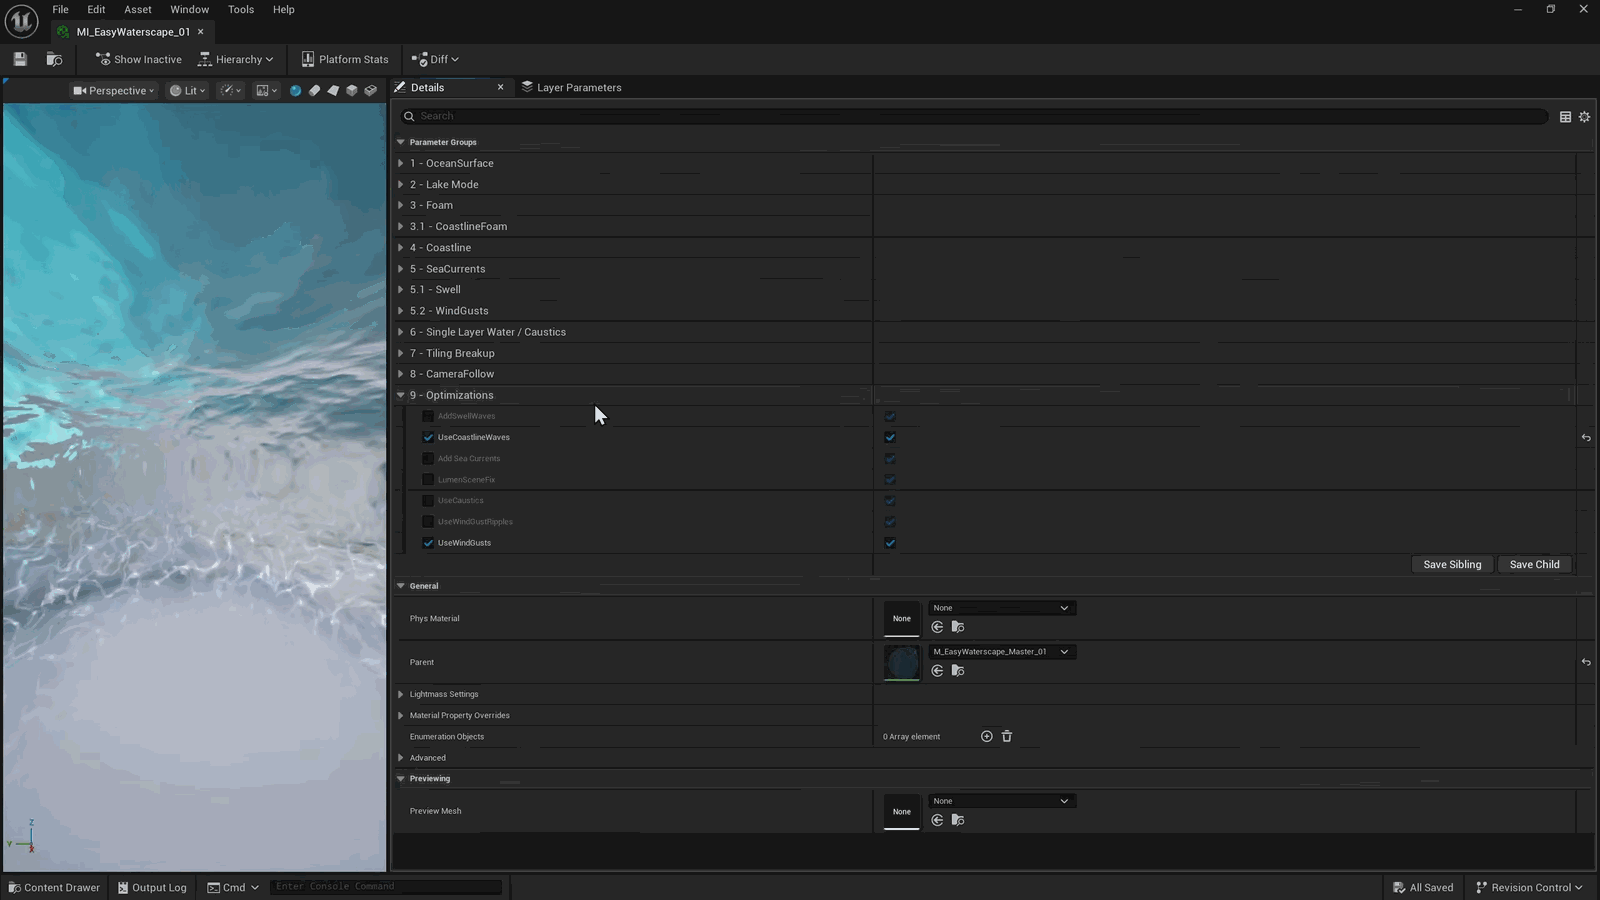
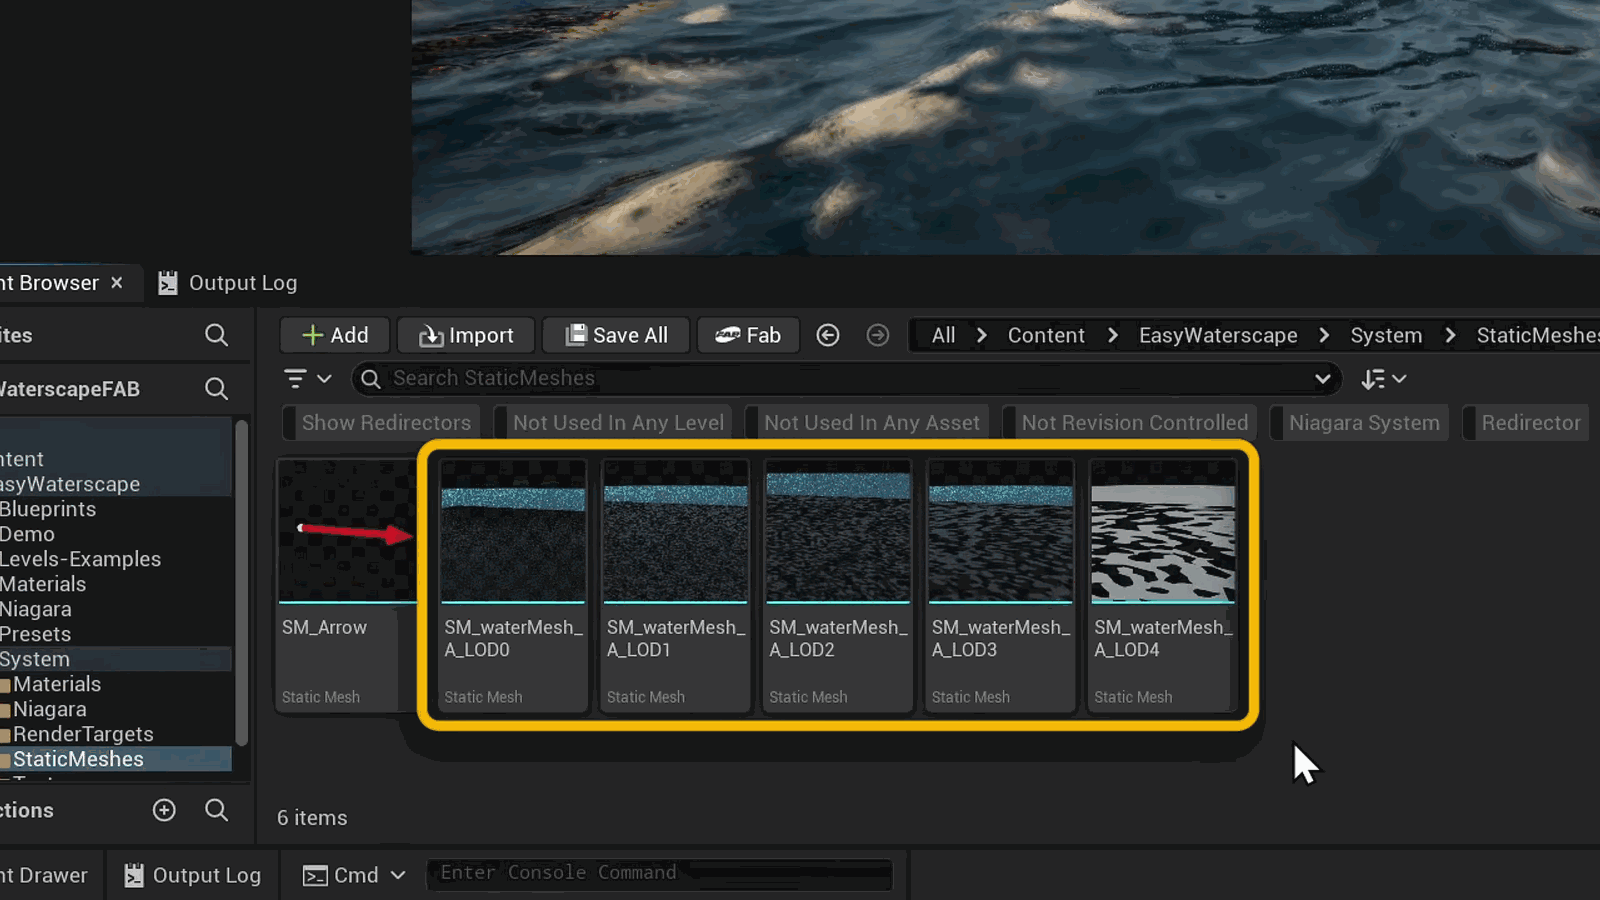
I also made sure to provide example levels that you can find here to get you started. These will be kept up to date as new features are added. Moving on, the easy water section here is where you will spend most of your time. Everything you need is exposed here. It’s where you assign your water mesh with five included LODs. LOD zero and one are really for cinematics; they’re very dense, and in fact, LOD zero is completely overkill and ridiculous. But it is there for the high-end. Cinematic people, LODs two through four are much more game-friendly.
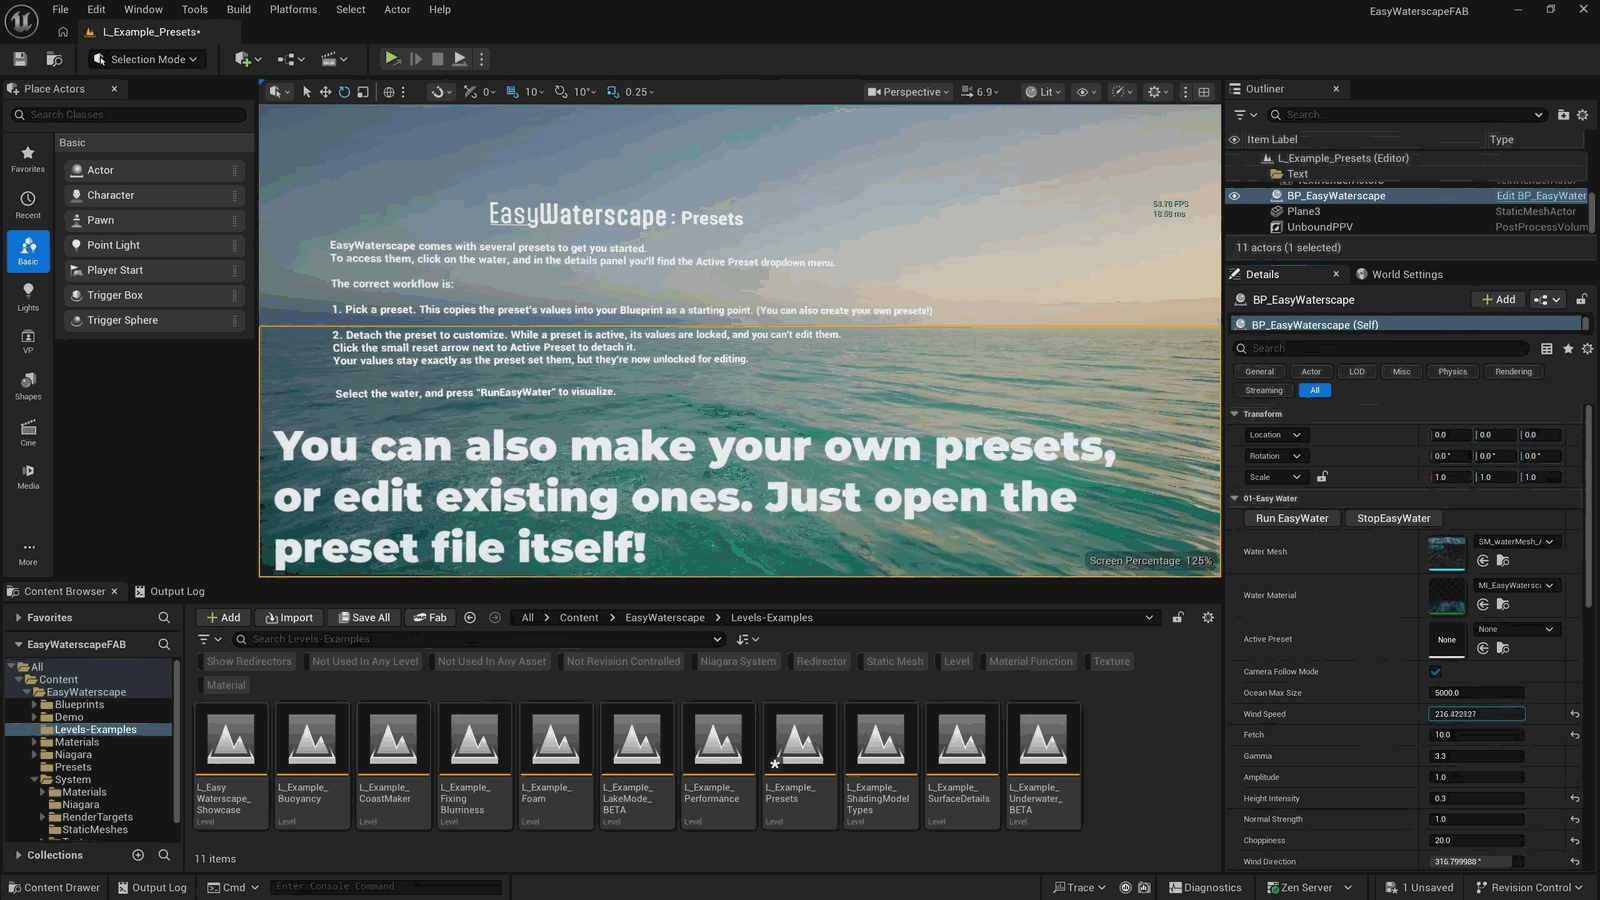
Next, we have presets. No water system is complete without presets to work from. Just click the drop-down menu here and pick the one you want. Important workflow tip: when you do.
Slide 14 — 00:03:34
📌 要点汇总
- 当前使用了预设模式,蓝图设置被锁定
- 如需修改设置,需先移除预设以解锁调整功能
- 若调整无效,请检查是否误启用了预设模式
Have an active preset. The blueprint settings are locked. To make further changes from there, click to remove the preset, and that unlocks the settings, so you can continue to adjust to your taste. So, if you’re playing around with the settings and nothing is happening, double-check that you don’t have a preset enabled.
Slide 15 — 00:03:51
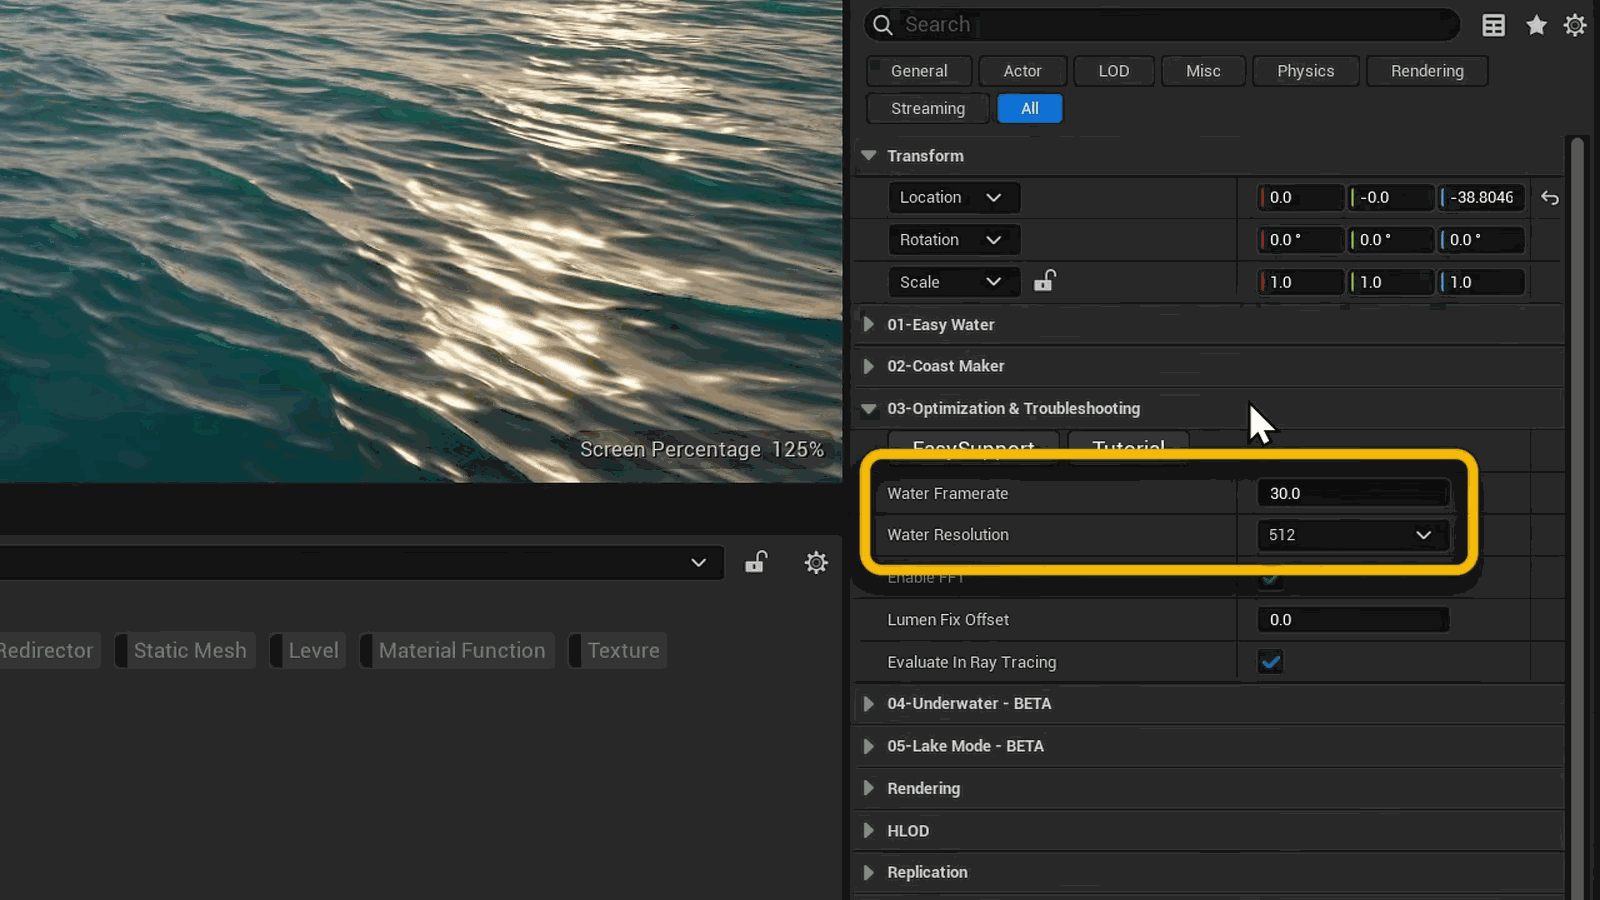
📌 要点汇总
- 通过调整帧率和分辨率控制海洋质量与性能平衡
- 风速和 fetch 决定波浪的大小、能量和频率
- 风速和 fetch 越高,波浪越大
- 振幅、高度和法线用于进一步调整水面外观细节
Switching over to the optimization and troubleshooting tab, real quick. That is where we control the frame rate and the resolution of our ocean. These are the two main dials that you’ll use to balance the quality and performance. We’ll dive into the specifics later.
Let me walk you through some of the main controls for tweaking the look of your water. Wind speed and fetch are what you’ll use to adjust the size, energy, and frequency of your waves. The higher the wind speed, the larger the waves. Same as fetch. Amplitude, height, and normals are.
Slide 16 — 00:04:22
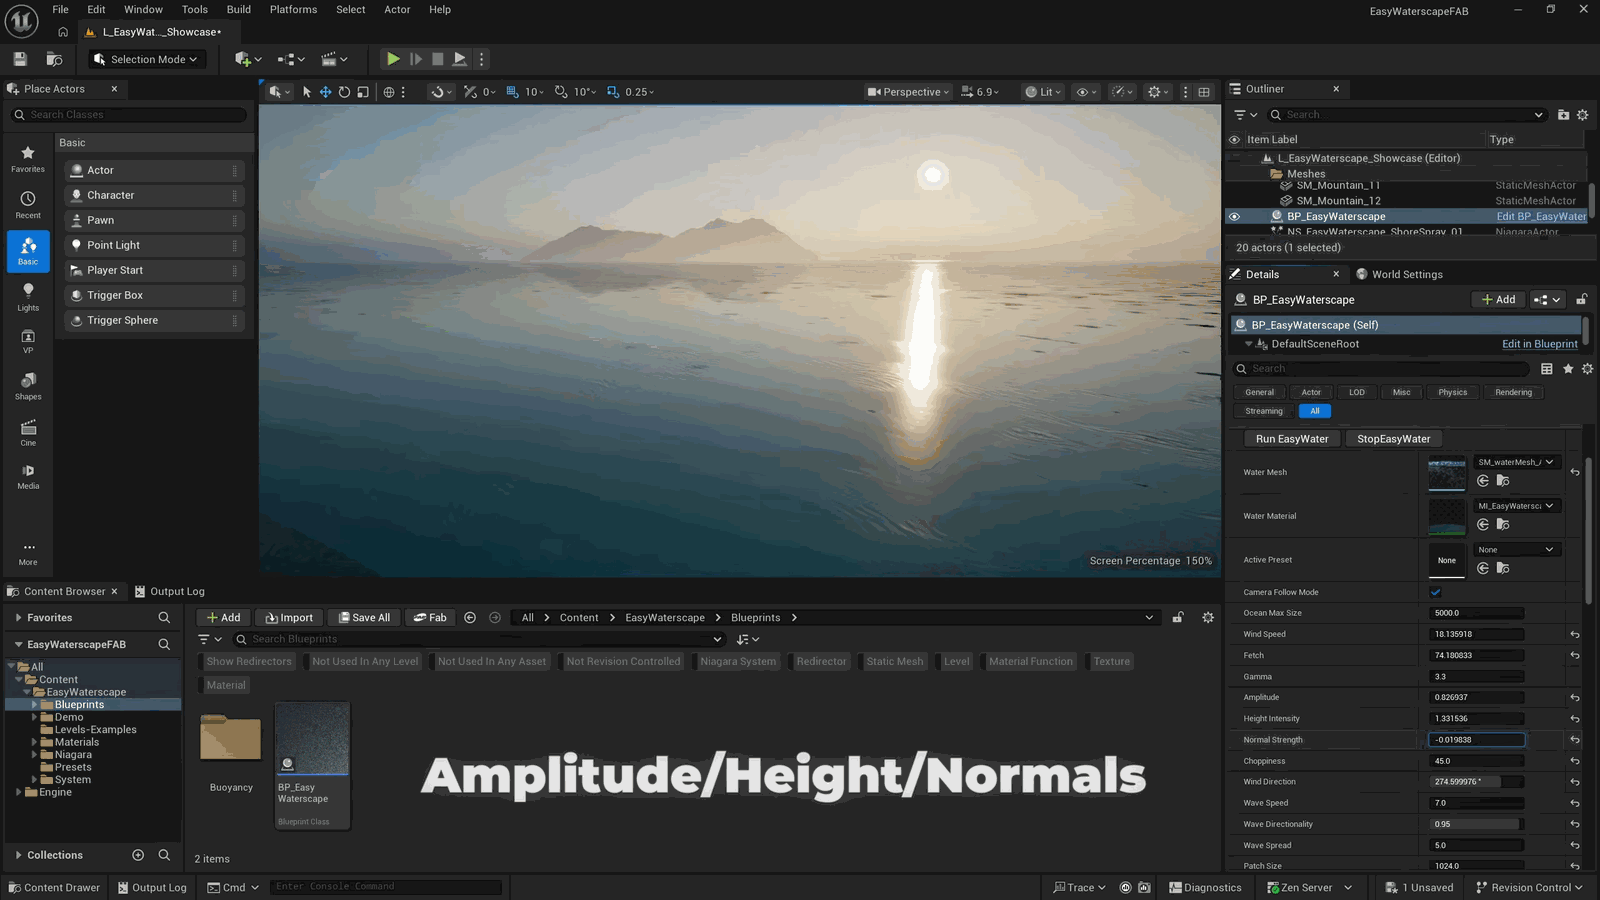
📌 要点汇总
- 振幅同时影响垂直和水平位移,而高度仅影响垂直位移和法线强度
- 法线强度对法线表现有直接影响
- 降低法线强度至 0.75 或 0.5 可提升水面视觉效果
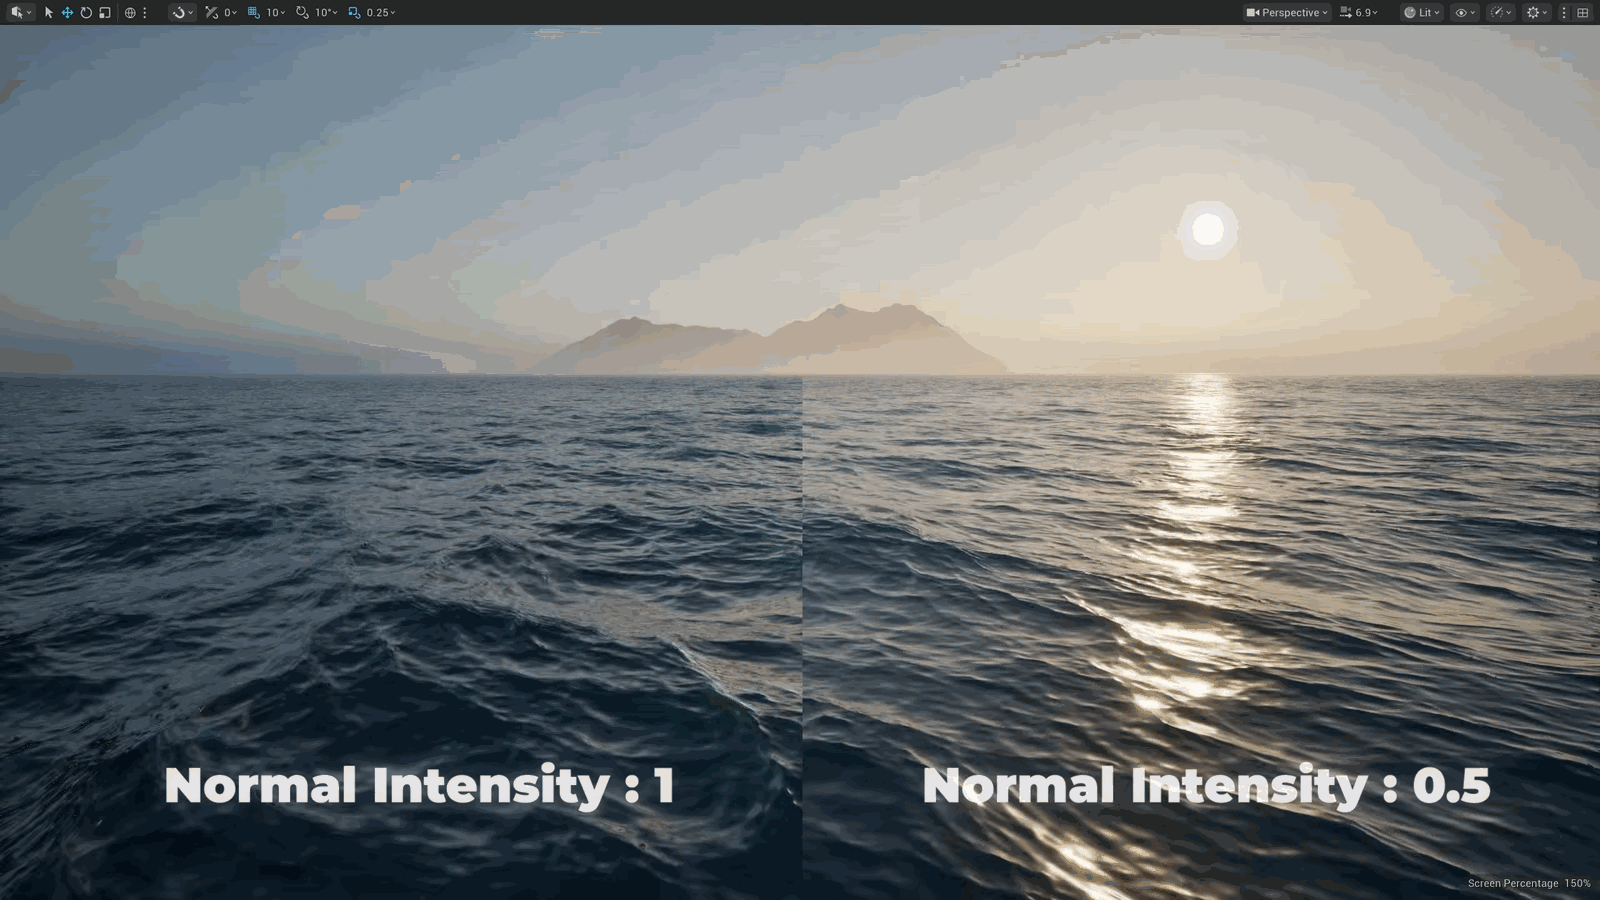
Fairly self-explanatory. Amplitude affects both vertical and horizontal displacement, whereas height will only affect the vertical displacement and normal strength as a result. Normals affect the normals. Pro tip: Very often, the water will look a little better when you tone down the normal intensity to 0.75, or even 0.5.
Slide 17 — 00:04:36
📌 要点汇总
- Chopiness影响波浪的尖锐程度和泡沫生成量。
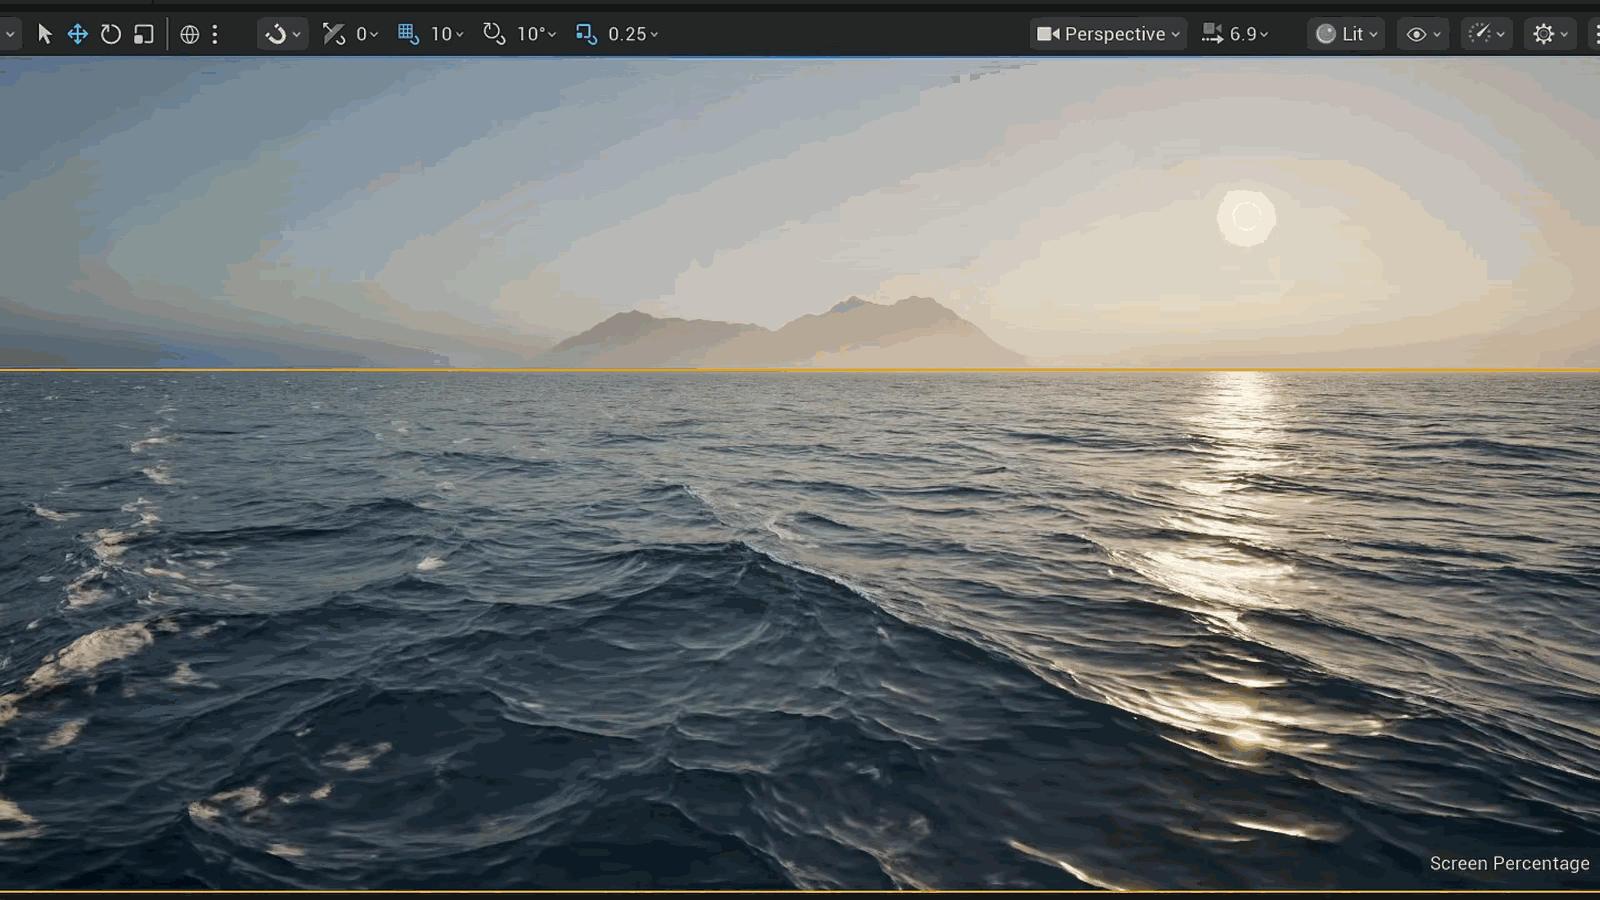
Try it out and see. Chopiness affects how sharp the crest of your wave will be, and has a direct impact on how much foam is generated.
Slide 18 — 00:04:46
📌 要点汇总
- 可通过滑块调整风向,也可使用可视化工具进行控制
- 波浪方向性是该工具最受欢迎的功能之一
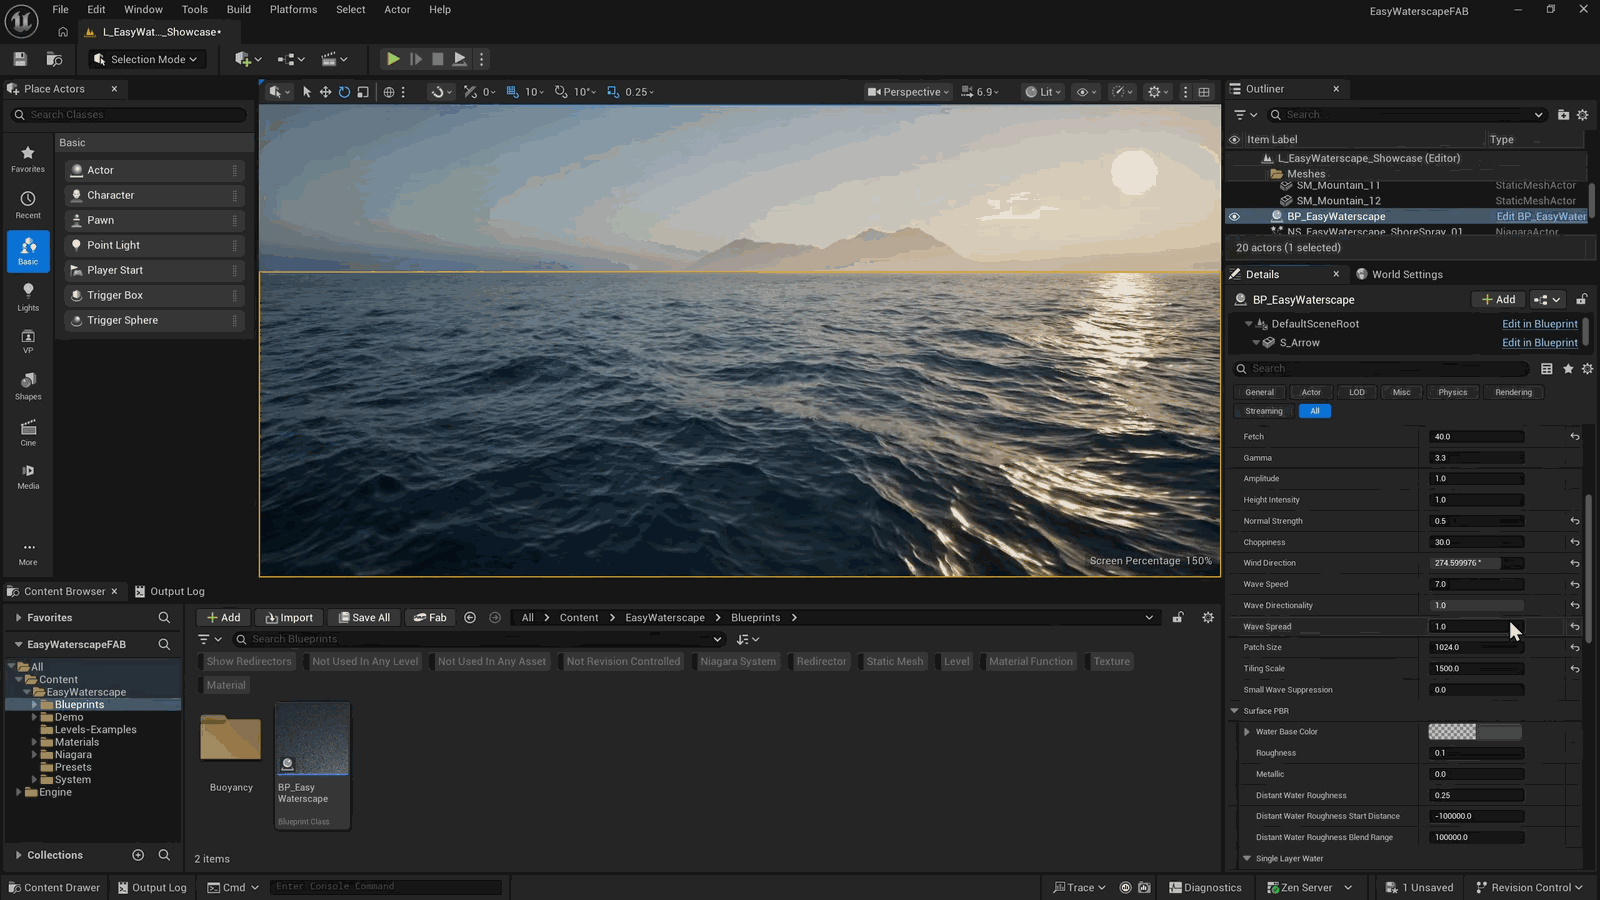
We will get into that soon. Over here, you can adjust the wind direction with one slider, but you can also control it with this handy little gizmo if you prefer a more visual indication. My favorite feature of this entire tool is the wave directionality.
Slide 19 — 00:05:04
📌 要点汇总
- 通过调整滑块,波浪效果从全向变为定向,使视觉效果更自然。
- 演示中提到对效果的主观评价,但未提供具体技术实现细节。
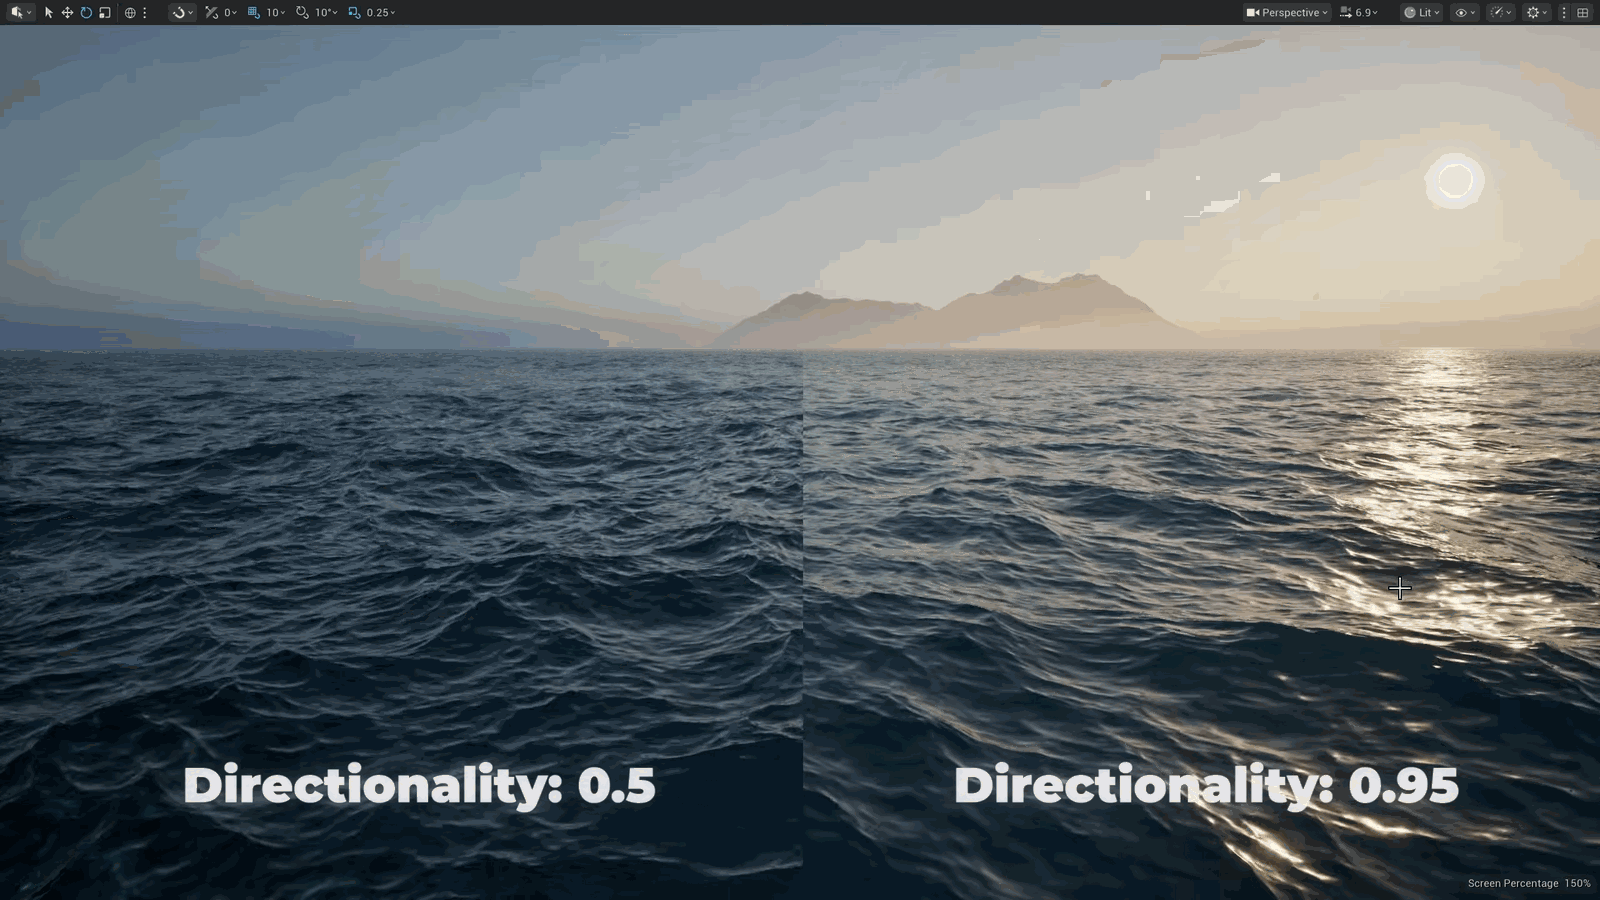
By cranking up that slider, our waves go from omnidirectional to fully directional, giving you a much more natural look. I’m not a huge.
Slide 20 — 00:05:16
📌 要点汇总
- 偏好全向波的范围在 0.75 到 0.95 之间
- 该范围与波的扩散效果协同作用
Fan of omnidirectional waves in general, so I think the best range is between 0.75 and 0.95. This works in tandem with wave spread.
Slide 21 — 00:05:25
📌 要点汇总
- 波浪方向性值需接近1,才能有效产生长而直的波浪
- 波浪速度控制波浪传播的快慢
- 接下来将讨论补丁大小和瓷砖缩放比例的影响
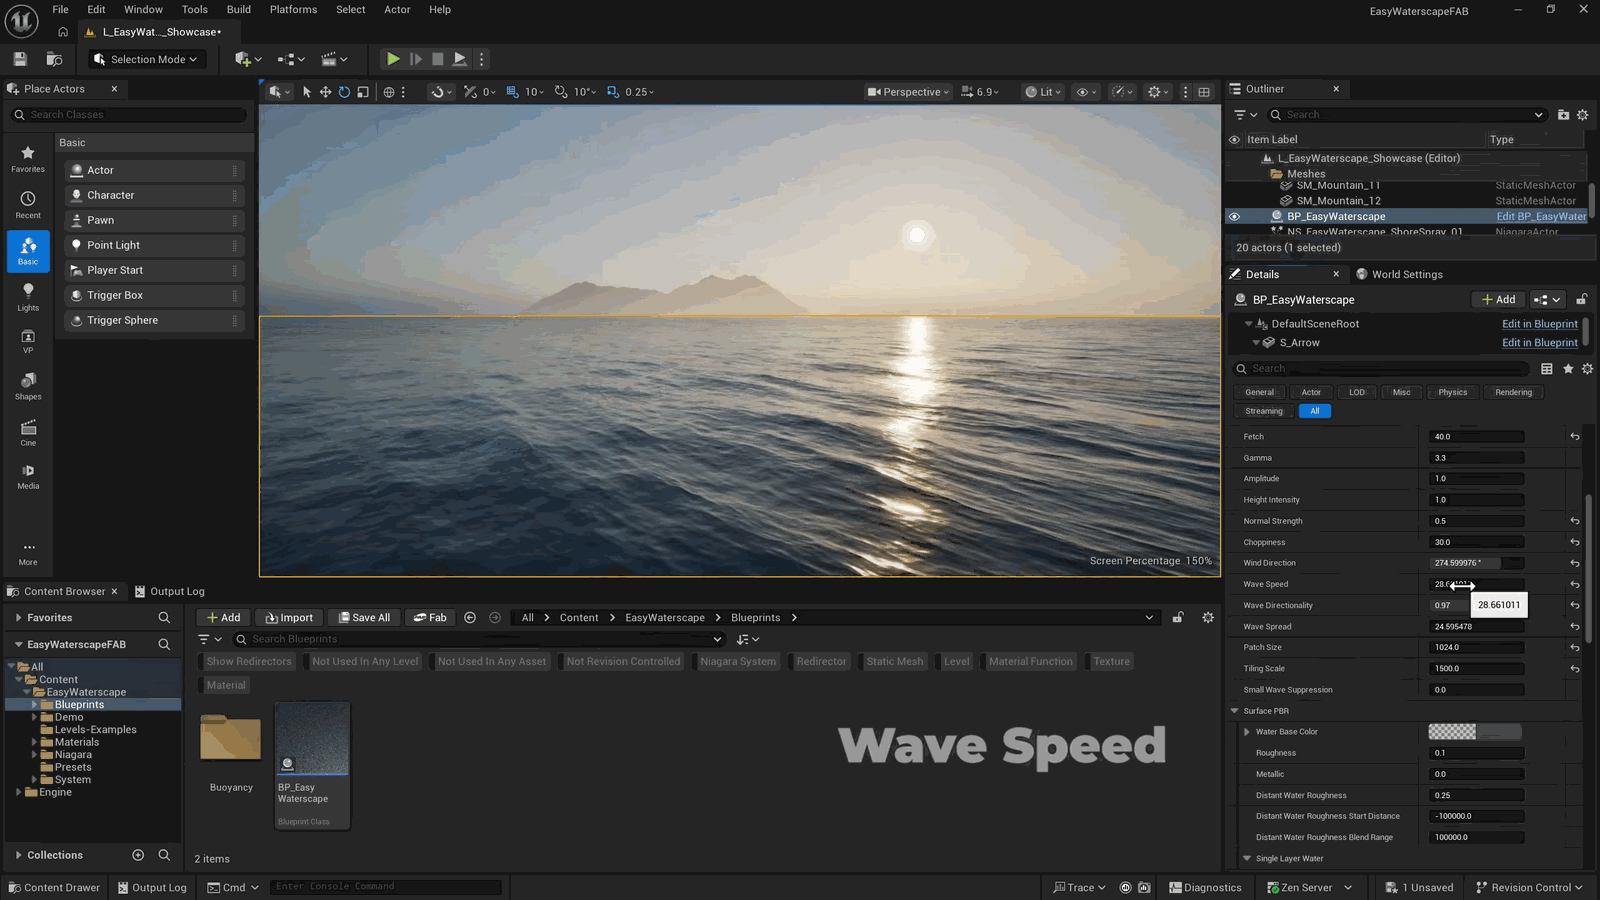
That is how you get those longer, straighter waves. For spread to work, you need a wave directionality value closer to one; otherwise, it will not have very much effect. From there, you can adjust how fast they travel with the wave speed.
Next up, patch size and tiling scale.
Slide 22 — 00:05:40
📌 要点汇总
- 补丁大小决定了捕获的海洋区域面积,影响拼接效果
- 增大补丁大小会降低单个波浪的分辨率,但能覆盖更多波浪
- 减小补丁大小会使波浪更详细,但拼接问题会加剧
- 过度调整补丁大小可能导致严重视觉问题
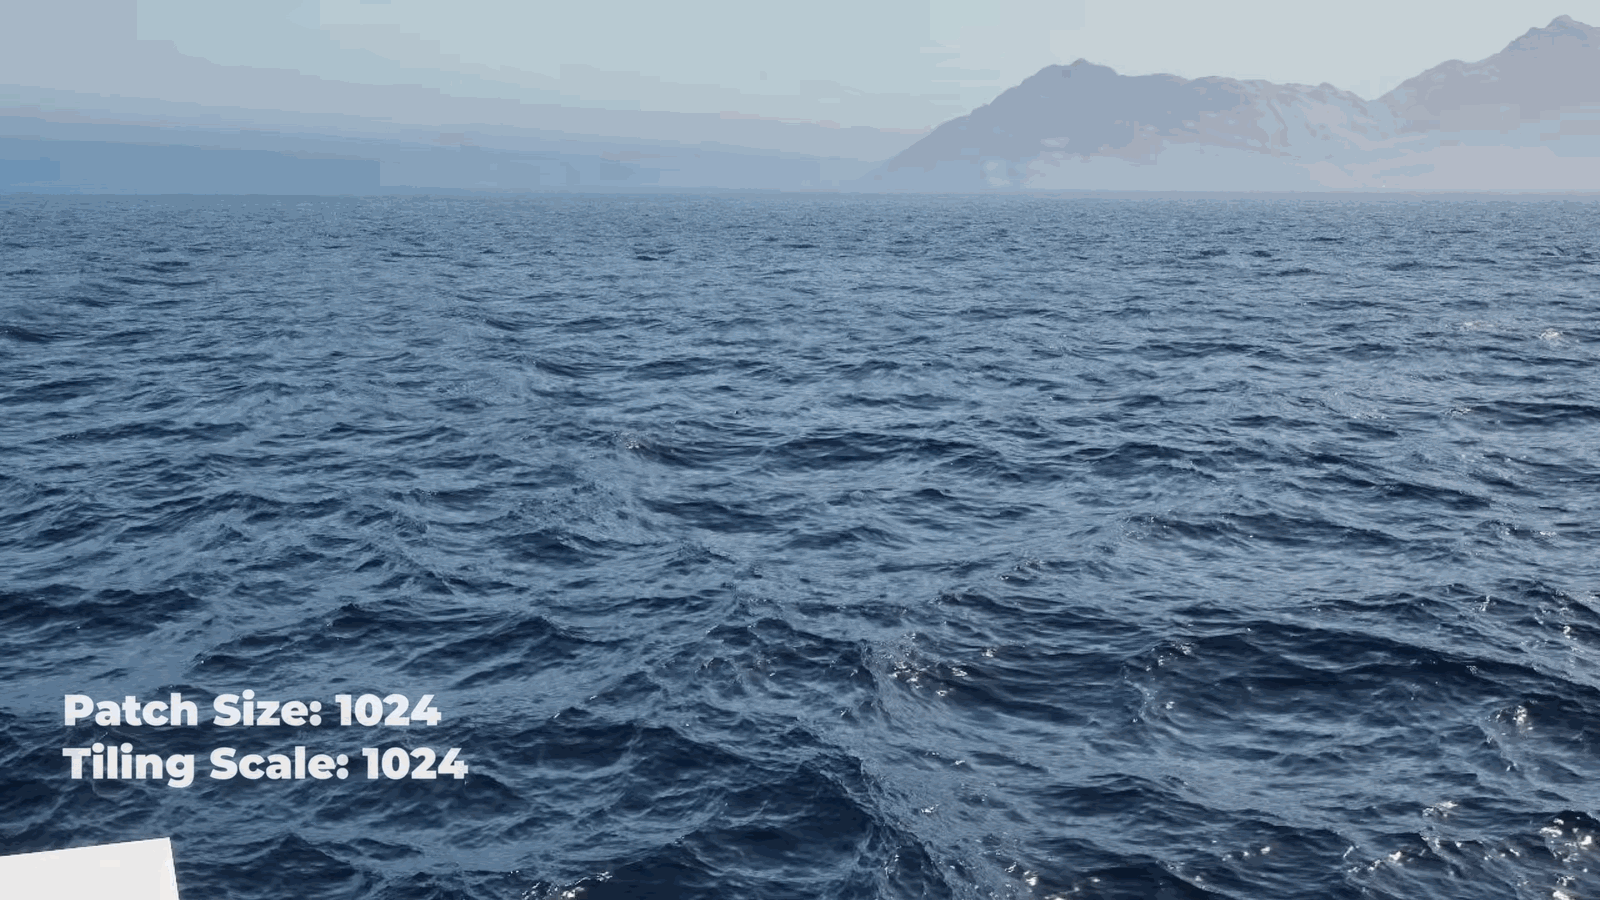
These two also work together. Patch size is basically how large an area of ocean you are capturing, and has a big impact on how well everything tiles. Raising the patch size means you capture more waves over a larger area, but each wave ends up at a lower resolution, which can be offset by increasing the resolution. Lowering the value makes each wave bigger and more detailed, but tiling becomes a huge problem. Let me exaggerate the value to give us a worst-case scenario. This looks awful, and that segues into.
Slide 23 — 00:06:12
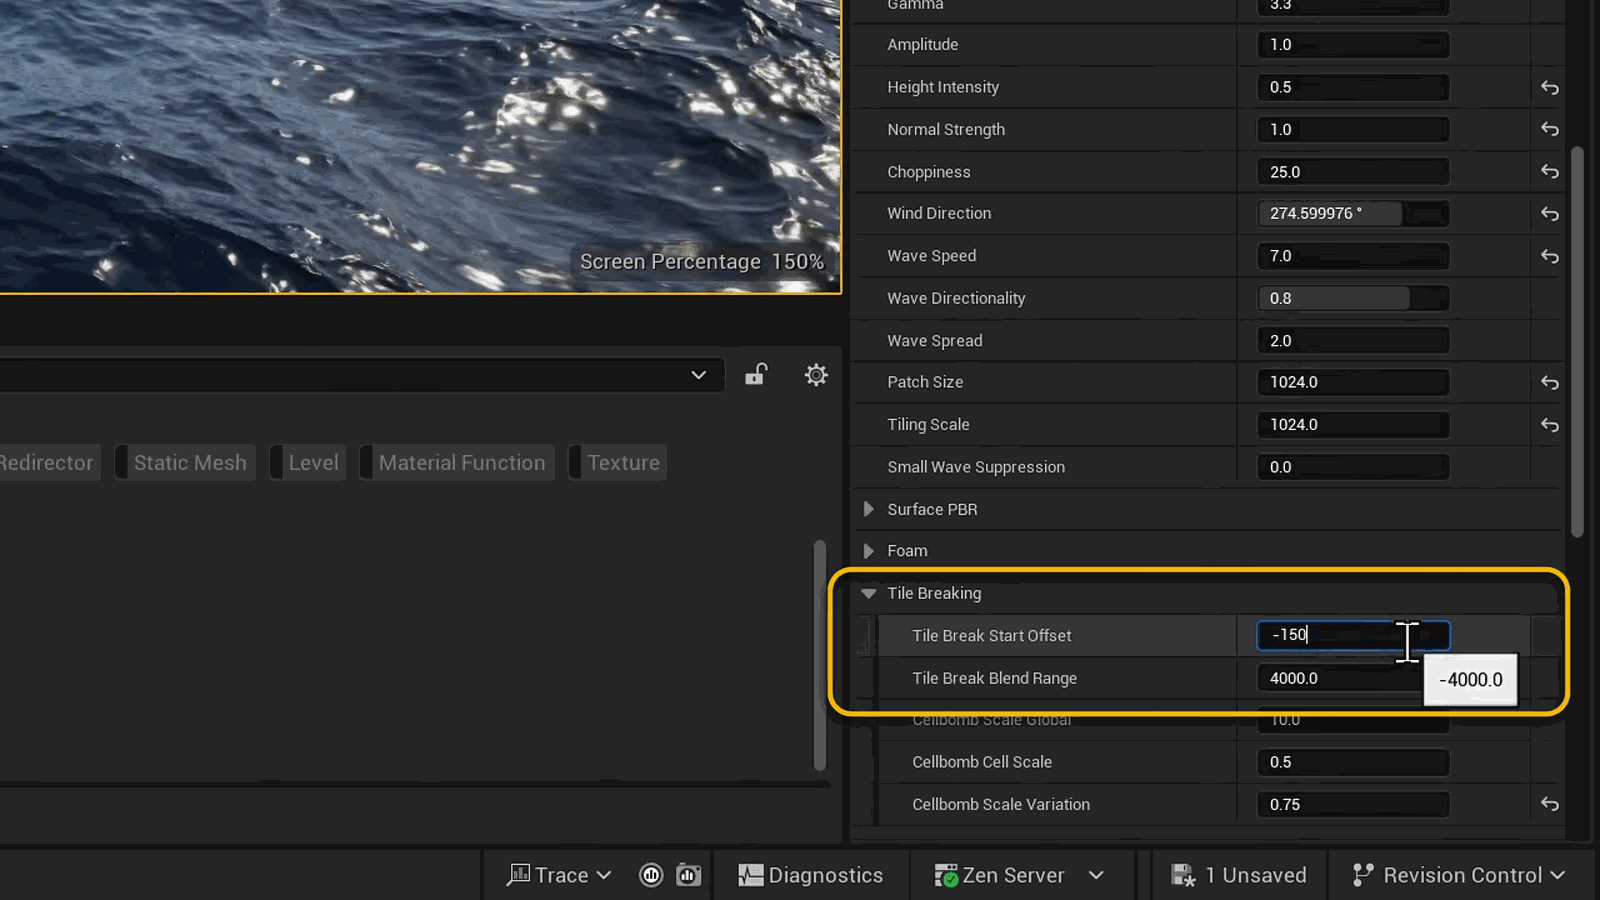
📌 要点汇总
- 设置偏移量为 -1500 以实现瓦片断裂效果
- 混合范围设为 1500 以确保过渡自然
- 该方法用于优化地图渲染中的瓦片拼接效果
The tile breaking section. So what we do is we set the offset to minus 1500 and the blend range also to 1500, and just like.
Slide 24 — 00:06:21
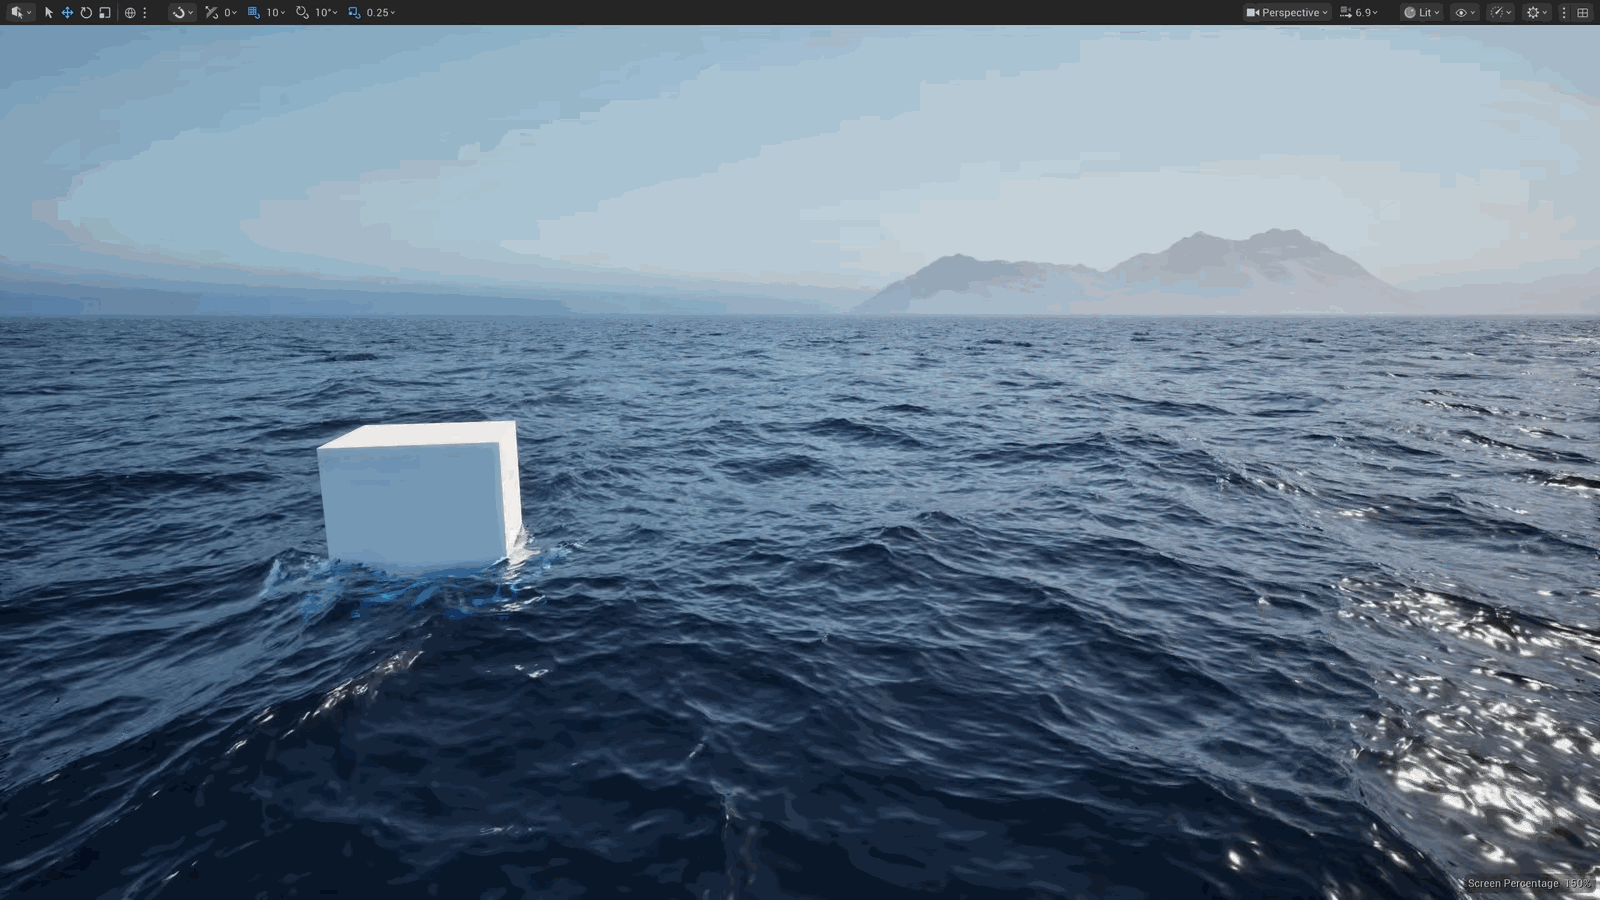
📌 要点汇总
- 已大幅减少严重的拼接现象,但并非完美
- 此为最坏情况下的表现,通常默认参数已足够使用
We’ve massively mitigated that horrible tiling. It isn’t perfect, but remember, this is an absolute worst-case scenario. Leaving these and patch size at default is usually a good starting point.
Slide 25 — 00:06:29
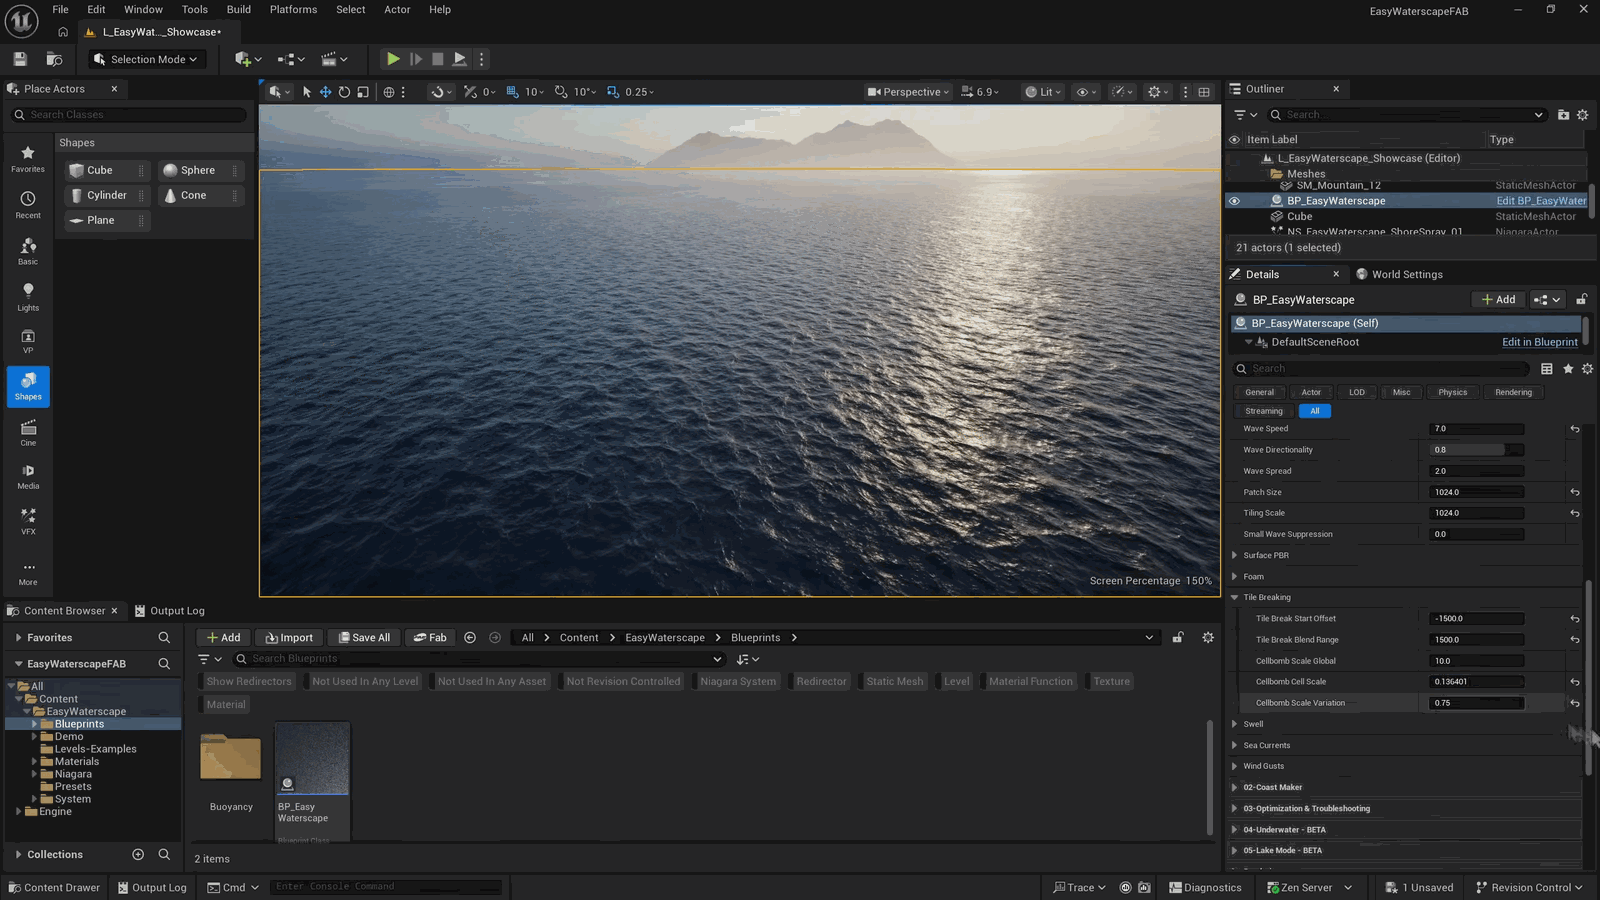
📌 要点汇总
- 可通过调整单元格大小来优化水面和波浪的破碎效果
- 实际应用中可能需要多次调整和微调以达到理想效果
You can also adjust the cell size to adjust that breakup a little bit more, depending on your water surface and the size of the waves. Sometimes that can require some tweaking.
Slide 26 — 00:06:43
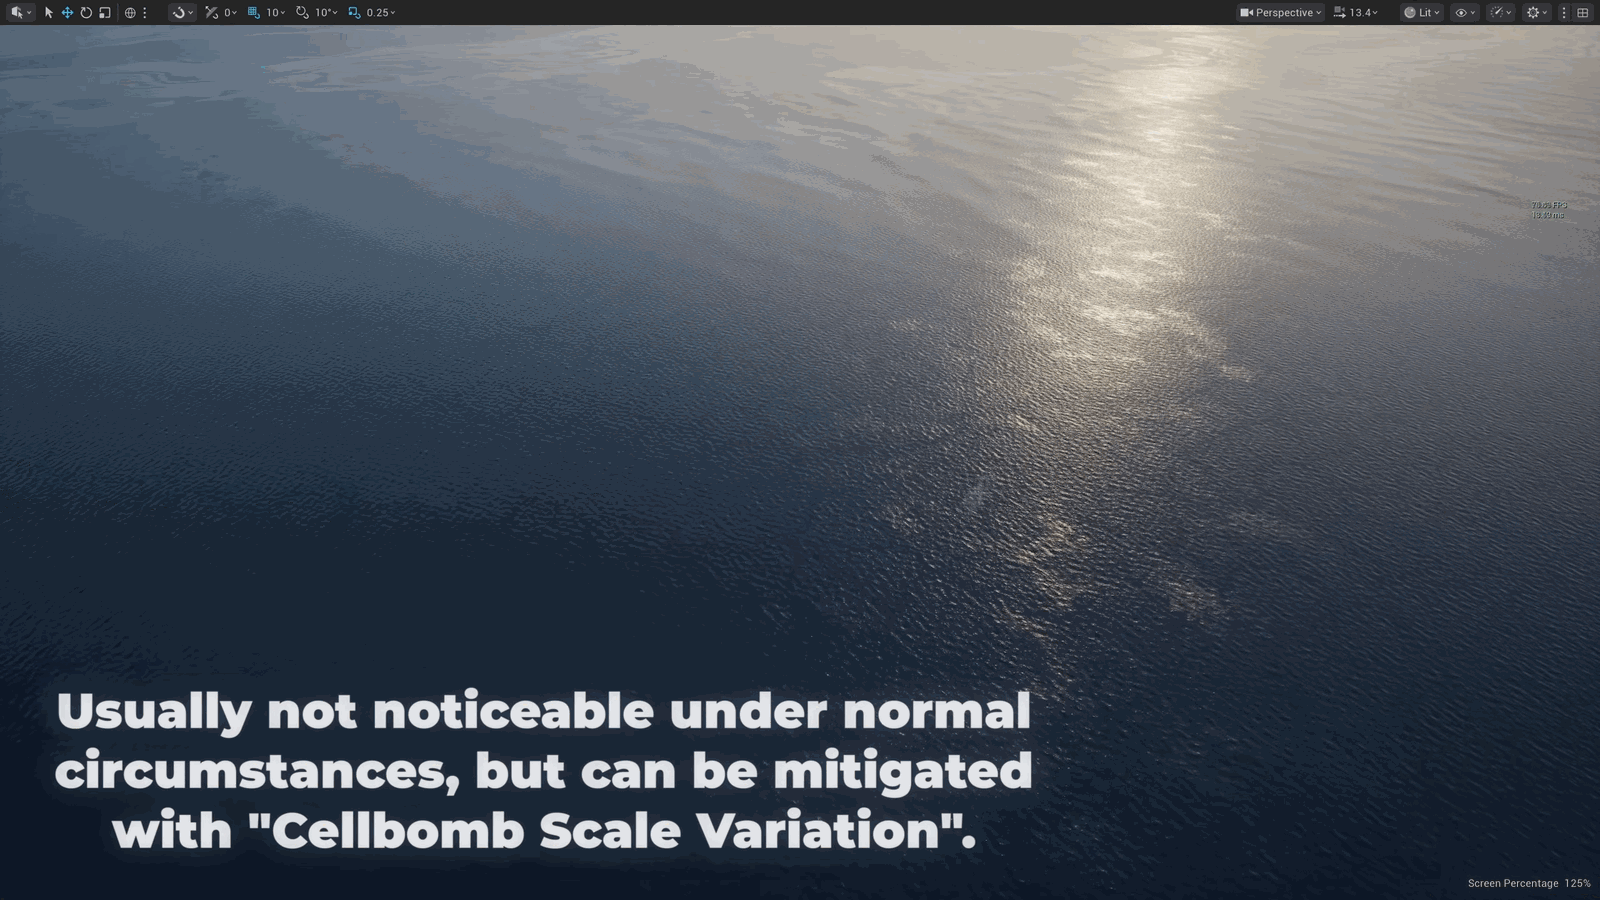
📌 要点汇总
- 高空拍摄时,平滑水面可能显现“细胞轰炸”图案
- 该现象在正常海洋环境下不易察觉
- 演讲者承认此现象并选择不隐瞒
Now, if your water is very smooth with not much detail, you may notice the cell bombing pattern here when the camera is really high up. I’m aware of it. I don’t want to keep it from you. It is not noticeable under a normal ocean, but…
Slide 27 — 00:06:56
📌 要点汇总
- 当前泡沫系统将被更先进的无缝瓦片破碎系统取代
- 现有泡沫生成方式不真实,常在其他工具中随机出现
- 泡沫应基于物理规则生成,而非随意出现
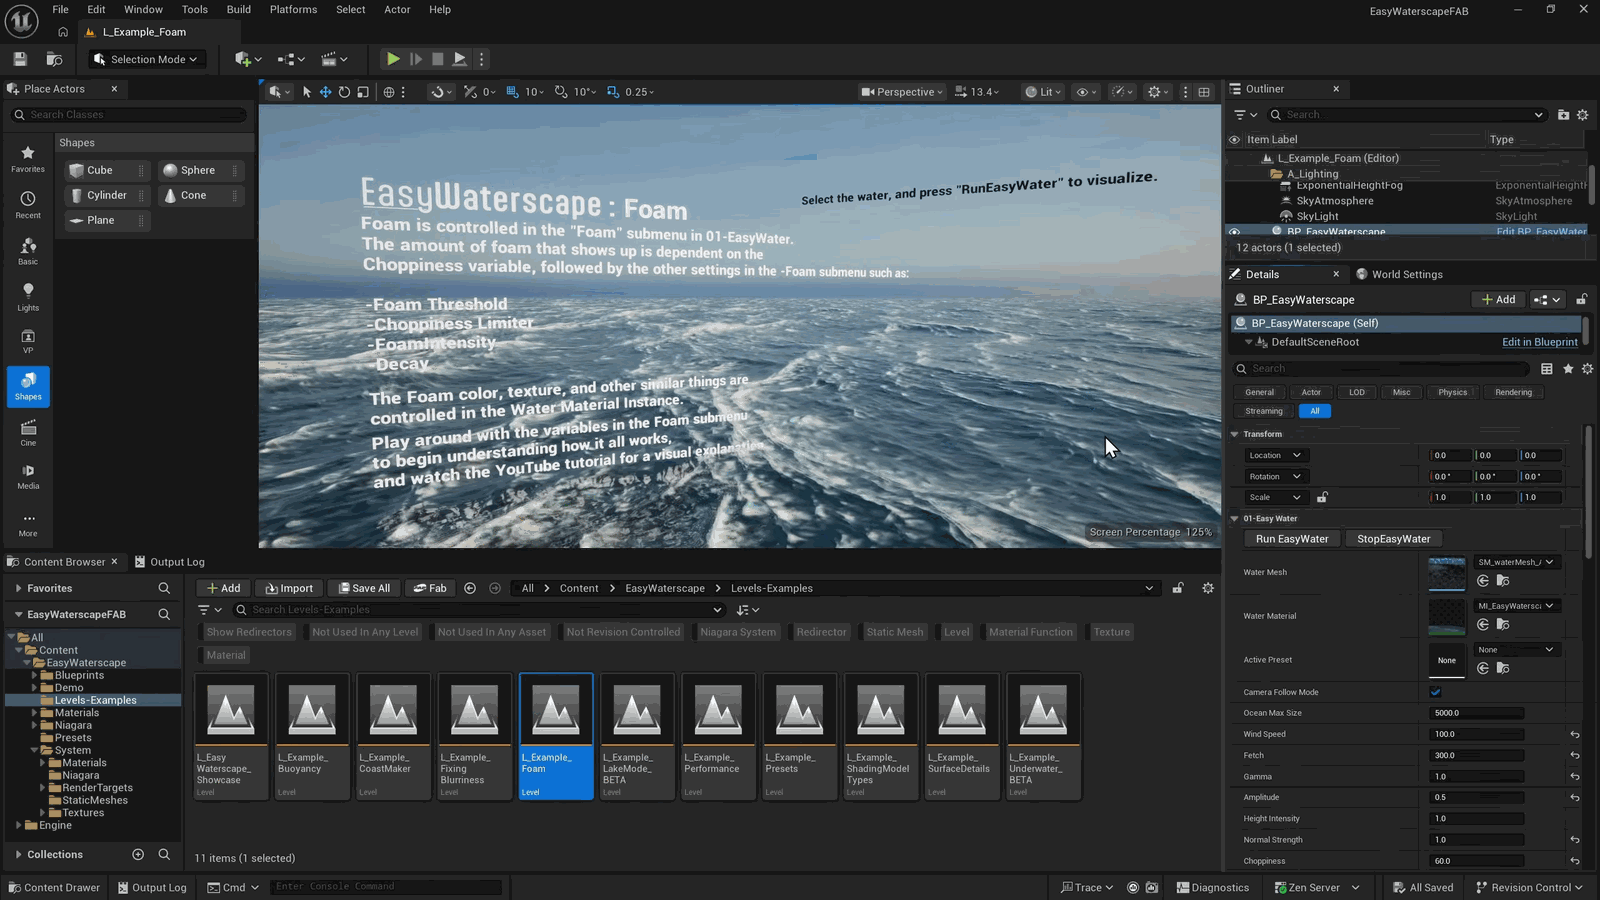
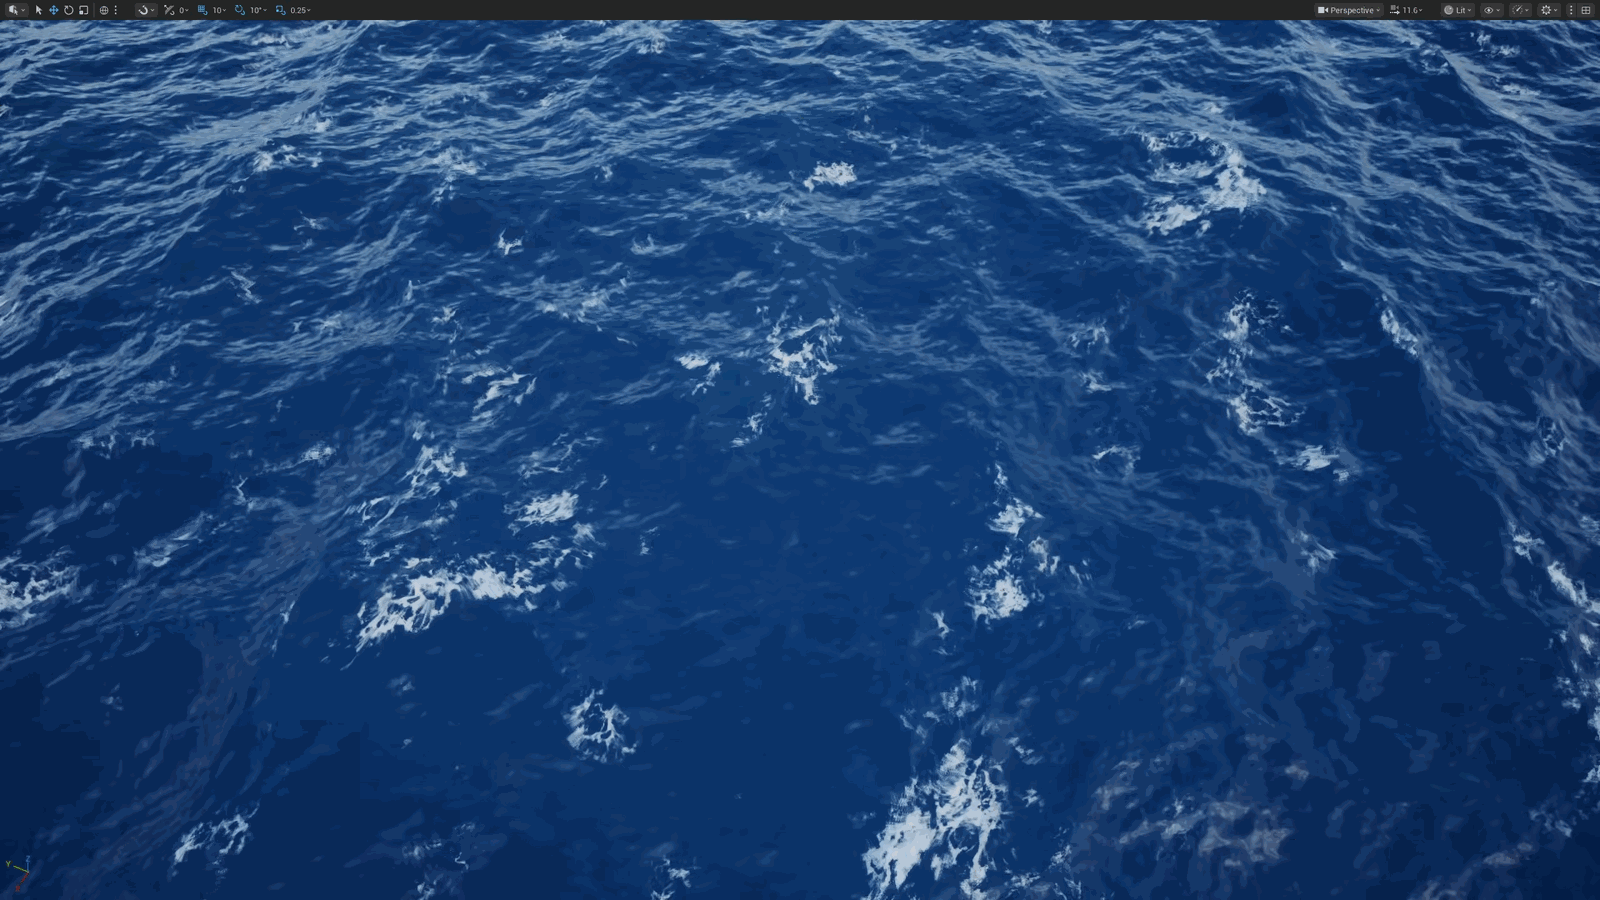
It can show up. This is at the top of my roadmap priority, and will be replaced with a newer, better tile-breaking system in the near future, that should be truly seamless. Next up, foam. Let’s open up the foam example level and run water. You often see foam in other water tools. Just spawn foam out of nowhere, randomly, and that’s not how foam works.
Slide 28 — 00:07:14
📌 要点汇总
- (过渡内容,无关键要点)
Whitewater forms when a wave gets.
Slide 29 — 00:07:20
📌 要点汇总
- 模拟的白浪由空气泡形成,类似真实水流的泡沫
- 泡沫在浪花后留下清晰的轨迹
- 该效果是工具中最引以为豪的部分
- 空气被浪花塌陷时困住,形成白水效果
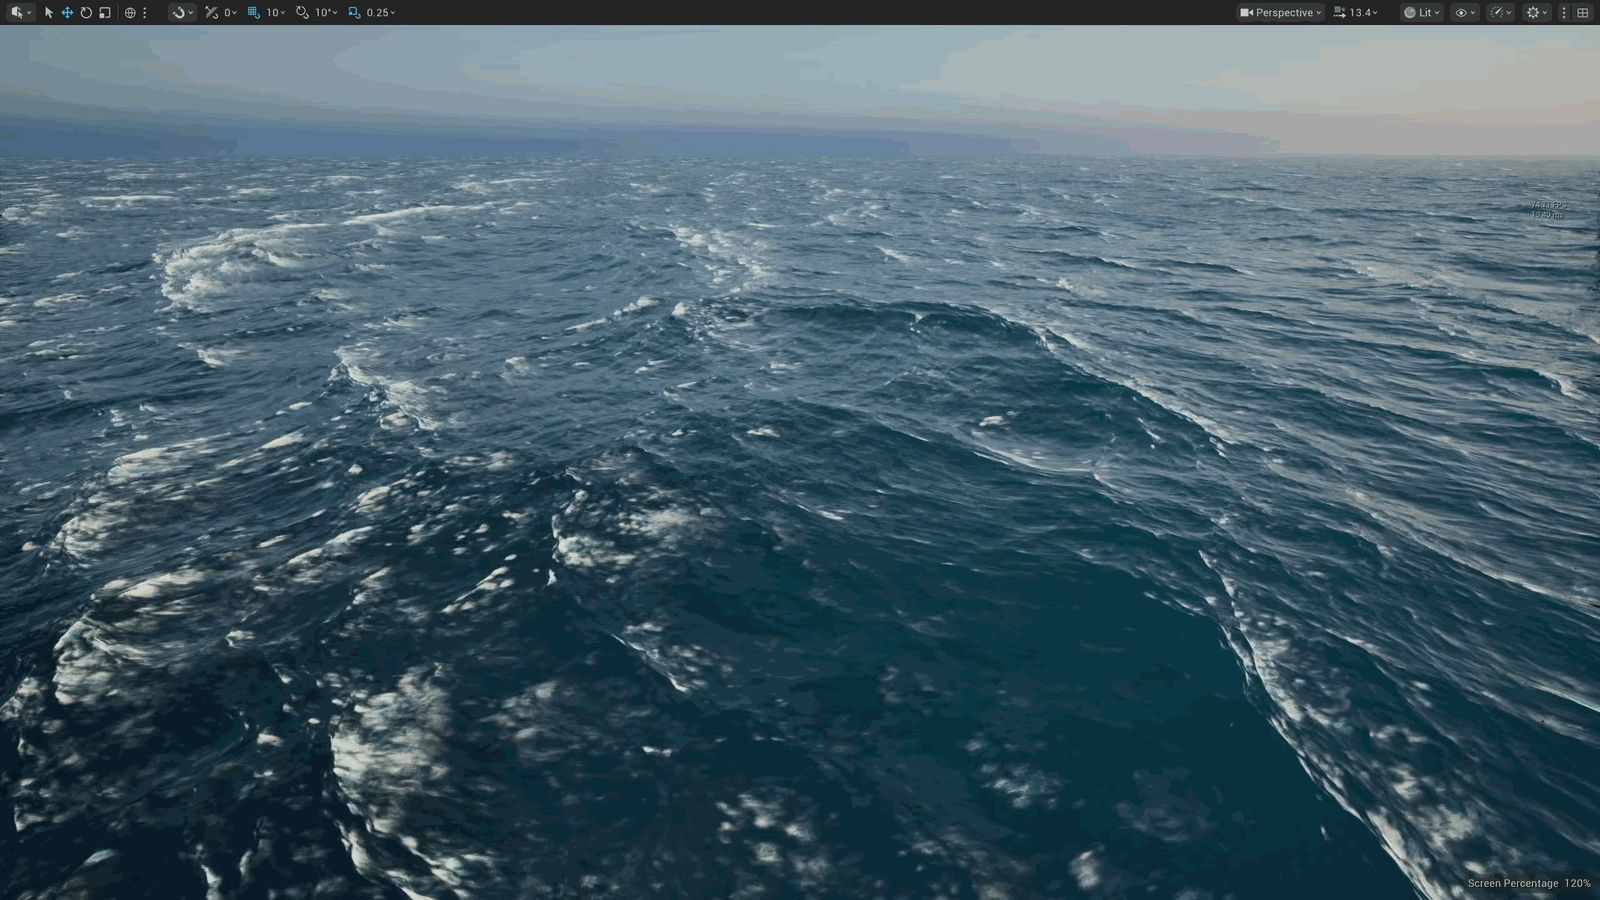
Too steep, it topples over and traps air as it collapses. That is the white water; those trapped bubbles. This is probably the part that I am most proud of in this tool. It feels like the waves themselves are generating the white water, and it leaves a nice trail behind it. Foam is primarily.
Slide 30 — 00:07:35
📌 要点汇总
- 波浪的 chopiness 值越高,泡沫越明显
- 实际波浪行为受 chopiness 影响
- 在 Open Ocean 标签页可单独设置泡沫强度
- 有时需要无泡沫的剧烈波浪效果
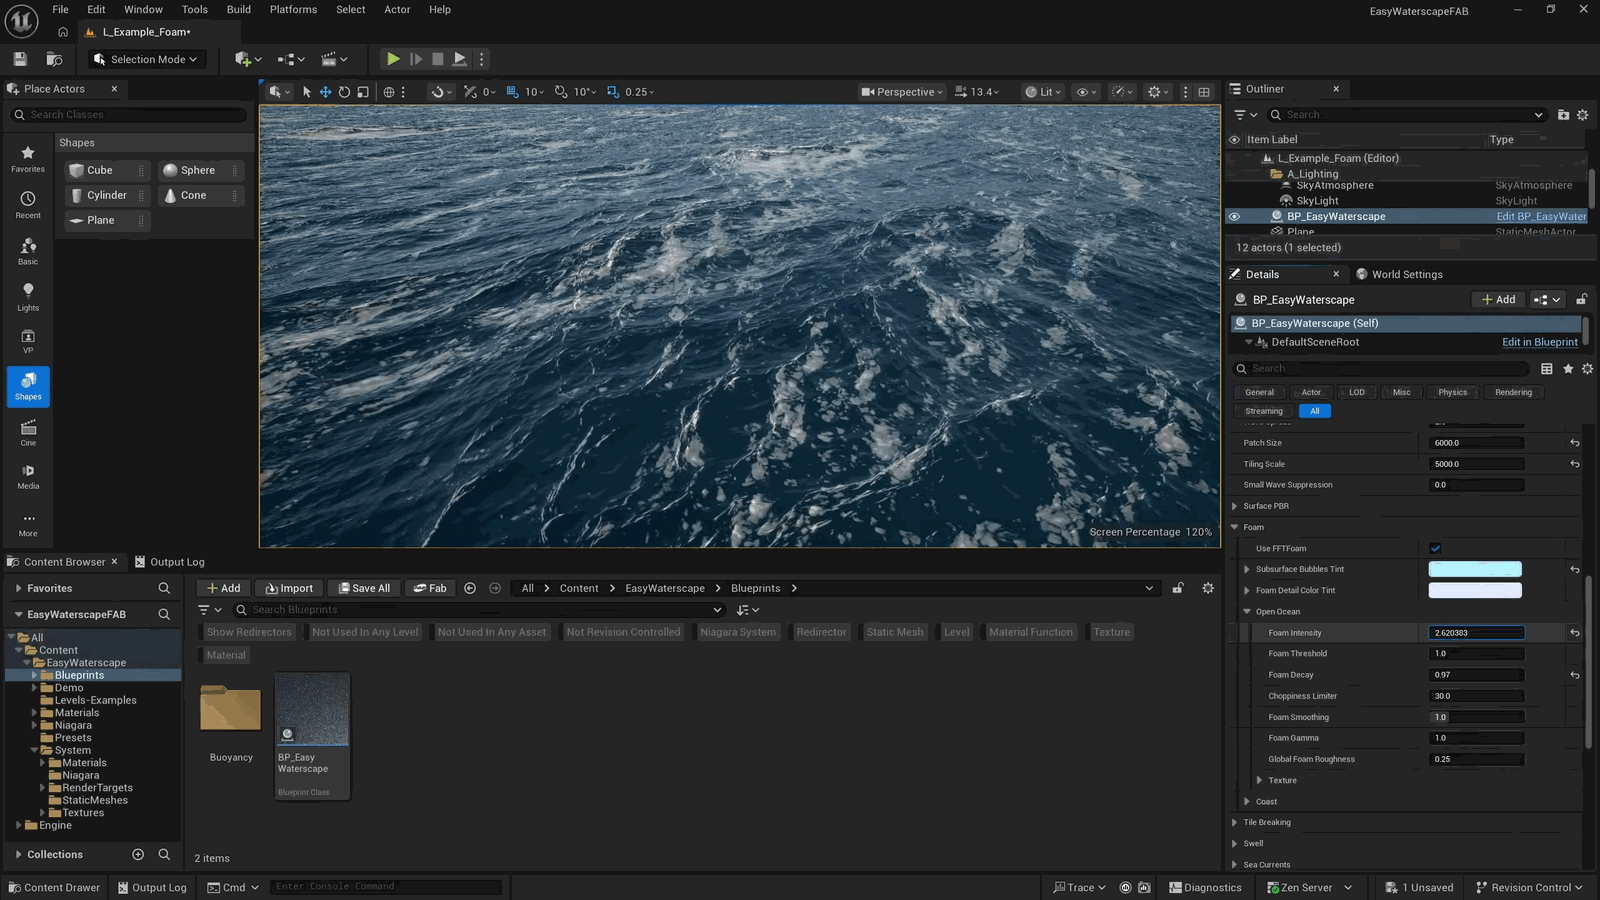
Affected by wave chopiness here. The higher the chopiness value, the more foam shows up. This is how real waves behave. But of course, sometimes you may want really choppy waves without the foam. And here, in the Open Ocean tab, is where we go to set that. So, foam intensity—how visible you want it to be.
Slide 31 — 00:07:55
📌 要点汇总
- 泡沫阈值越高,泡沫仅限于浪峰顶端
- 阈值越低,泡沫效果更分散
- 混乱限制器用于减弱泡沫效果而不影响波浪本身
- 这两个参数是主要调节项,需平衡使用
- 没有通用的最佳设置,需根据场景调整
Foam threshold: higher values limit the foam to the tip of the crests. Lower values give you a much more diffused look. The choppiness limiter here is essentially a divider to offset the effect of chop without affecting the wave itself. These two settings are the main dials you’ll have to balance. There are no magical settings.
Slide 32 — 00:08:12
📌 要点汇总
- 泡沫的可见时间由衰减值(decay)决定,低值使泡沫快速消失
- 衰减值接近1时,泡沫会持续更长时间
- 平滑处理会降低泡沫边缘的清晰度
It all depends on how strong your chopiness and amplitude values are. Decay here is how long the foam remains visible. Low values make the foam fade quickly. Values closer to one make it linger for a very long time. Smoothing will reduce the sharpness of the foam edge.
Slide 33 — 00:08:27
📌 要点汇总
- 该功能在使用高分辨率纹理时特别有用
- 将纹理设置为…(具体设置未完成,内容不完整)
This one is especially handy if you are using a very high-resolution texture. Let me show you what I mean. If I set my texture to…
Slide 34 — 00:08:36
📌 要点汇总
- 4K画质展示了波浪的细节,看起来酥脆且视觉效果出色。
- 泡沫的细节受到直接影响,但可能对观众效果有限。
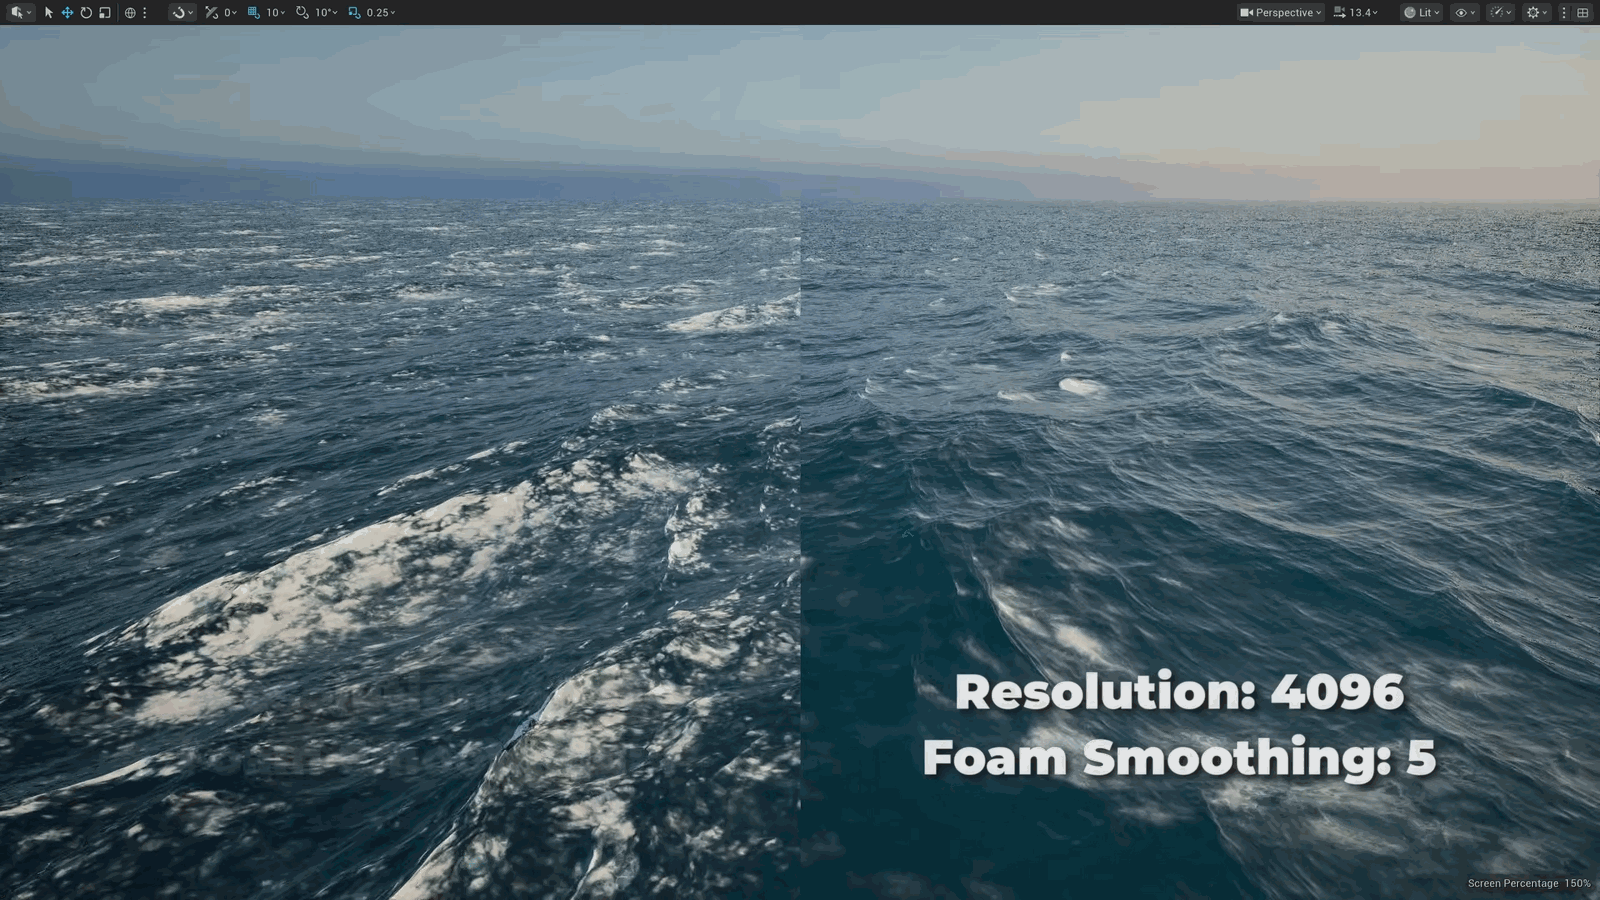
4K here. We’ll see the wave detail here looks deliciously crispy and looks amazing. This had a direct effect on the detail of the foam, but maybe you.
Slide 35 — 00:08:45
📌 要点汇总
- 感觉细节过于锐利、嘈杂、繁杂
- 可通过增加该值来柔化视觉效果
- 这是一个有用的美术指导功能
- 承认这可能是最难掌握的技巧之一
Feel that detail is too sharp, too noisy, too busy. You can soften that look by increasing that value. It’s a helpful art direction feature. I’ll admit this is probably the trickiest.
Slide 36 — 00:08:56
📌 要点汇总
- 该工具包含大量设置,需通过调整参数来熟悉操作
- 当前界面为了控制精度,保留了部分复杂设置
- “open ocean”和“coast”功能位于“foam”子菜单下
- 调整“coast”滑块目前无效,因为海岸尚未生成
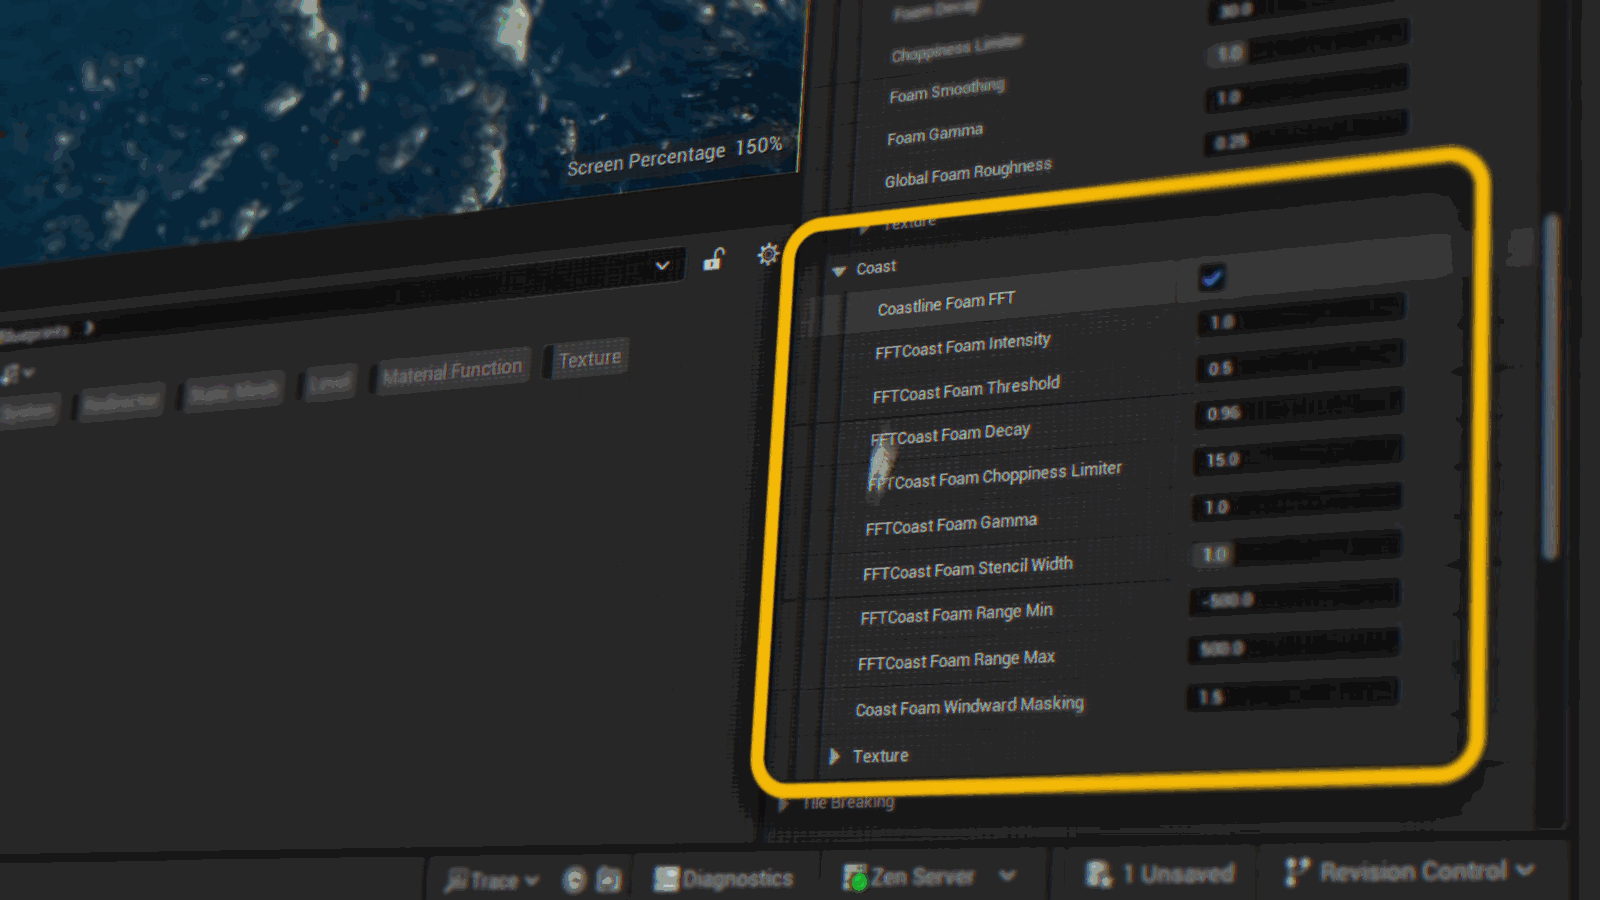
Part of this whole tool to really wrap your head around. There’s a lot of settings here, but fiddle with the values a bit, and you will get the hang of it. Eventually, I want to simplify this process a bit. There’s maybe one or two dials too many, but in this specific situation, I opted for better control over simplicity.
Now, you’ll see we have the open ocean and coast under the foam sub menu. Adjusting the coast sliders won’t do anything yet because we haven’t generated our coast, and that’s.
Slide 37 — 00:09:25
📌 要点汇总
- 直接使用内置的 Coastmaker 工具进行海岸线生成
- 打开示例关卡后,只需点击 Coastmaker 即可生成波浪和泡沫效果
- Coastmaker 会捕获指定区域内的所有陆地,并可通过滑块调整覆盖范围
- 可调整生成地图的分辨率,工具在运行时自动执行一次
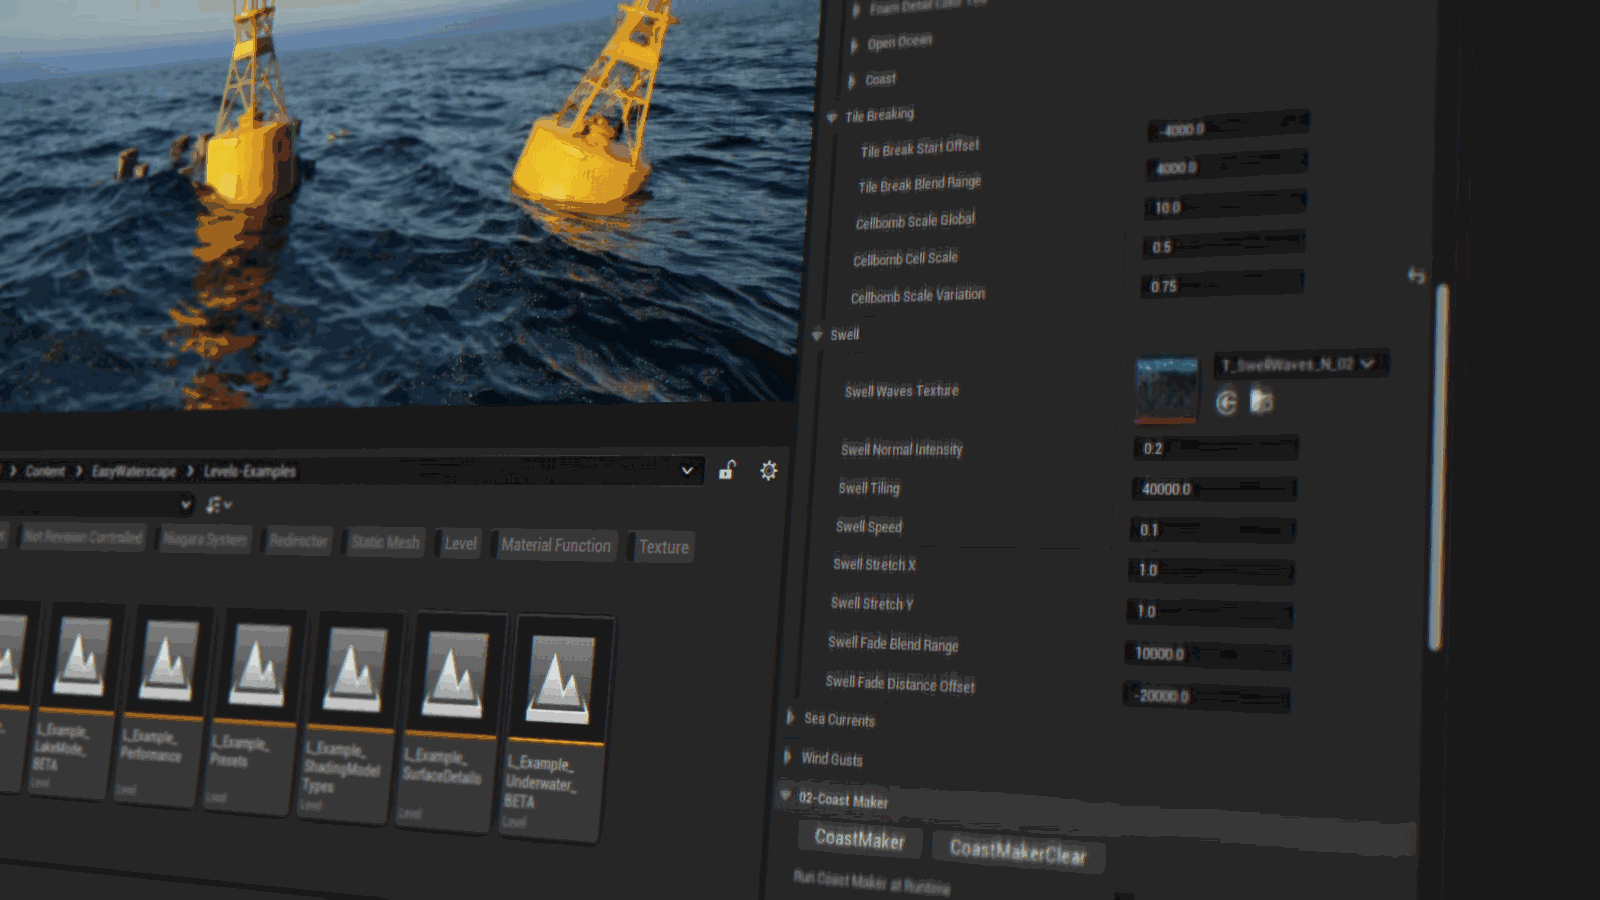
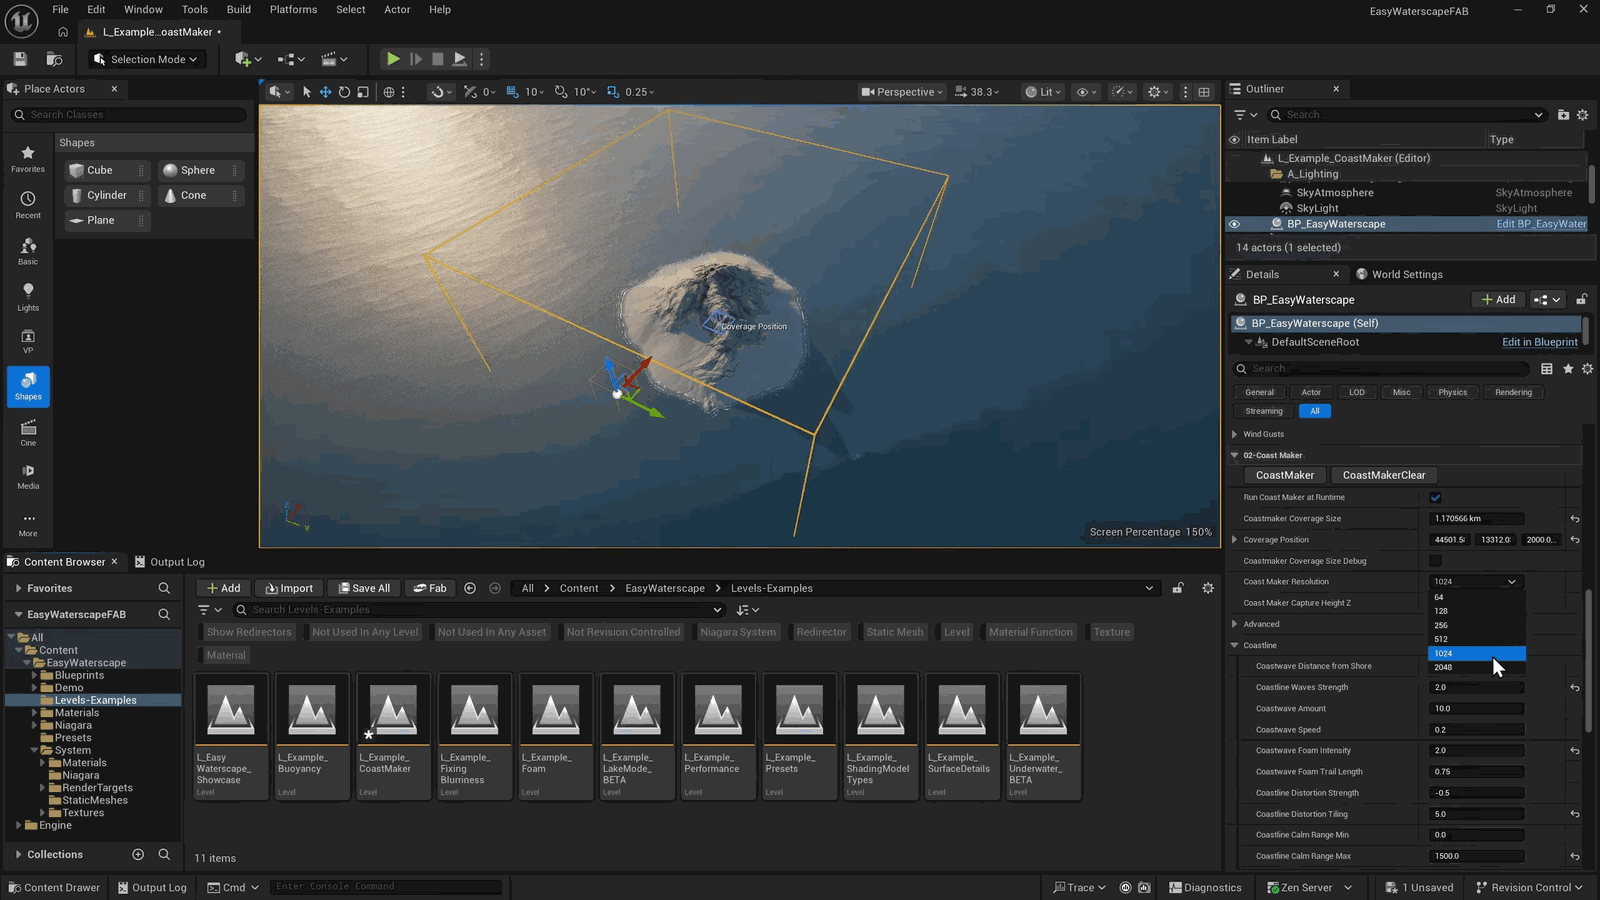
Takeaways right into the built-in Coastmaker tool. Let’s open the Coastmaker example level. Everything’s already placed for you, so you just run into water, head over to the Coastmaker tab, and click Coastmaker. Right away, you’ll see waves and foam all around your coastline.
Coastmaker captures all of the land within this bounding box right here, which you can place wherever you want and resize with the coverage slider. Followed by adjusting the resolution of the map it generates. It runs automatically at runtime, but only once.
Slide 38 — 00:09:54
📌 要点汇总
- 游戏启动后不会影响性能,可选择完全禁用
- Clear Coast Maker 可清除烘焙数据,便于切换关卡
- 沿海泡沫与开放海洋泡沫使用相同参数设置
- 沿海波浪参数在 Coastmaker 的海岸线部分进行控制
- 调整捕获区域大小或分辨率可能导致波浪效果异常
- 波浪效果受扭曲、离岸距离和波浪数量等变量影响
- 将 50 个波浪压缩到 5 米内会导致视觉效果异常
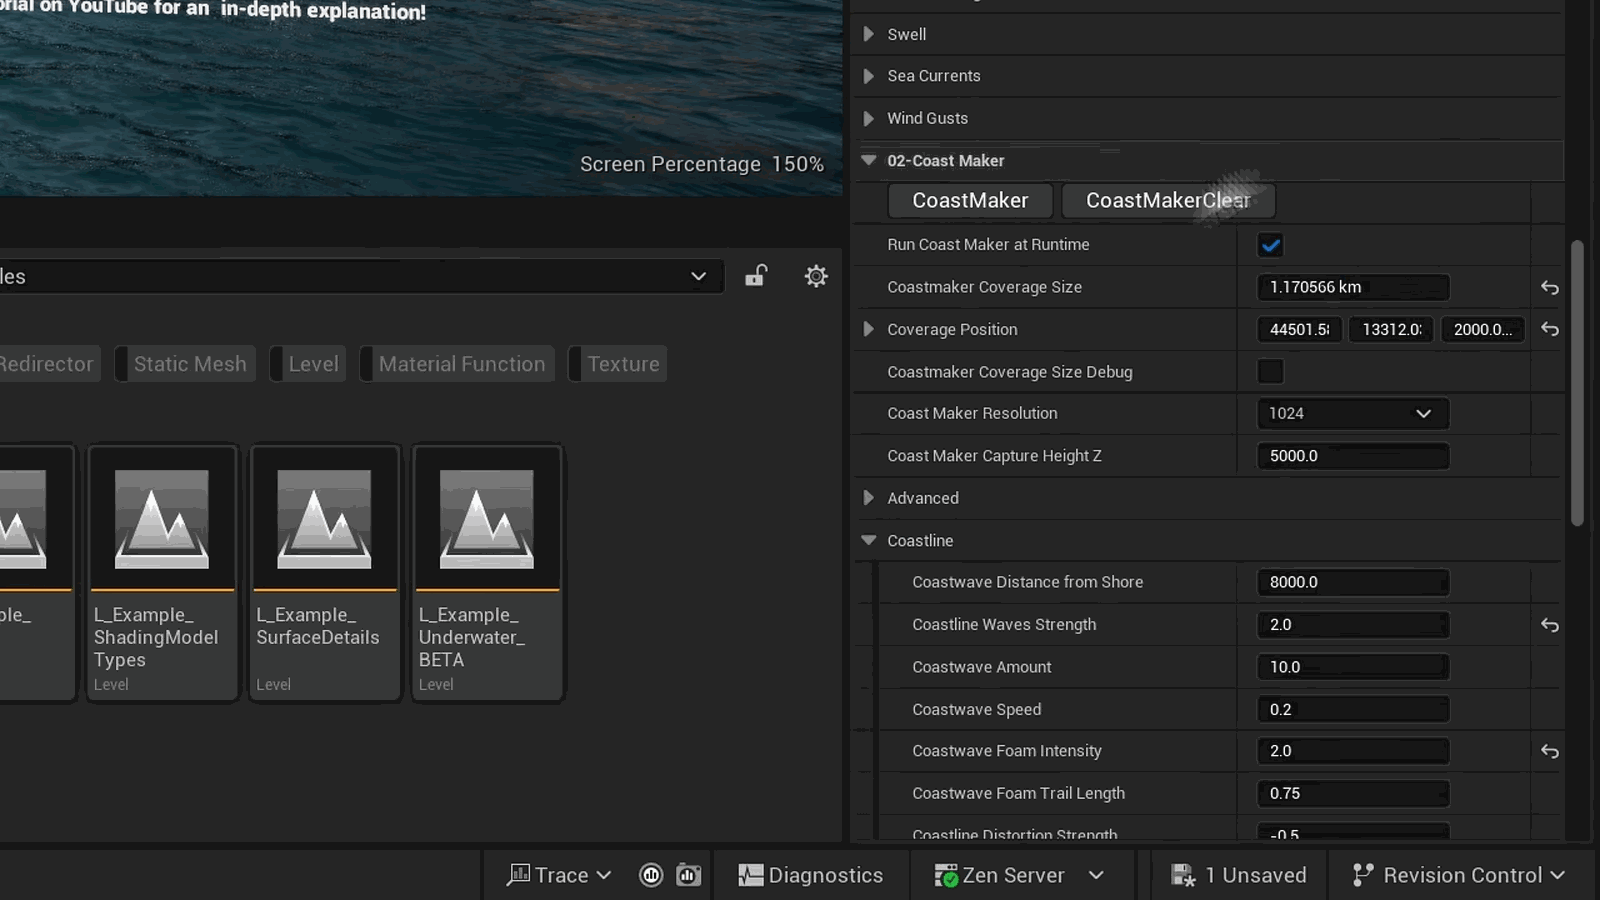
So there’s no performance impact after the game starts. Of course, you can tell it not to run at all if you don’t need it. And Clear Coast Maker just wipes the bake data, which is helpful if you’re switching between levels and the previous bake is showing up in your water here.
Now, back in the foam section, the coast foam has the exact same settings as the open ocean: intensity, threshold, decay, and so on. This works really well for rocky coast. It’s nice to have coast foam and ocean foam decoupled.
For the coast waves, let’s jump back into Coastmaker, and under the coastline section is where we control the waves themselves: intensity, amount, speed, breaking foam—all of it. Play around those settings. As you adjust the size of the capture area or change the resolution, the waves might start to look a little odd or different. The variables to reach for are distortion, distance from shore, and wave amount, since they are all tied to the resolution and size of the Coastmaker texture.
If you cram, for example, 50 waves into five meters, each one’s going to look a little weird.
Slide 39 — 00:10:58
📌 要点汇总
- 调整 capture height Z 以避免地形过高部分被捕捉
- 静态网格可设置 “Hidden in scene capture” 以隐藏
- 紧密区域可通过模糊设置改善波浪效果
- 使用 “Coast Maker” 可使波浪更自然
- 海洋具有方向性,反方向波浪和泡沫需注意视觉效果
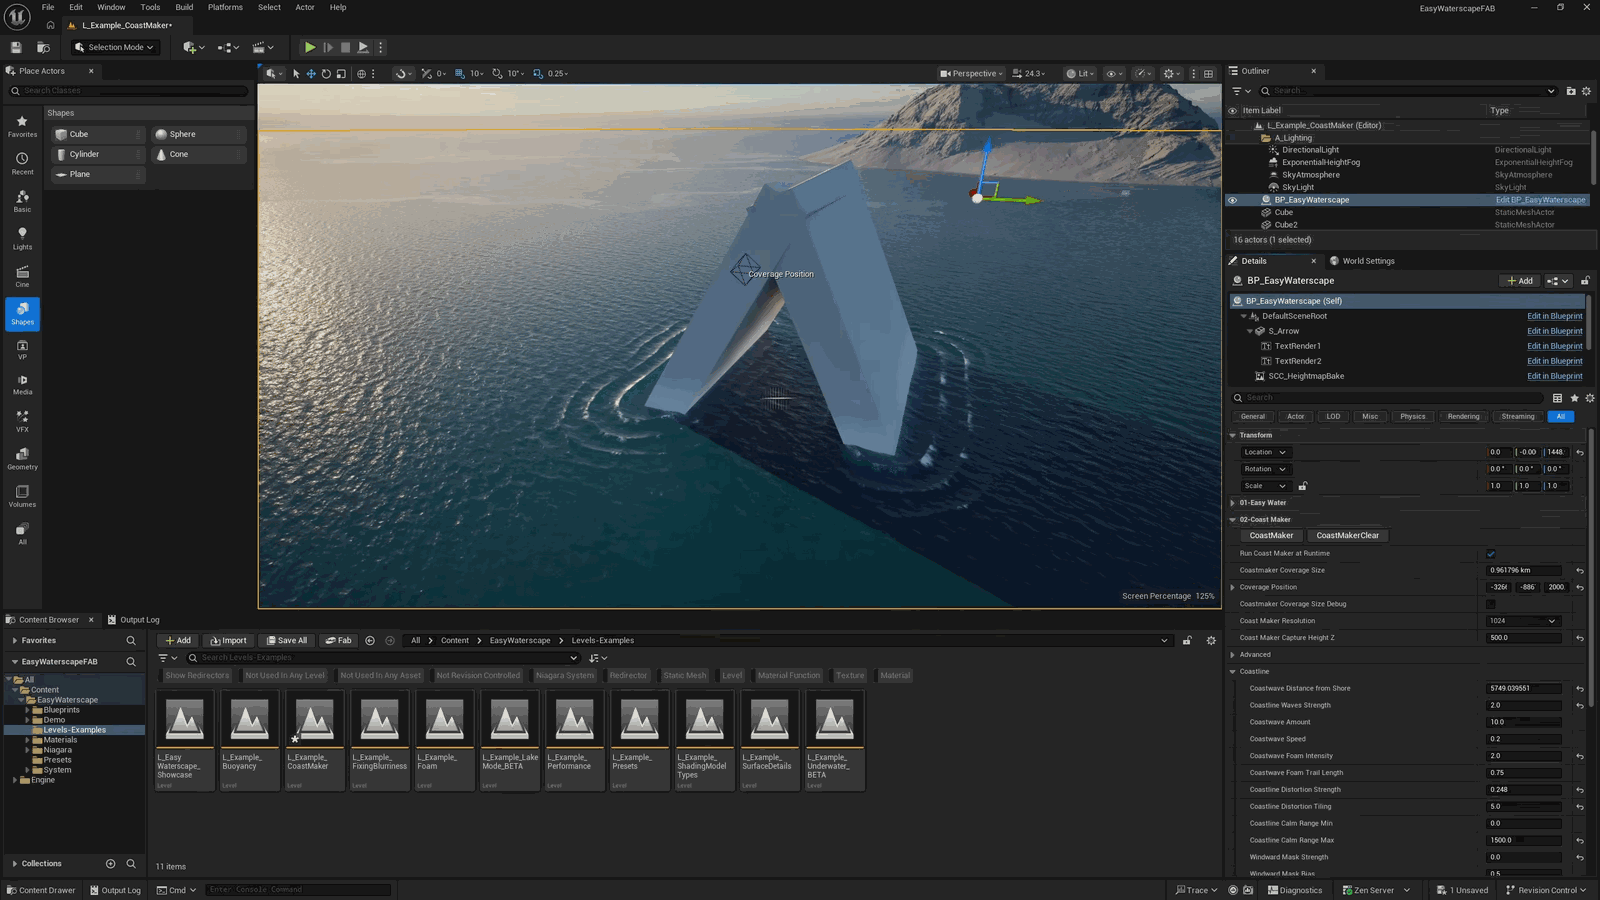
Right, so you need to spread it out and art direct it for your level. There is no one size fits all here. And now that the new mesh terrain features in Five Eight are here, if your landscape has overhangs or caves, lower the capture height Z to a point below that overhang. Otherwise, it will capture the top of the landscape, and that’s no good. But also, if you place a static mesh in your scene and you don’t want it to show up around it, select your mesh, search for scene capture, and tick “Hidden in scene capture.”
We also have an advanced tab here. In general, I advise against touching these, but there is one example where it does help. In very tight areas or places with a small bay, waves coming in like this look pretty bad. So these settings will blur out our maps to smooth it. Raise these values a fair bit. Hit “Coast Maker” again, and now the waves come in much more naturally.
One more tip: notice we’ve got waves and foam coming in from all sides. Because our ocean has a directionality to it, coast waves and foam coming in from the opposite direction look.
Slide 40 — 00:12:06
📌 要点汇总
- 为海岸波浪和泡沫添加了风向遮罩,使其仅在风的来向出现
- 遮罩效果使岛屿的背风侧不显示波浪和泡沫
- 该技术增强了场景的真实感和环境互动性
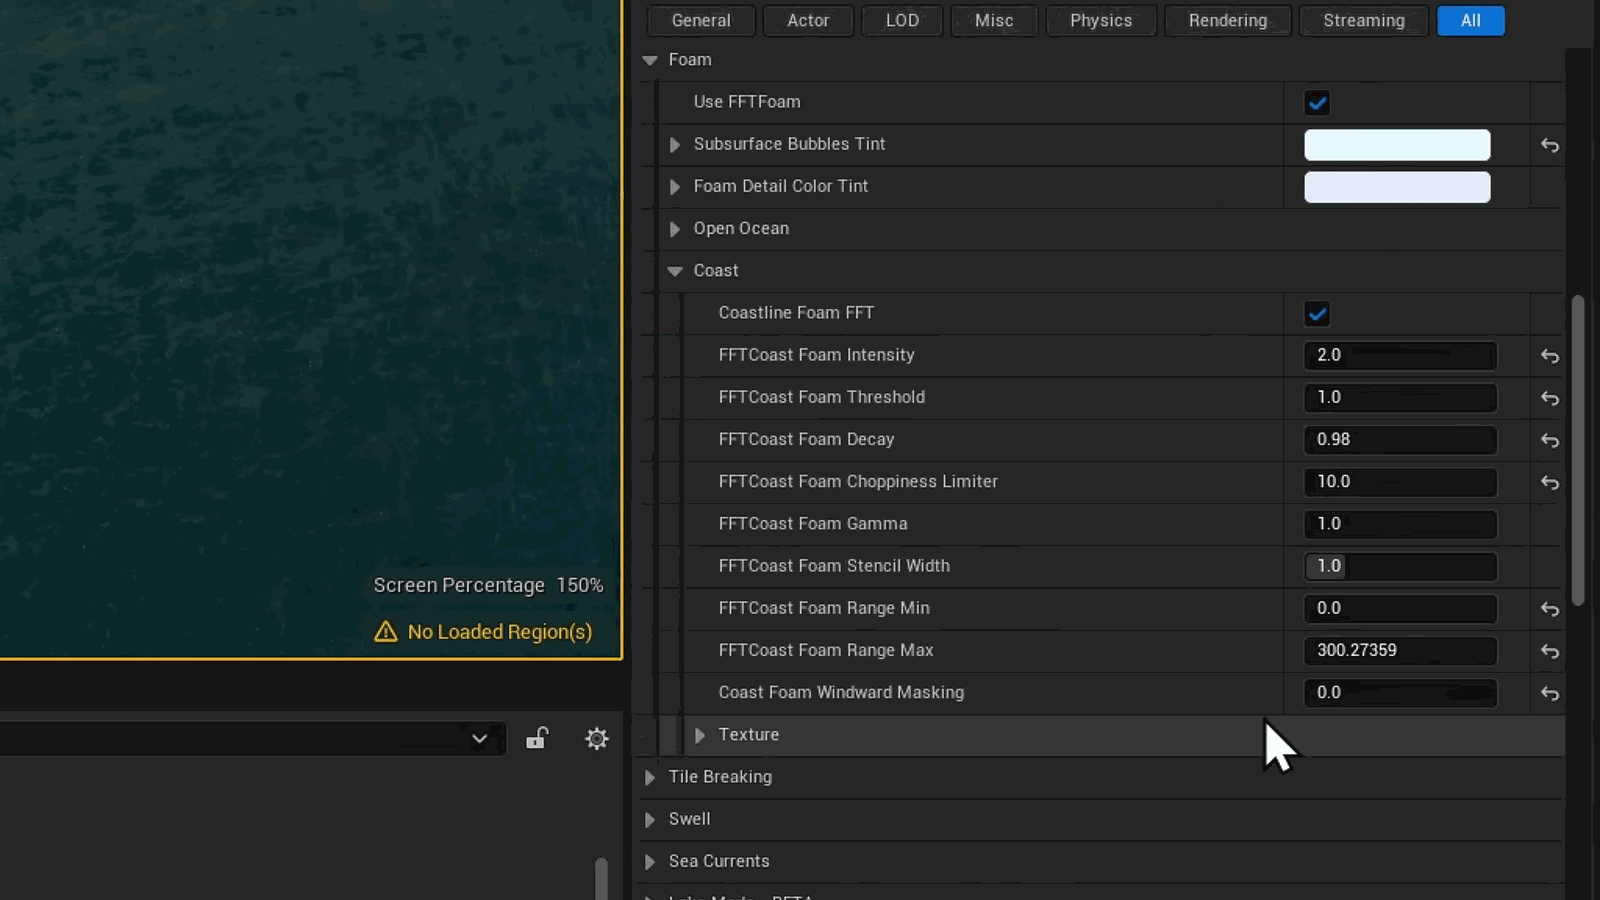
Weird. So I added a windward mask for the coast waves and foam, which make them only appear in the direction the wind is coming from. Essentially sheltering the opposite side of your island.
Slide 41 — 00:12:15
📌 要点汇总
- 使用该功能使画面更加真实自然
- 海岸线波浪效果是工具中最薄弱的部分
- 波浪在海滩上的表现不够理想
- 该部分效果略显不足,未达到最佳状态
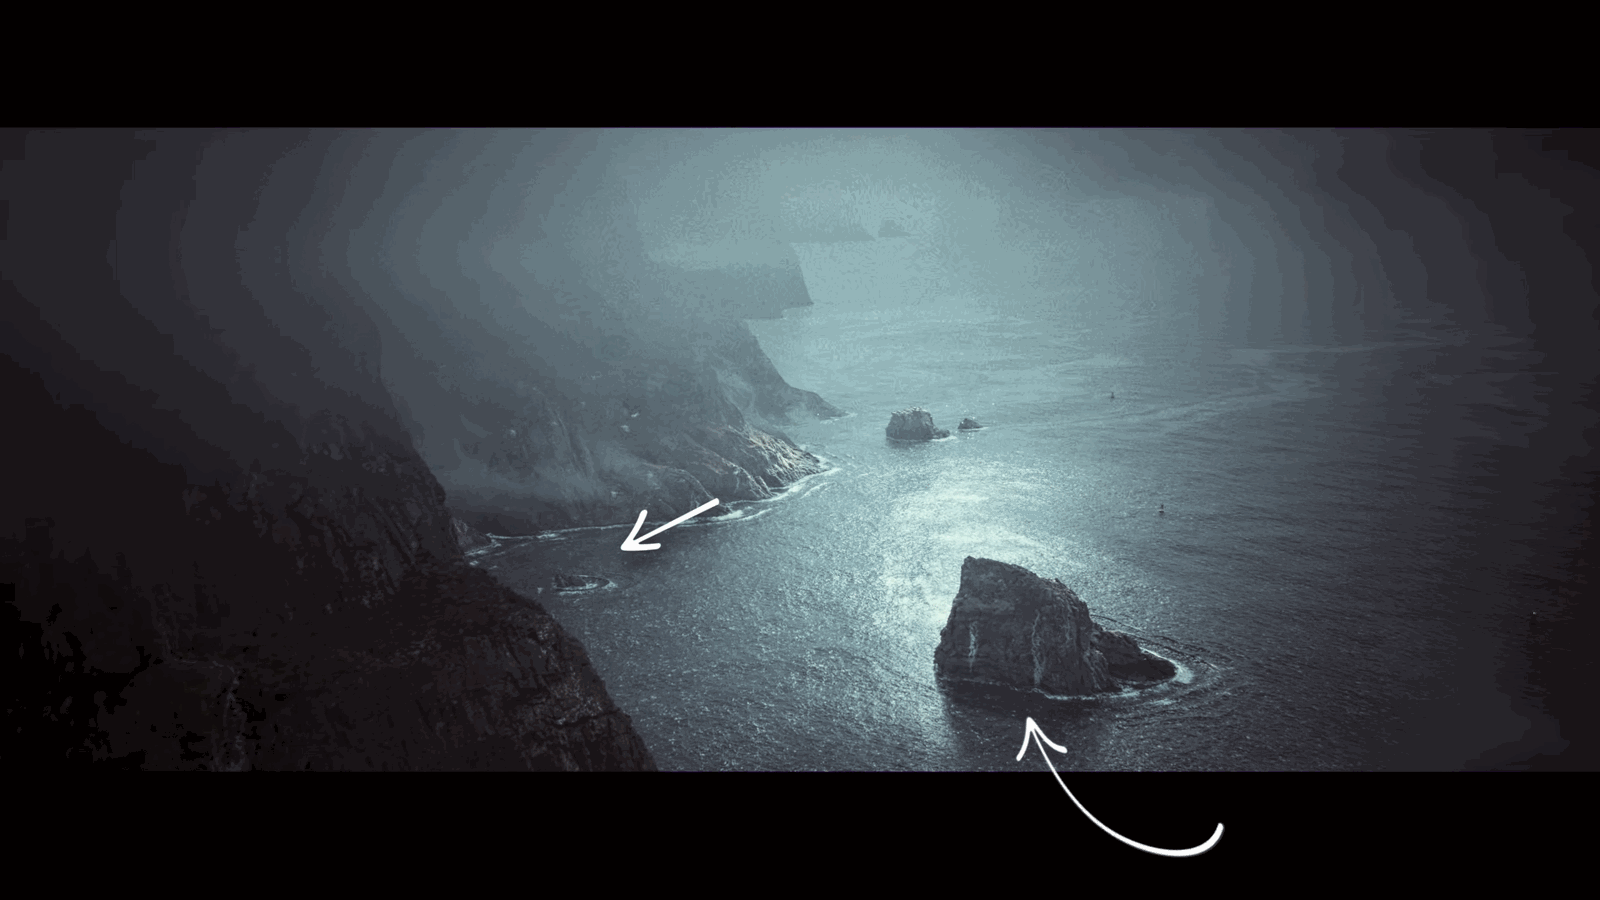
I made use of that feature in this shot here, which makes it feel a whole lot more real and natural. Now, I want to be completely transparent. The shoreline waves and the way they crash on beaches is honestly the weakest part of this entire tool. It doesn’t look the best, and I’m not going to hide it from you. It works a little less well.
Slide 42 — 00:12:35
📌 要点汇总
- Easy Waterscape 特别适用于陡峭悬崖环境,模拟水流直接冲击岩石的效果
- Niagara 系统免费提供,用于生成美观的水花效果
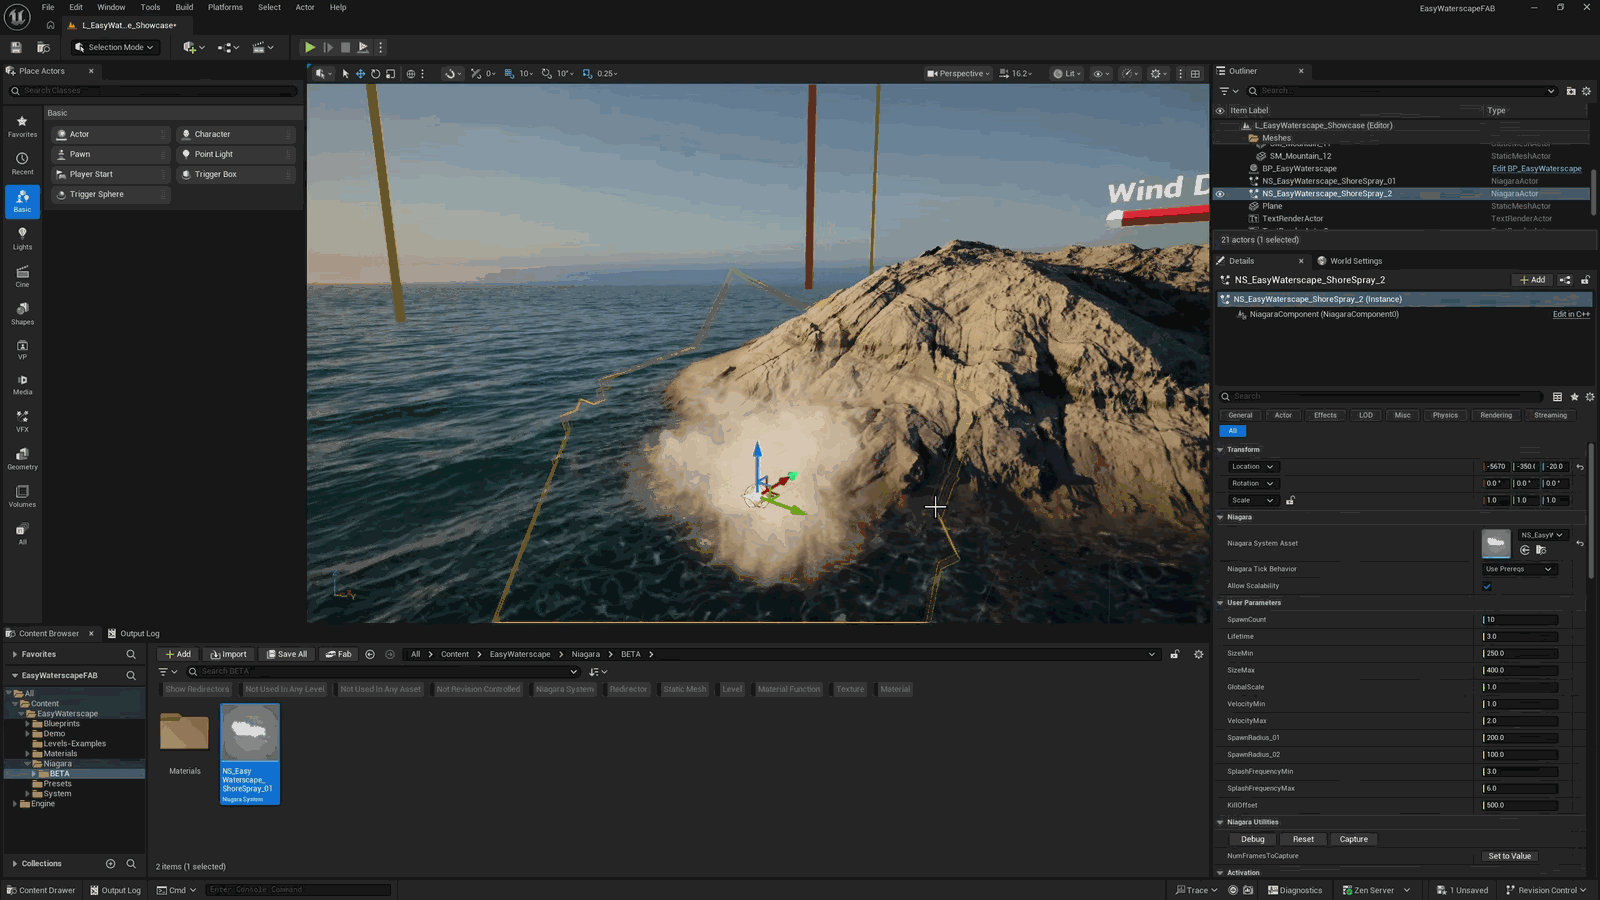
With those long breaking waves over shallow shorelines, the kind you see at beaches, where Easy Waterscape really shines, though, is environments with steeper cliffs, places where water crashes directly against rocks, like what you’re seeing here. Included for free is a Niagara system that generates splashes for a pretty effect.
Slide 43 — 00:12:53
📌 要点汇总
- 远距离说服效果正在开发中
- 海岸线波浪效果将在未来版本中更新
- 详细面板新增了三类数据:海浪、洋流和阵风
- 这些细节增强了场景的真实感
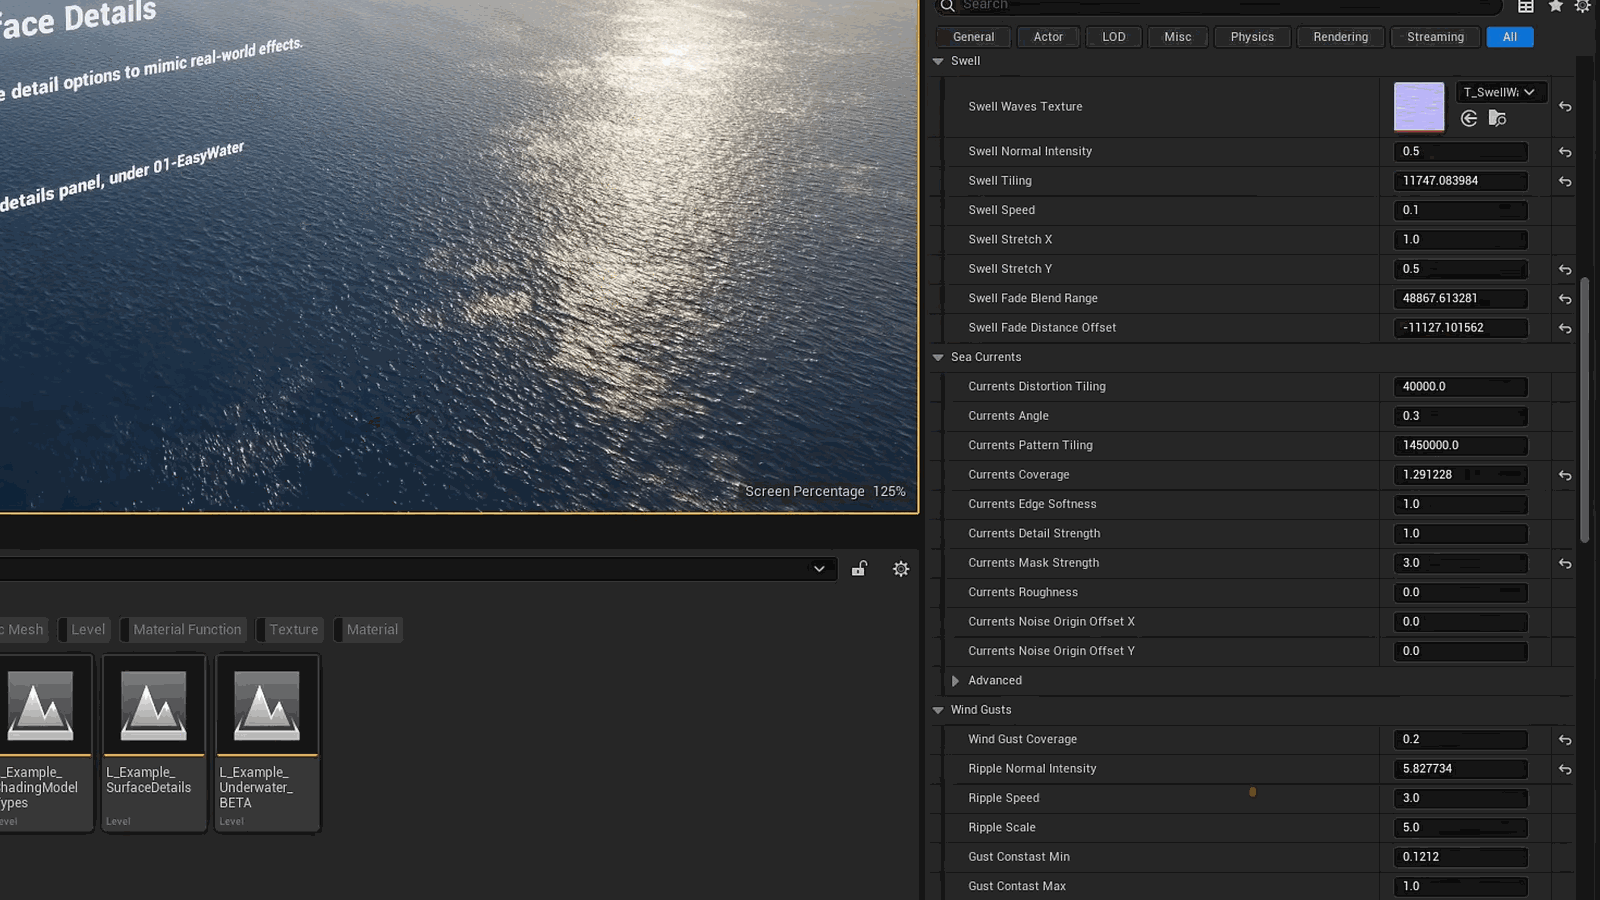
Convincing effect from a distance. Improved shoreline waves are absolutely in the works. Something I will be adding in a future version update. We’ve got three more categories here in the detailed panel: swells, currents, and wind gust. These are extra details that add a layer of realism to.
Slide 44 — 00:13:10
📌 要点汇总
- 可调整远处大规模波浪图案的细节
- 提供三种不同法线贴图选项,分别赋予不同视觉效果
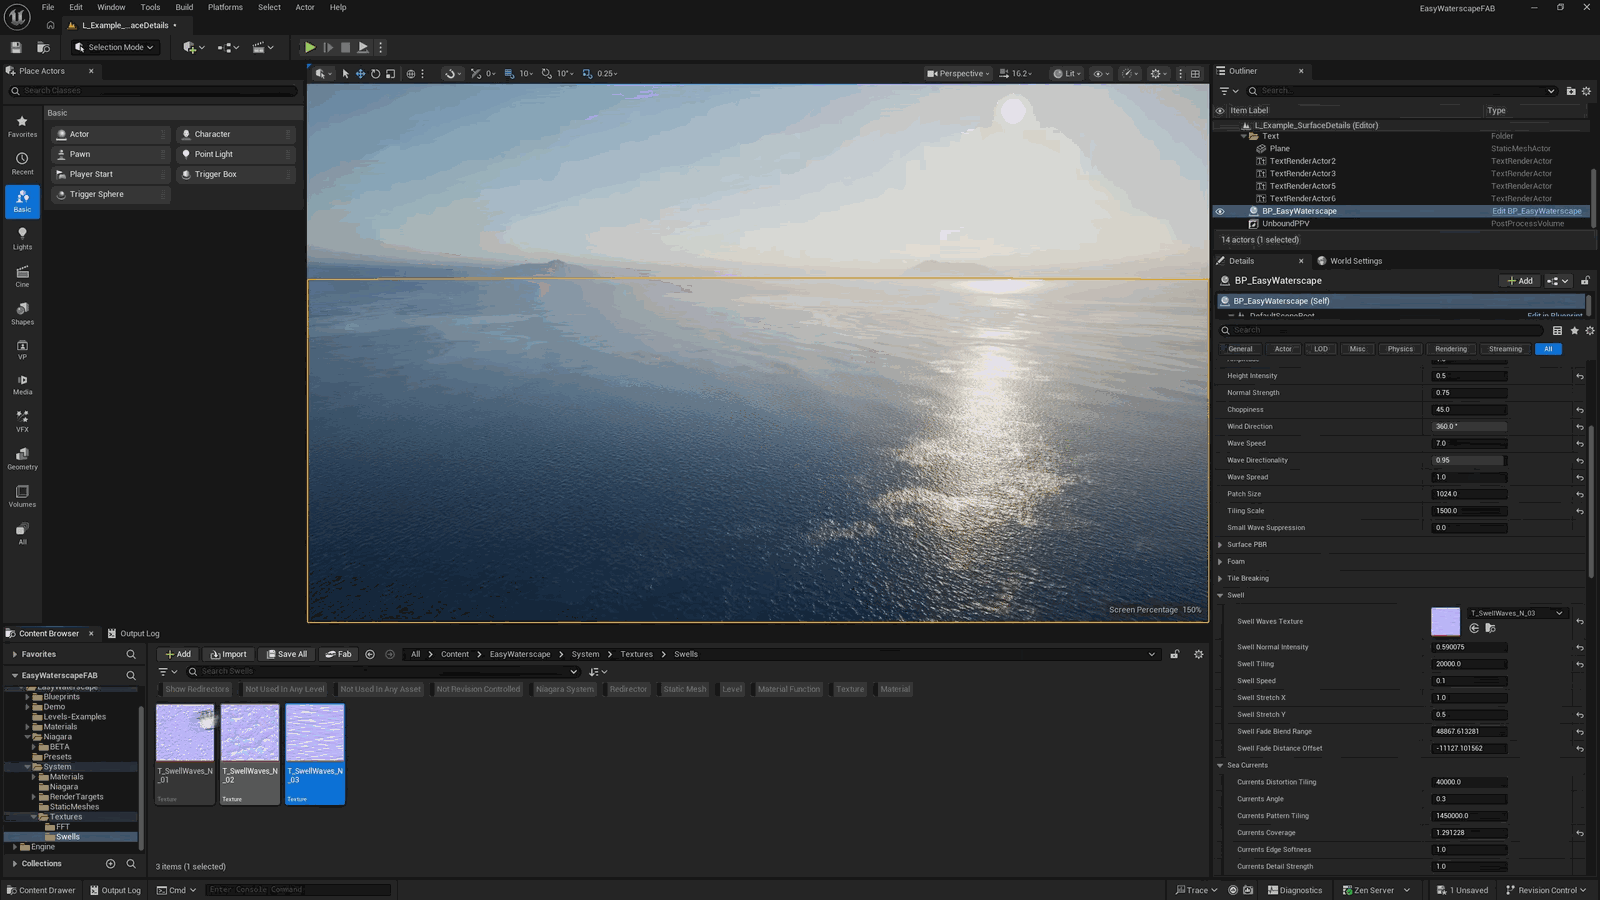
Swells at a large scale wave pattern in the distance, which you can adjust right here. I’ve also included three different normal maps that you can plug in. They’re labeled as such, each one giving you a completely different look.
Slide 45 — 00:13:23
📌 要点汇总
- 使用基于噪声的漩涡破碎效果,避免出现平铺现象
- 未采用3D噪声以保持性能和成本较低
- 提供大量控制参数,允许用户精细调整视觉效果
- 增强了水系统的细腻度和真实感
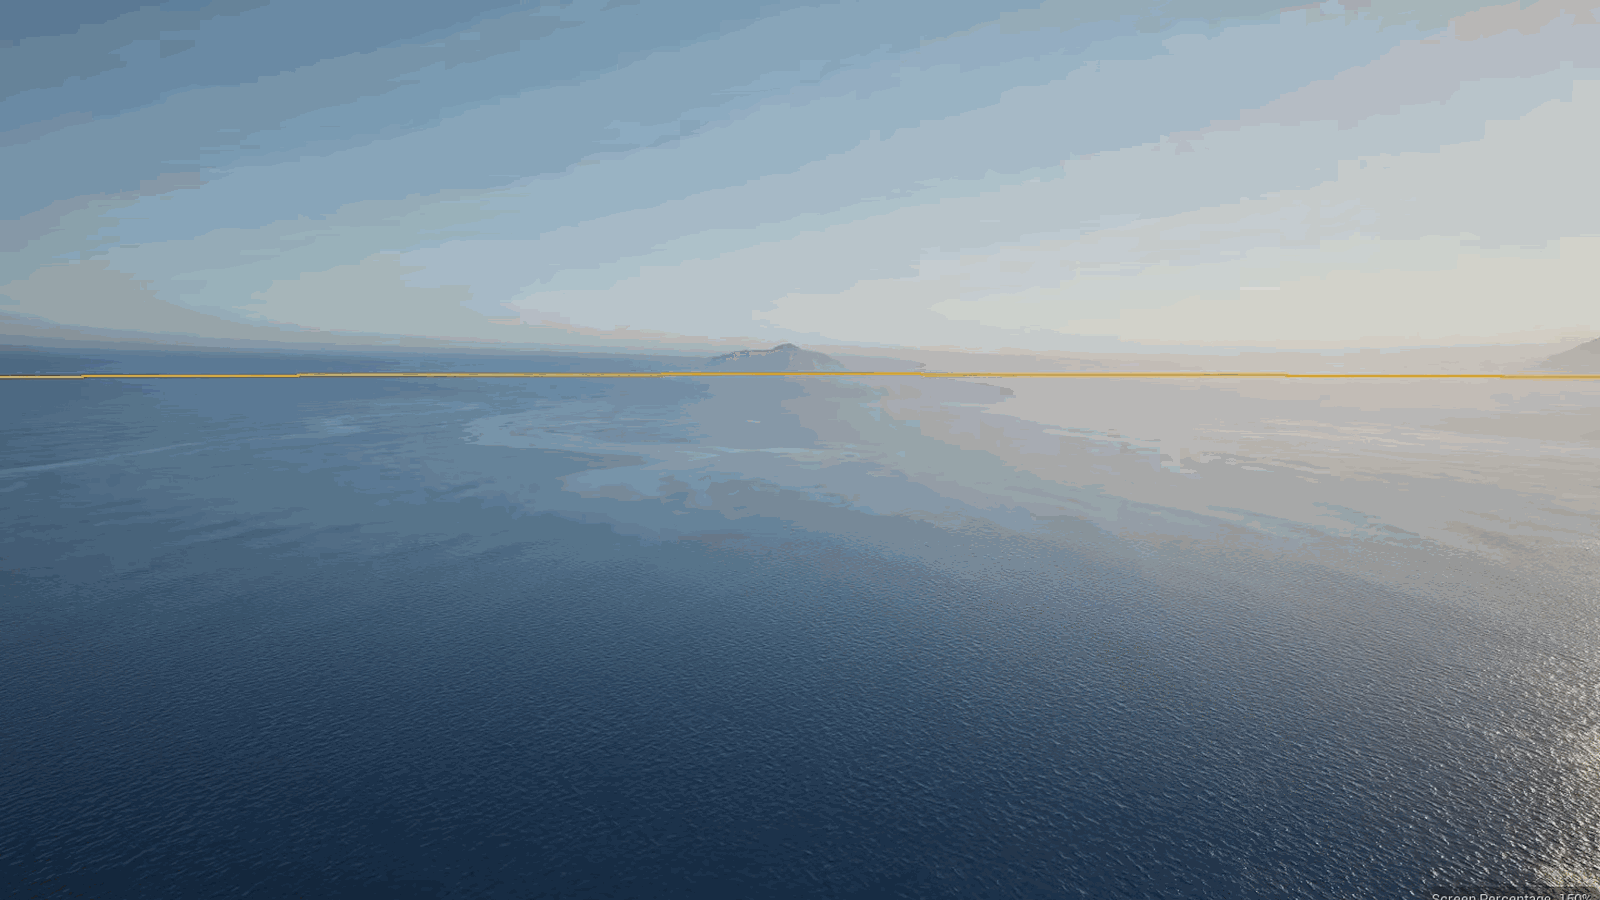
To choose from, see current. Add that kind of swirly breakup pattern that you see on real oceans, and it’s a feature I’m really glad to have added. It’s all noise-based, so you won’t get any tiling, but I’m not using 3D noise, which keeps it relatively cheap. I expose a whole bunch of controls so you can really fine-tune exactly how it looks, and in my opinion, adds a really nice level of polish and realism that you just don’t often see in water systems.
Slide 46 — 00:13:49
📌 要点汇总
- 风暴(wind gusts)是增加水体模拟真实感的重要细节
- 风暴能打破水体重复的视觉模式,提升画面多样性
- 该功能增强了模拟的自然性和真实感
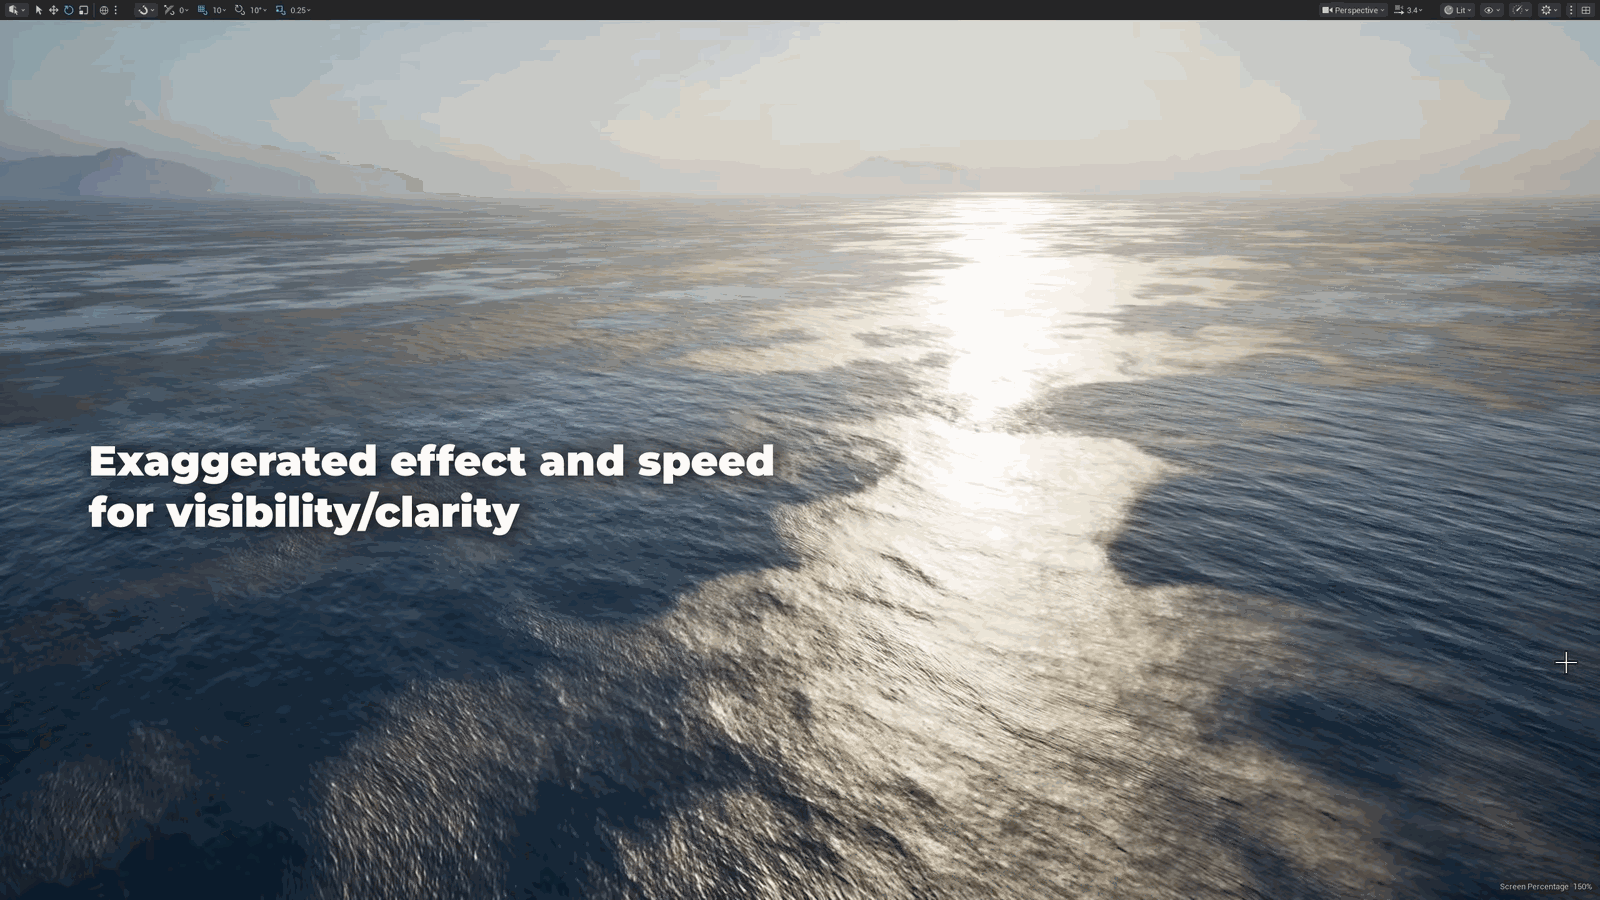
And lastly, wind gusts. Well, wind gusts. Just one more realism feature I wanted to include. One that breaks up the repetitive nature of water and literally adds variety to the simulation.
Slide 47 — 00:13:59
📌 要点汇总
- 使用三种技术叠加可以让水体看起来更生动,而非重复纹理
- Easy Water 提供三种不同的浮力类型,各有优缺点
- 最便宜但视觉效果最差的是材质函数(material function)
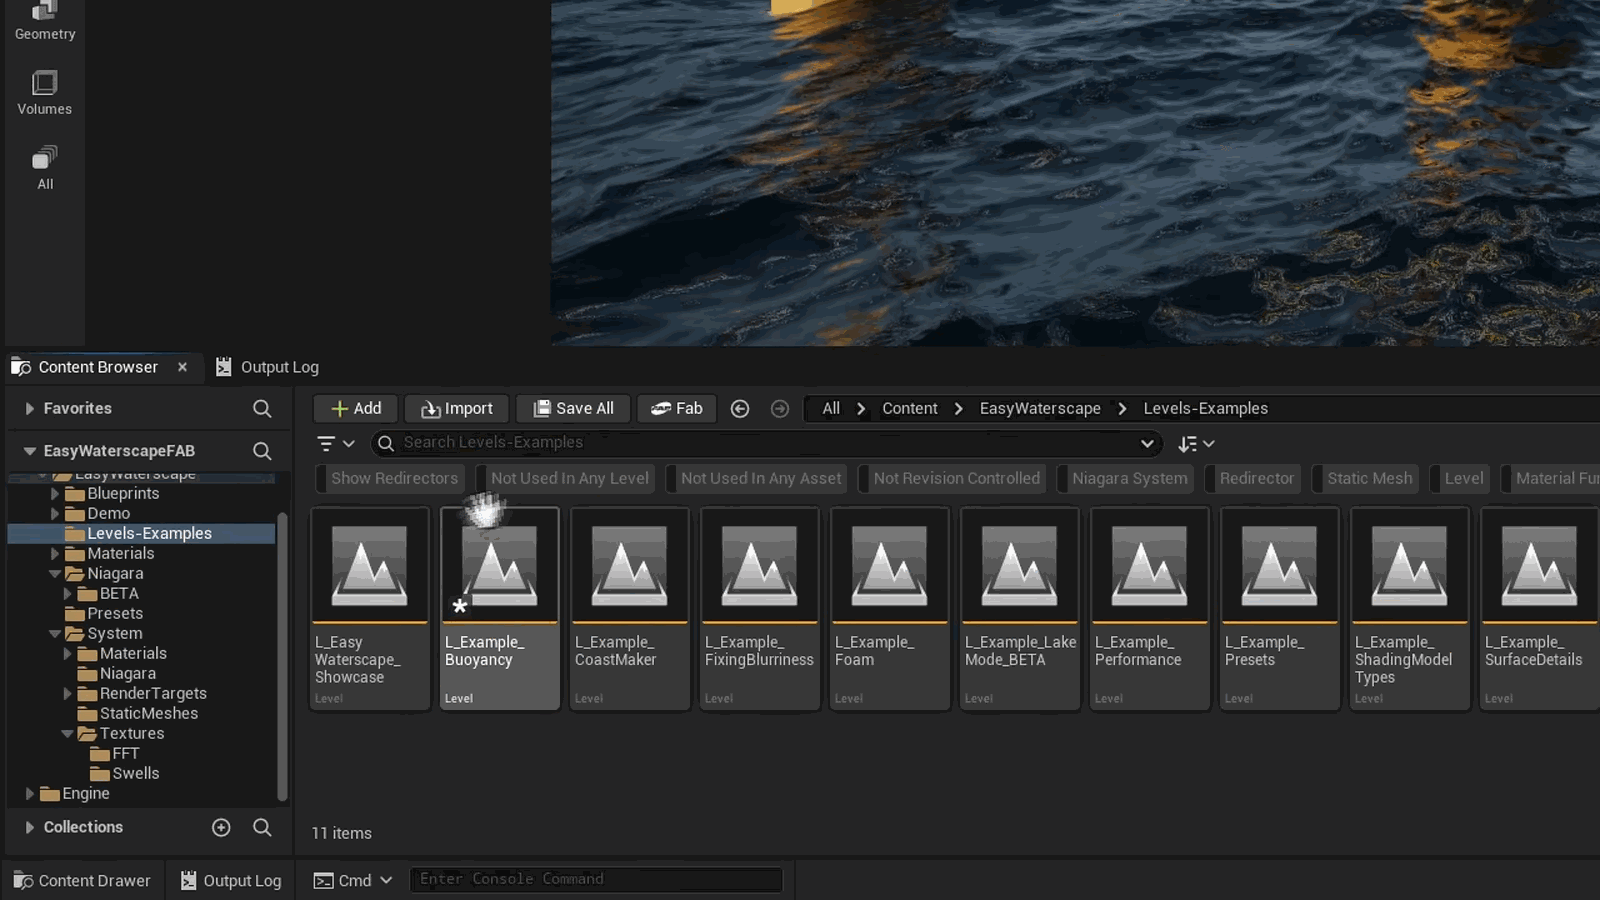
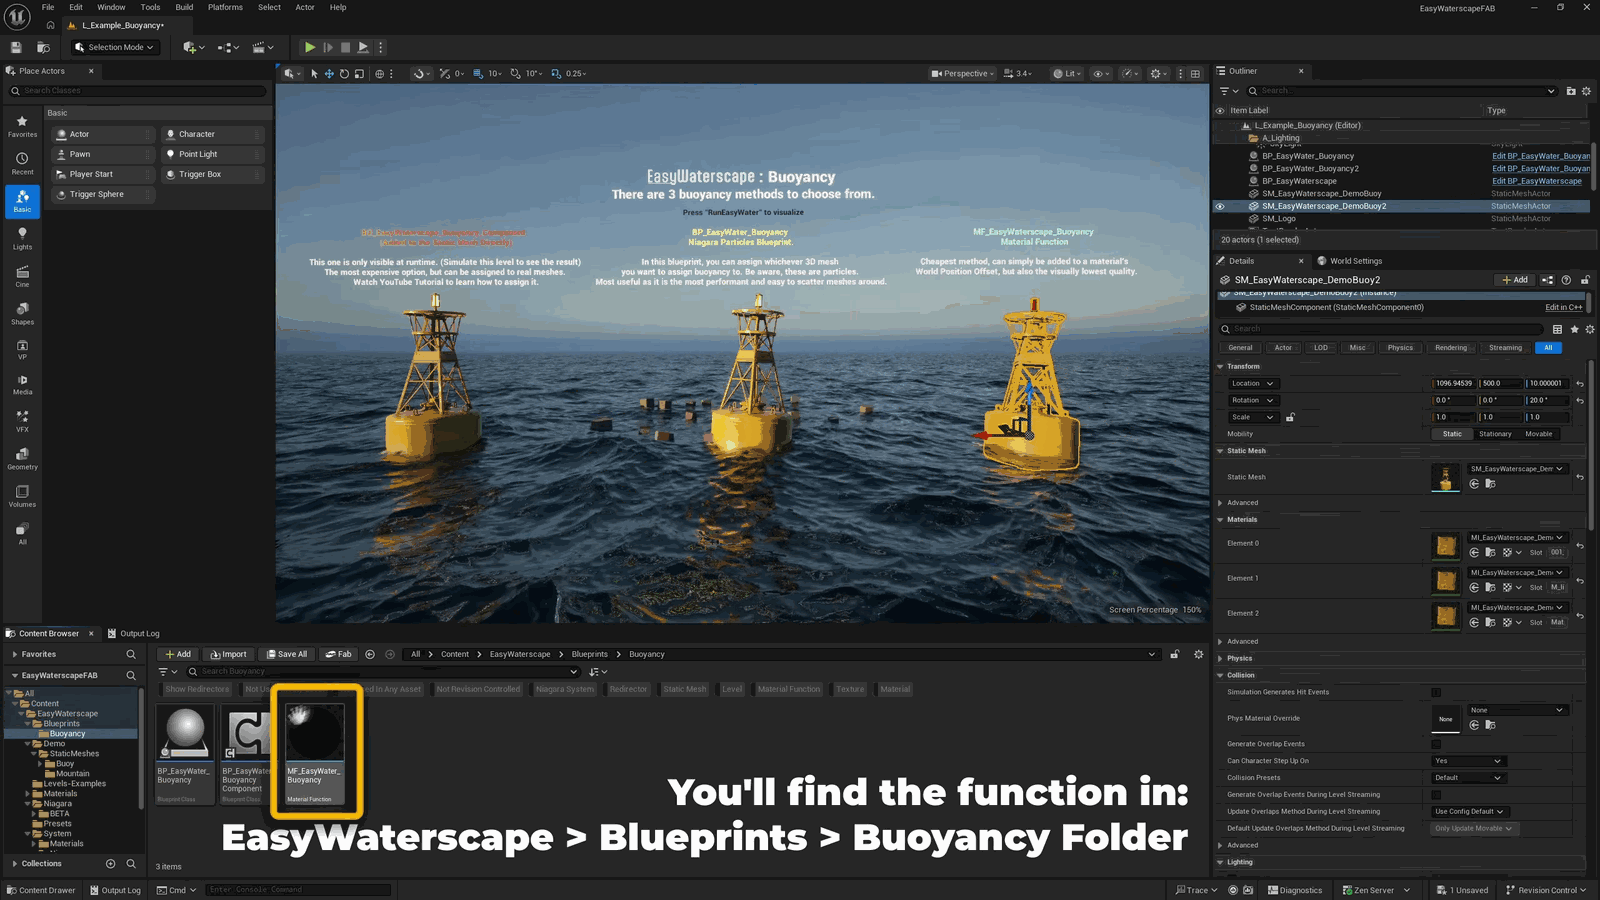
Breathe life into your environment. Stack all three, and your water stops looking like a repeating texture and feels alive. Easy Water offers three different types of buoyancy as well, each with their own pros and cons. First, and the cheapest, but lowest visual quality, is the material function.
Slide 48 — 00:14:12
📌 要点汇总
- 该方法通过连接世界位置偏移引脚实现材质的浮力效果
- 效果基于海洋波浪采样,而非真实物理模拟
You can slap it onto any material connected to the world position offset pin, and it’ll fake buoyancy by sampling the waves of the ocean. But bear in mind, there’s no actual physics.
Slide 49 — 00:14:26
📌 要点汇总
- Niagara Blueprint 适用于在背景中实现简单的移动效果
- 可以指定静态网格、生成数量、半径、缩放和缩放变化
- 适合在水面散落碎片或漂浮废墟
- 该系统性能优秀,运行在 GPU 上
- 浮力效果出色,若物体位置不对可轻微调整使其归位
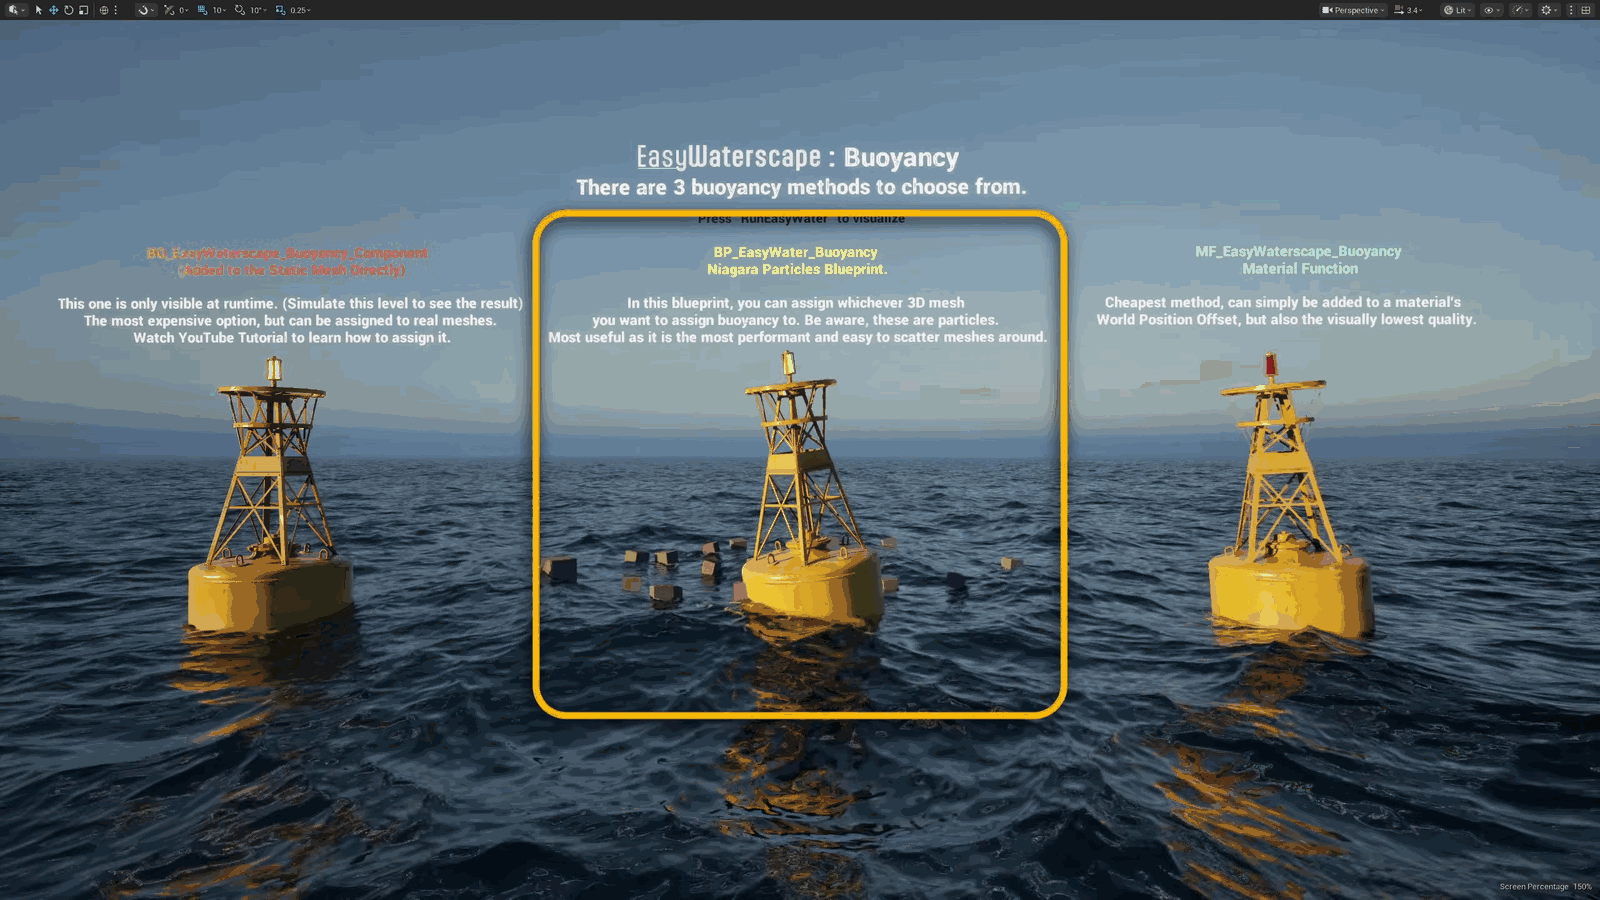
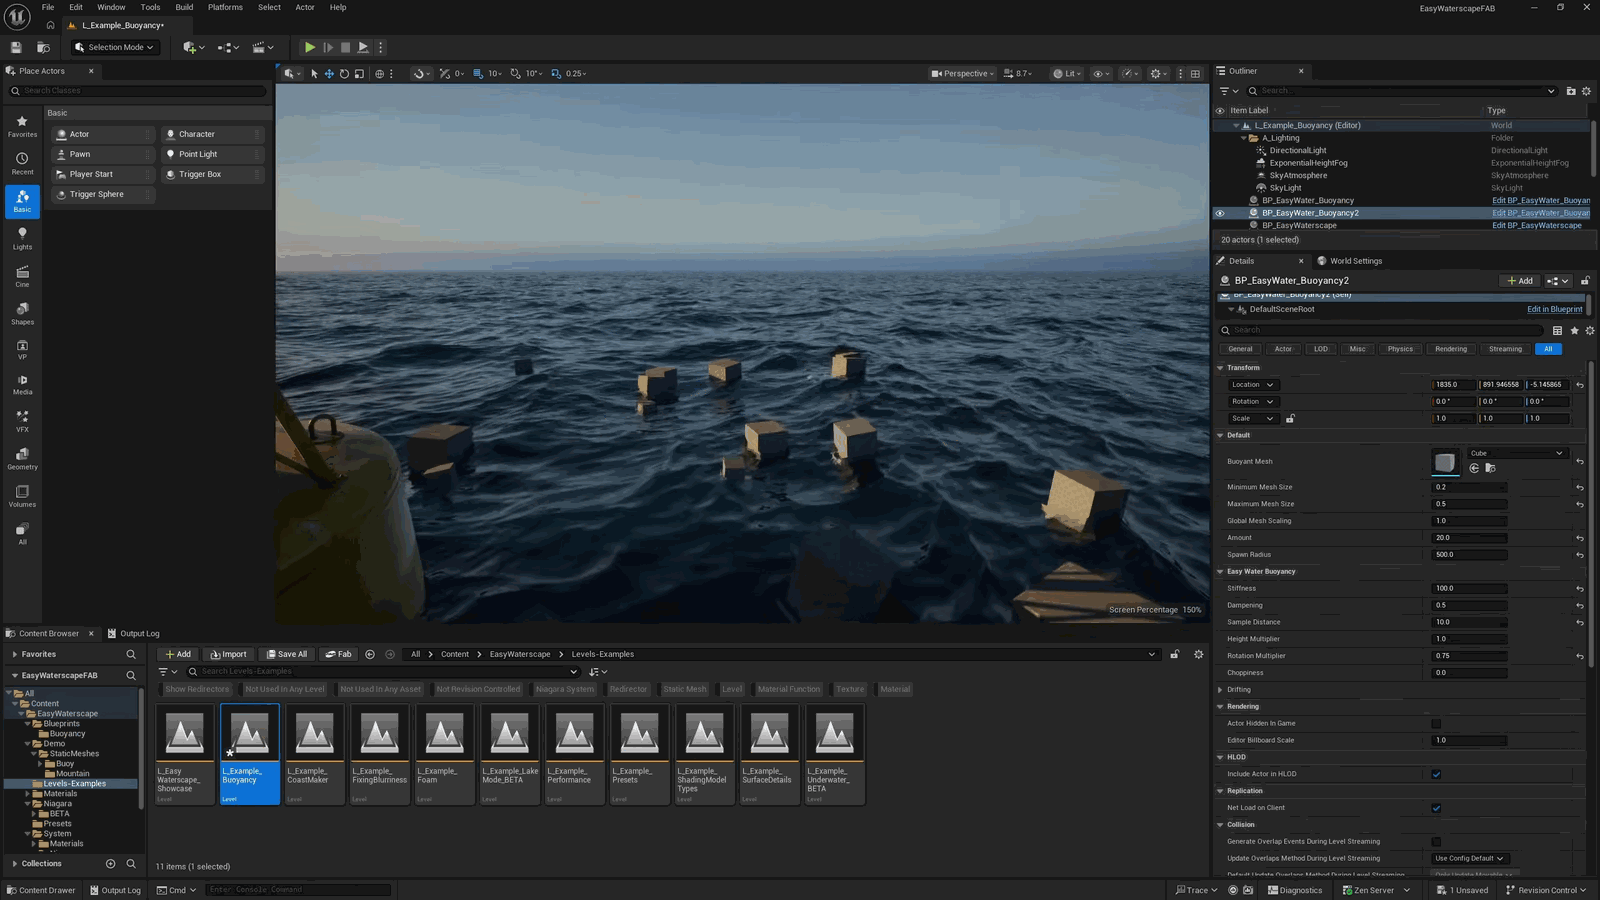
Involved here, so it looks bad. That said, it works great for simple movement in the background. Next, we have the Niagara Blueprint. You drop it into your level, assign a static mesh of your choice. You can choose how many objects you spawn, their radius, their scale, their scale variation. Perfect for scattering a bunch of debris or floating rubble on the water. This is the one you should be using most of the time. It is highly performant, runs on the GPU. The buoyancy looks great. And if you ever notice something not lining up or being a little floaty—no pun intended—just nudge it, and it’ll snap right into place.
Slide 50 — 00:14:54
(该幻灯片时间段内未检测到语音内容)
Slide 51 — 00:15:03
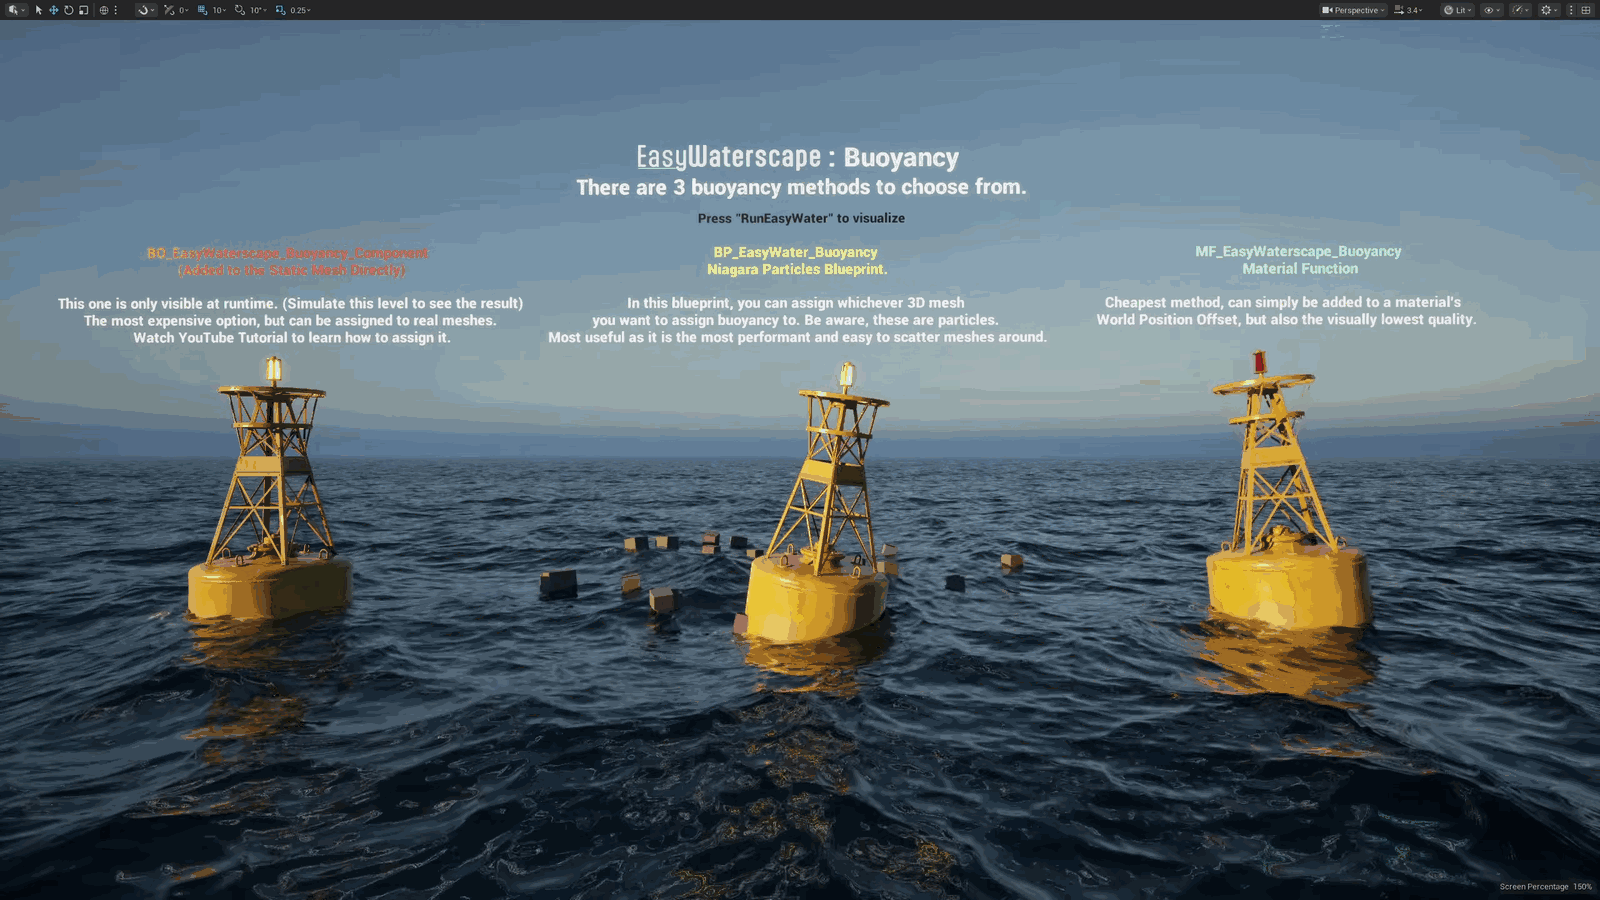
📌 要点汇总
- 蓝图组件可分配到静态网格、动画蓝图、摄像机等几乎所有对象
- 不适合需要复杂逻辑或游戏机制的主角对象
Lastly, there’s a blueprint component that you can assign to just about anything—a static mesh, an animation blueprint, a camera, whatever. This isn’t ideal for hero objects that need logic or gameplay mechanics.
Slide 52 — 00:15:11
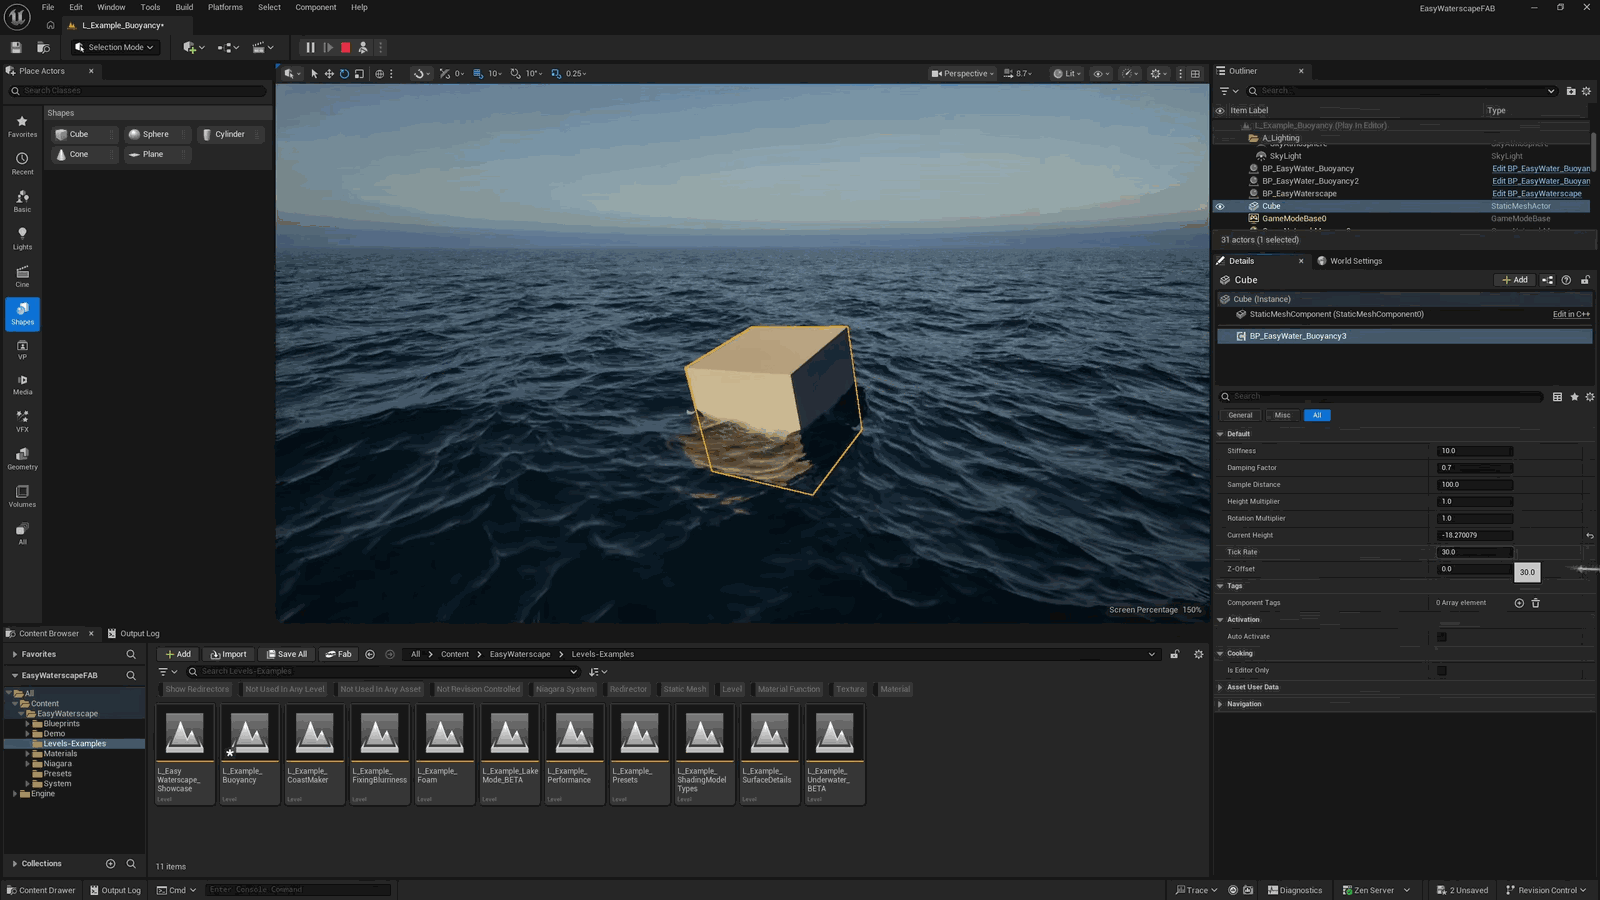
📌 要点汇总
- 与 Niagara blueprint 行为一致,提供相同控制选项
- 通过 Add Component 添加 Easy Water 组件
- 确保对象设置为 movable
- 可通过 Pi 模式或编辑器模拟查看效果
- 有帧率限制器以优化性能,但会直接影响视觉效果
- 可根据需要降低帧率限制器数值
It behaves the same way as the Niagara blueprint, with the same controls exposed. Just select your actor, click Add Component, and search for Easy Water in the list here. Make sure your object is set to movable. To see how it looks, jump into Pi mode or simulate in editor. There’s a tick rate limiter for performance. Just be aware it has an immediate impact on how things look. At least you have the option to lower it if you need to.
This is probably.
Slide 53 — 00:15:42
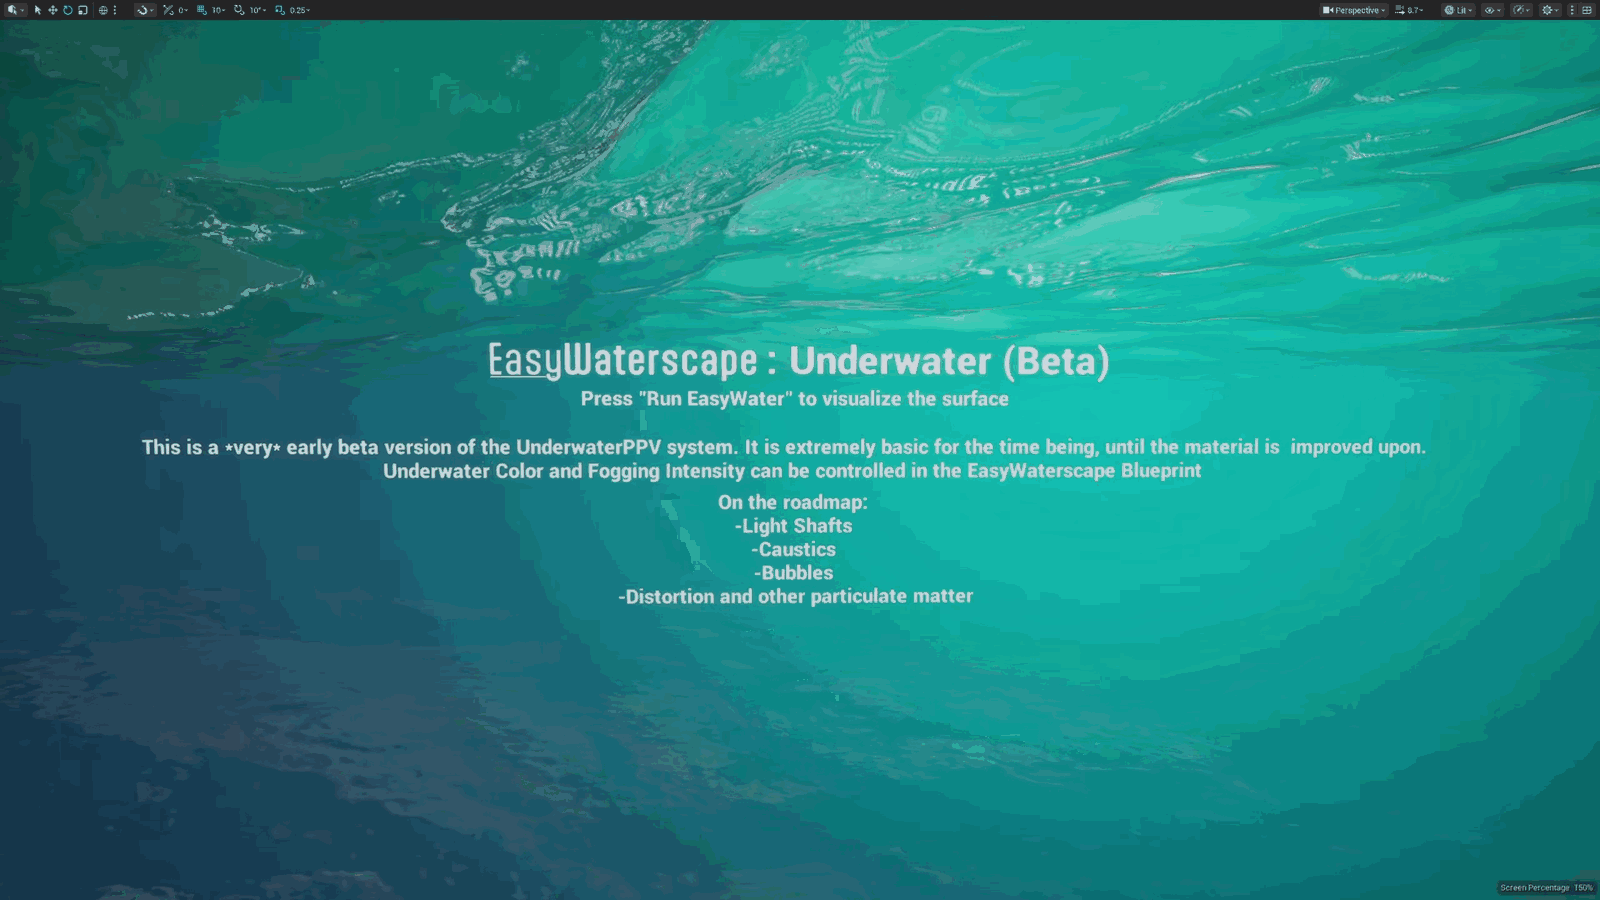
📌 要点汇总
- 该功能将收到最多反馈,这是设计使然
- 与用户共同构建浮力系统,以提供项目需求反馈
- 版本 1.0 将包含水下选项,对许多拍摄场景至关重要
- 水下功能是工具中最早期的特性,后续将大量开发完善
The part that’ll get the most feedback, and that is by design. I want to build out the buoyancy system together with you, so I can give some feedback on what your project needs. Next, I have two features that are in beta. I want version 1.0 to ship with an underwater option because, for a lot of shots, it’s kind of essential. So it’s in there. It’s the most early-stage feature in the tool, and I’ll be building it out a lot.
Slide 54 — 00:16:03
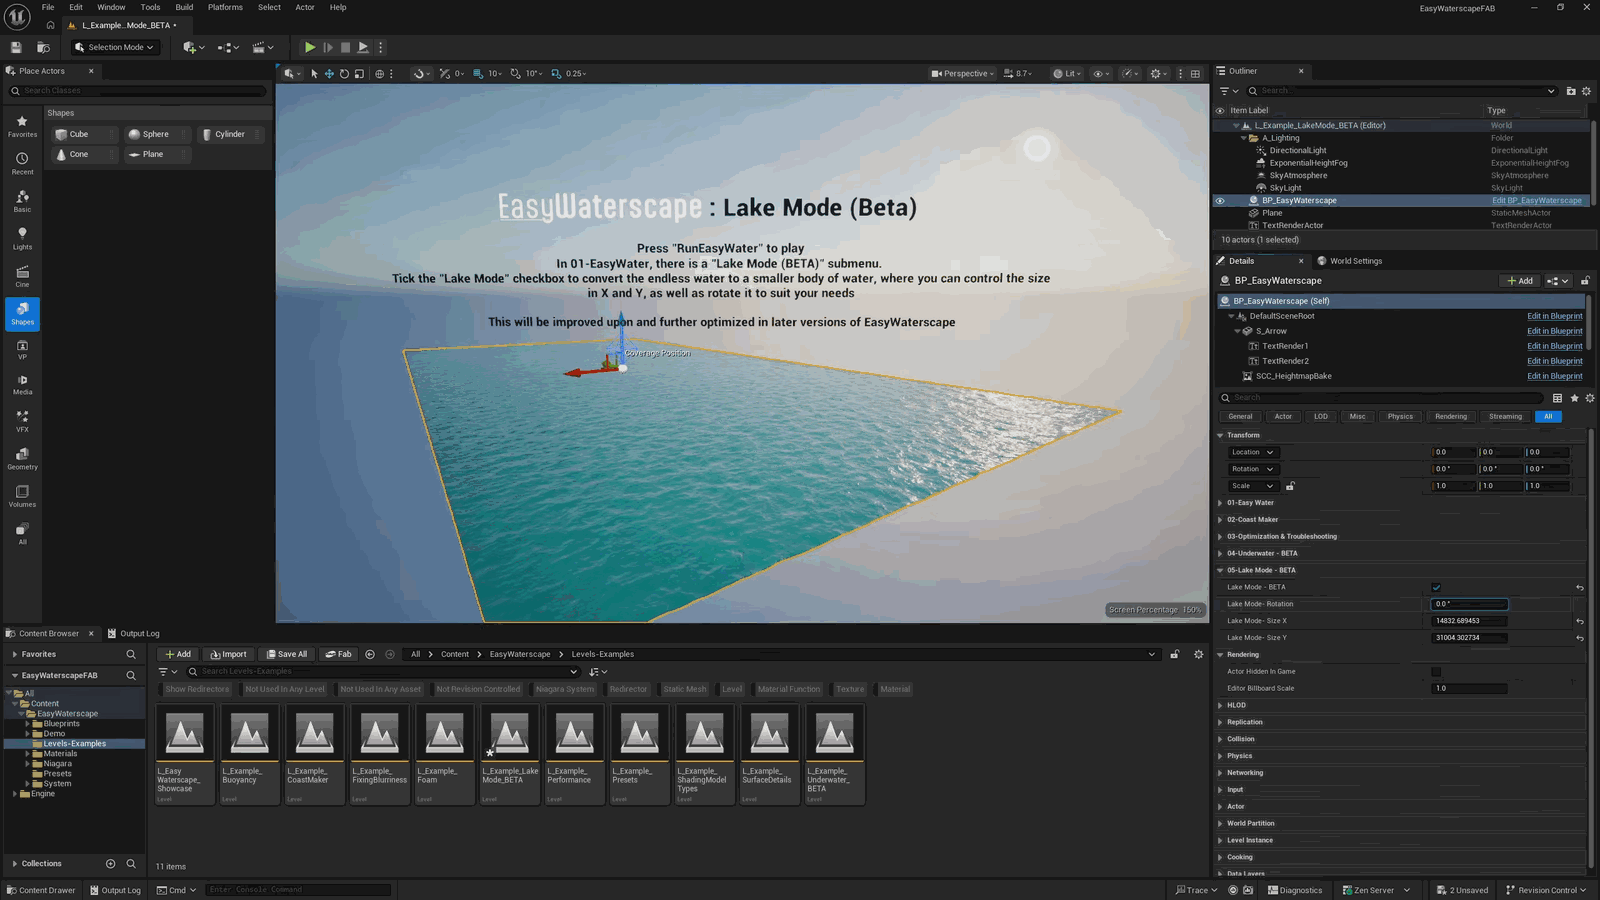
📌 要点汇总
- 添加上帝之光、颗粒物、气泡和扭曲效果,作为基础功能
- 湖泊模式允许用户塑造和旋转水面,适用于非无限海洋场景
- 湖泊模式仍在完善中,未来将提升其稳定性和效率
Adding God rays, particulate matter, bubbles, and distortion. So think of this as the foundation. There’s plenty more coming. Lake mode is for when you don’t want an endless ocean stretching out to the horizon. It lets you shape and rotate your water to sit exactly where you need it. Just tick the lake mode checkbox and adjust it from there. It’s still maturing. I’ll make it a lot more robust and efficient down the line.
Slide 55 — 00:16:25
📌 要点汇总
- 可加载自定义网格并禁用摄像机跟随,实现精确的水面平面
- 提供材质函数,在网格底部沿海岸线添加湿润和变暗效果
- 材质函数读取精确水位,确保与水面对齐
- 只需将材质函数添加到主材质中即可使用
- 支持材质属性和普通引脚,通过静态布尔值指定类型
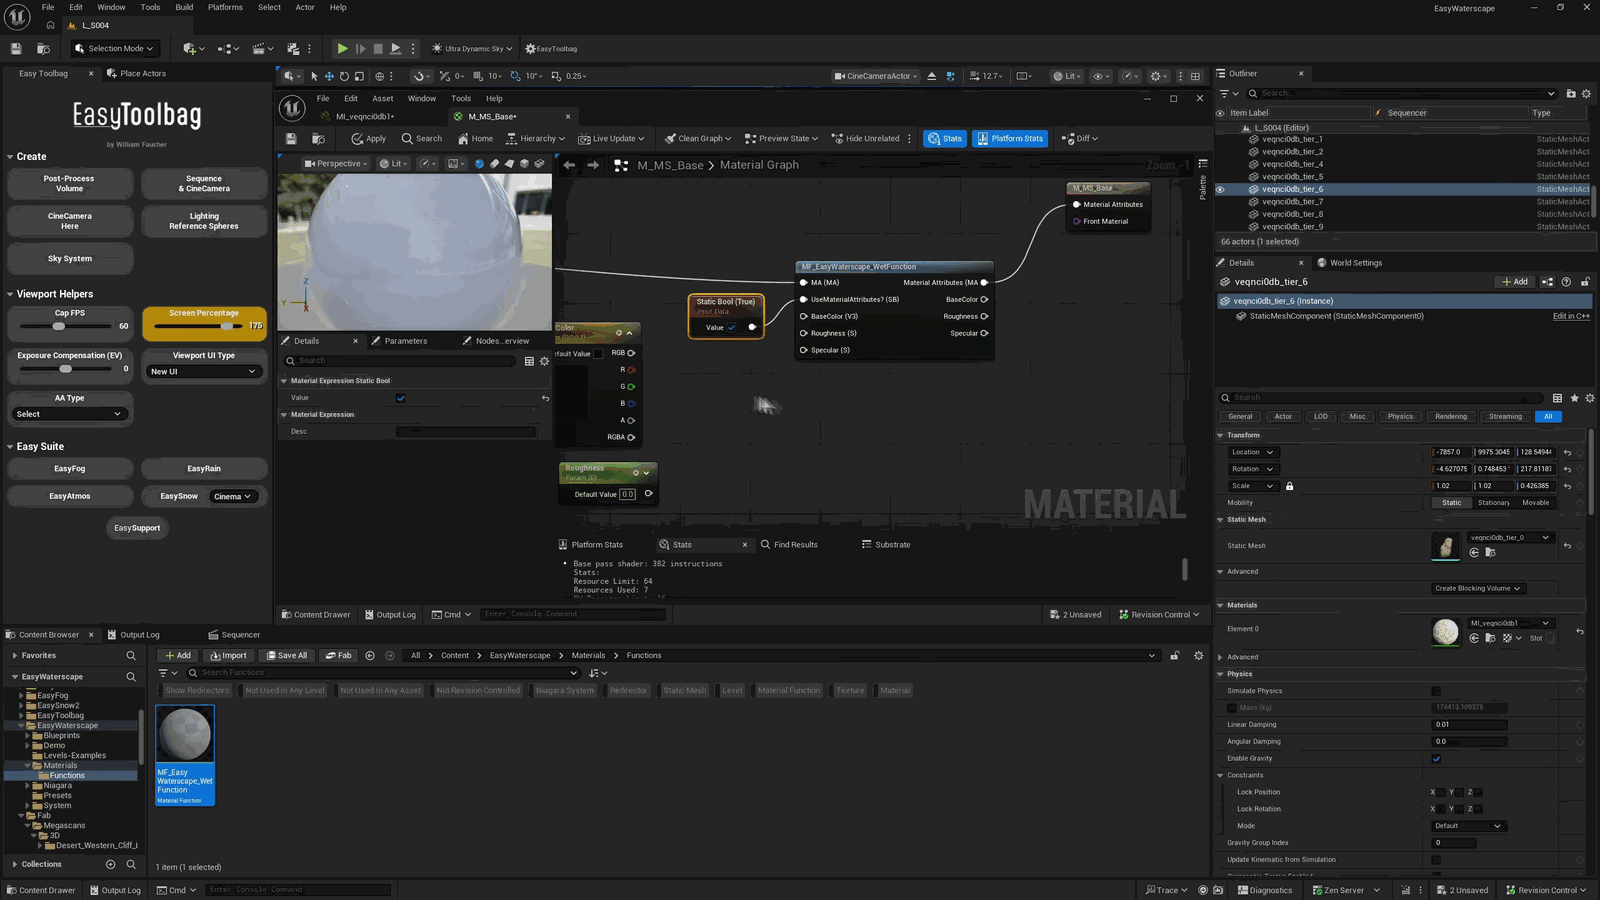
And remember, if you’d rather use your own mesh, you can load a custom one right here and disable camera follow here, giving you a water plane that is exactly what you need and where you need it. Included is a material function that adds wetness and darkening around the base of your meshes right along the coastline. It reads the exact water level, so it always lines up. All you have to do is add this material function to your master material. It supports both material attributes and regular pins. You just designate which one with a static boolean here. Once you’ve compiled your master material.
Slide 56 — 00:17:02
📌 要点汇总
- 将湿感效果应用到 Megascans 主材质中
- 每个 Megascans 资产都自动带有湿感属性
- 可通过材质实例调整各材质的湿感变量
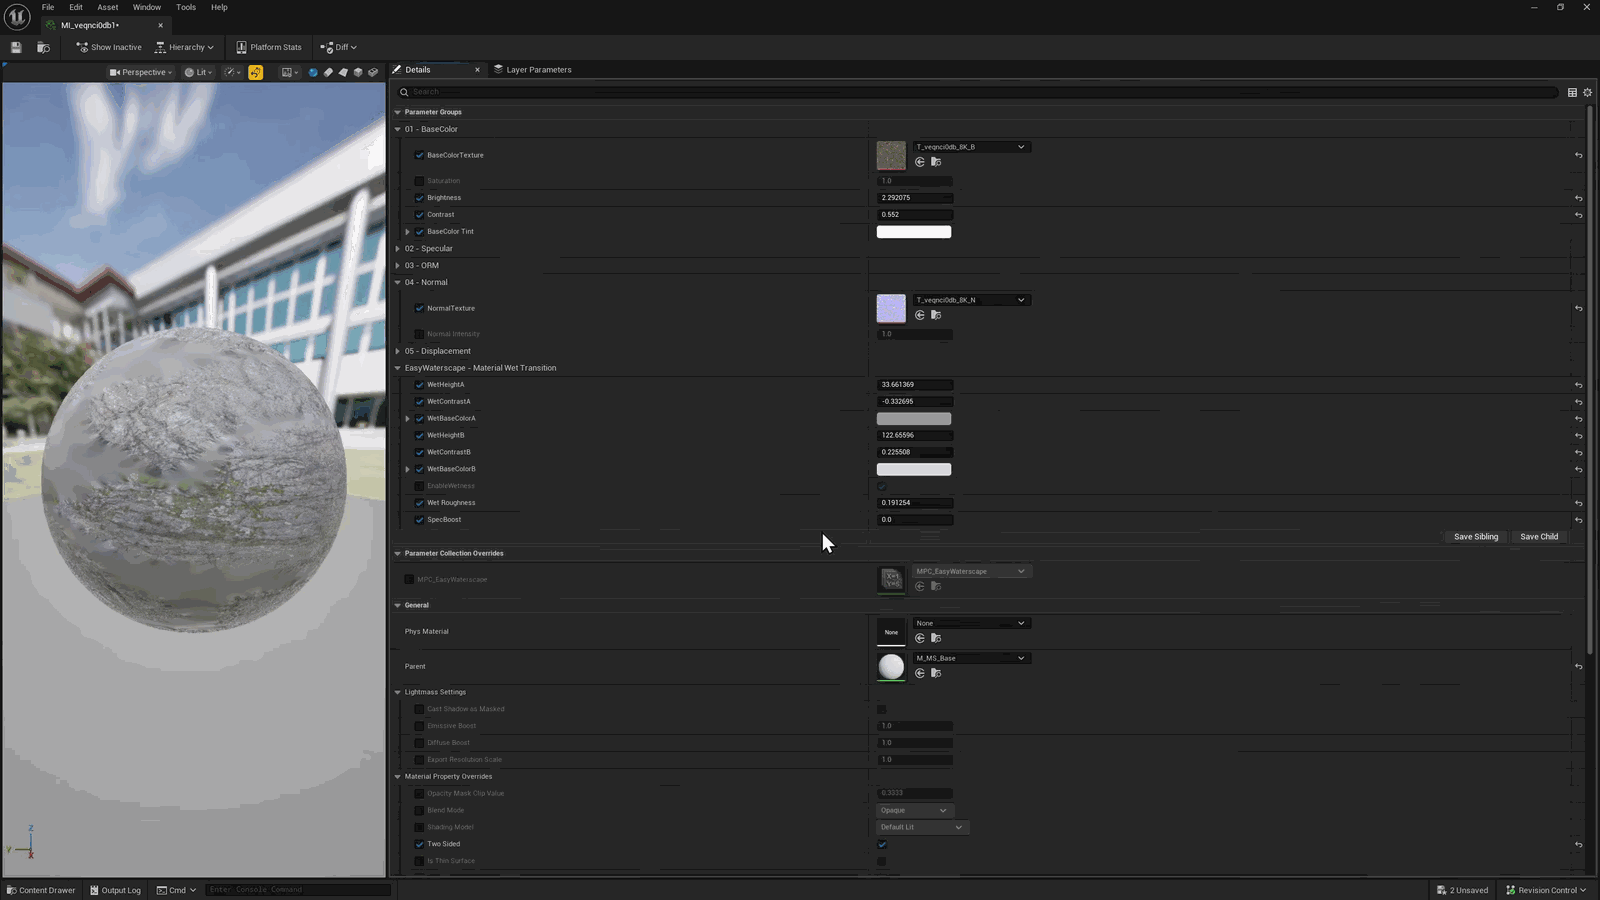
In this case, I applied it to my Megascans master material. Every Megascans asset now has this wetness applied to it. Open up the material instance of your choice, and you’ll find the wetness variables ready for you to adjust on a per-material basis.
Slide 57 — 00:17:18
📌 要点汇总
- 单层水是Unreal Engine中渲染水的默认标准方案
- 单层水效果非常出色,视觉表现优秀
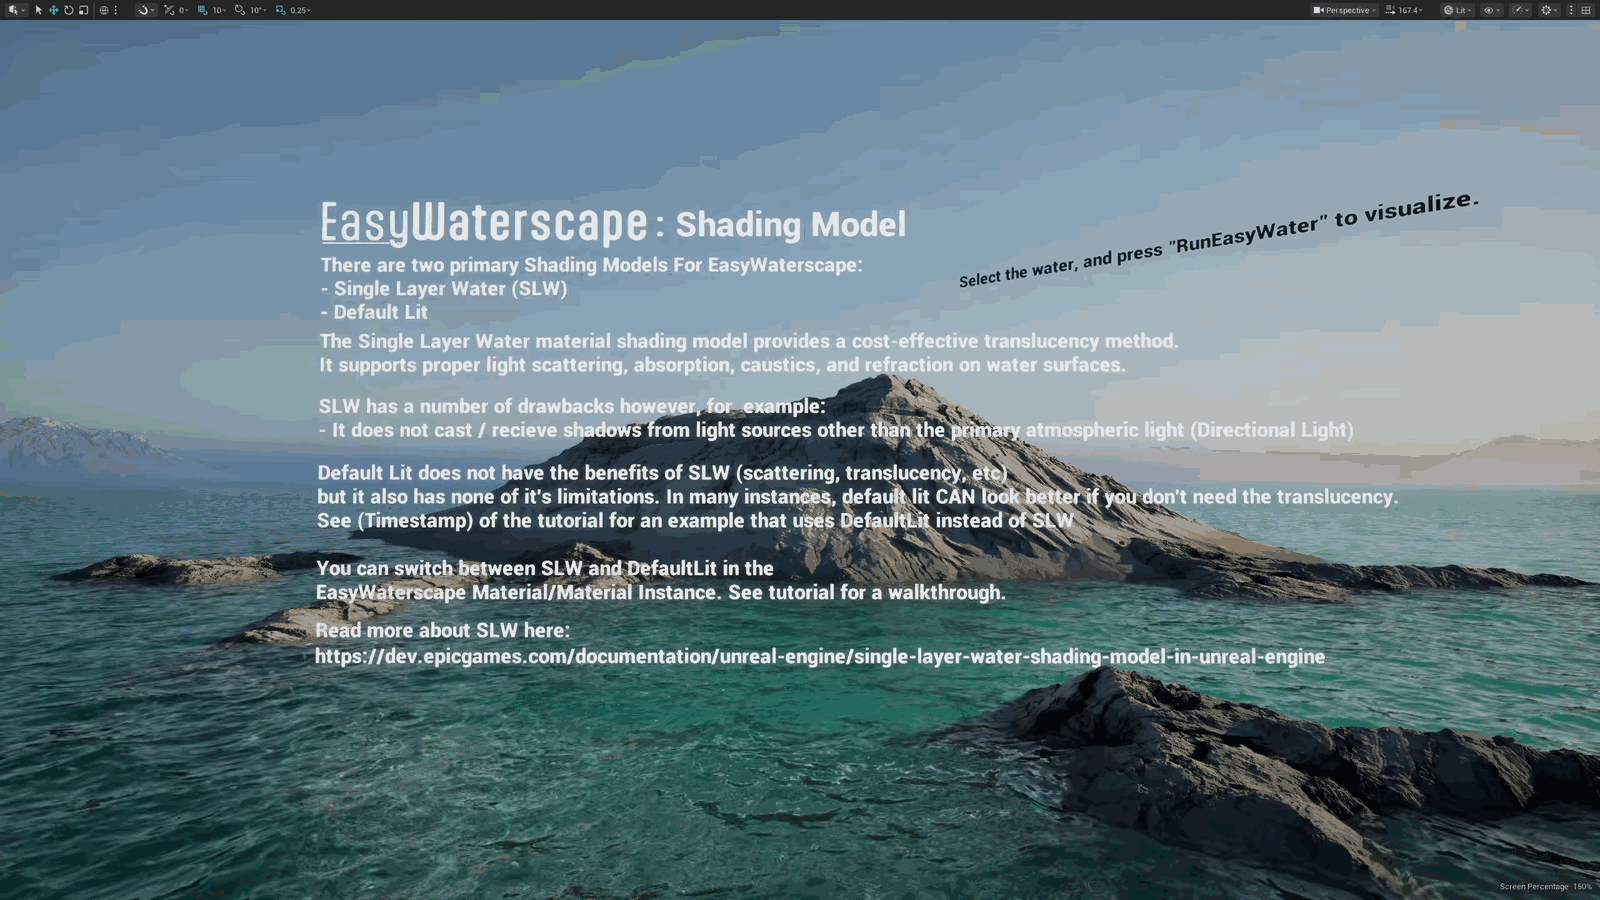
Single-layer water is the de facto standard for rendering water in Unreal Engine. It looks amazing.
Slide 58 — 00:17:24
📌 要点汇总
- 使用该技术时无法接收或投射除主定向光源外的其他光源阴影
- 在需要复杂光影效果的场景中可能无法达到预期效果
- 示例中因岩石未投射阴影导致整体视觉效果受损
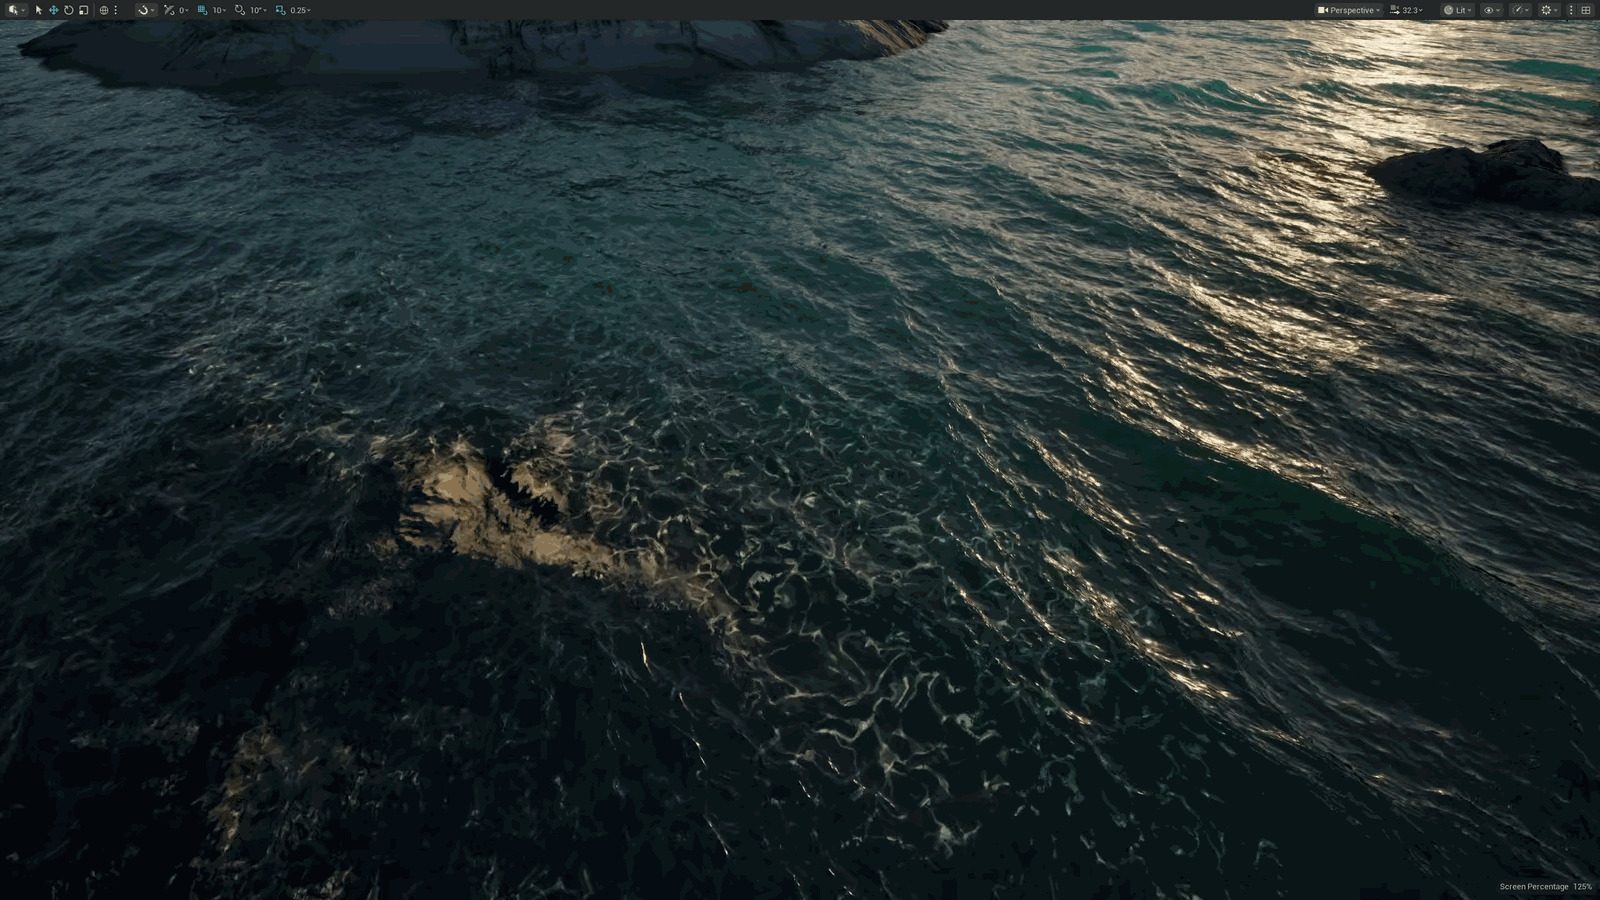
You get translucency and caustics, but it does come with a few drawbacks. For example, it won’t cast or receive shadows from any light other than your primary directional light. Most of the time, that’s totally okay. But in some situations, like this here, where you want more dramatic lighting, it just won’t work. This shot was primarily lit with one spotlight, and because there’s no shadows being cast by this rock here, the whole illusion falls apart. That is when…
Slide 59 — 00:17:55
📌 要点汇总
- 默认光照在不需要透明效果的场景中表现更佳
- 将金属值设为1可增强材质表现
- 参考图中的水色较暗且深,适合使用默认光照
- 默认光照能有效模拟深色水体效果
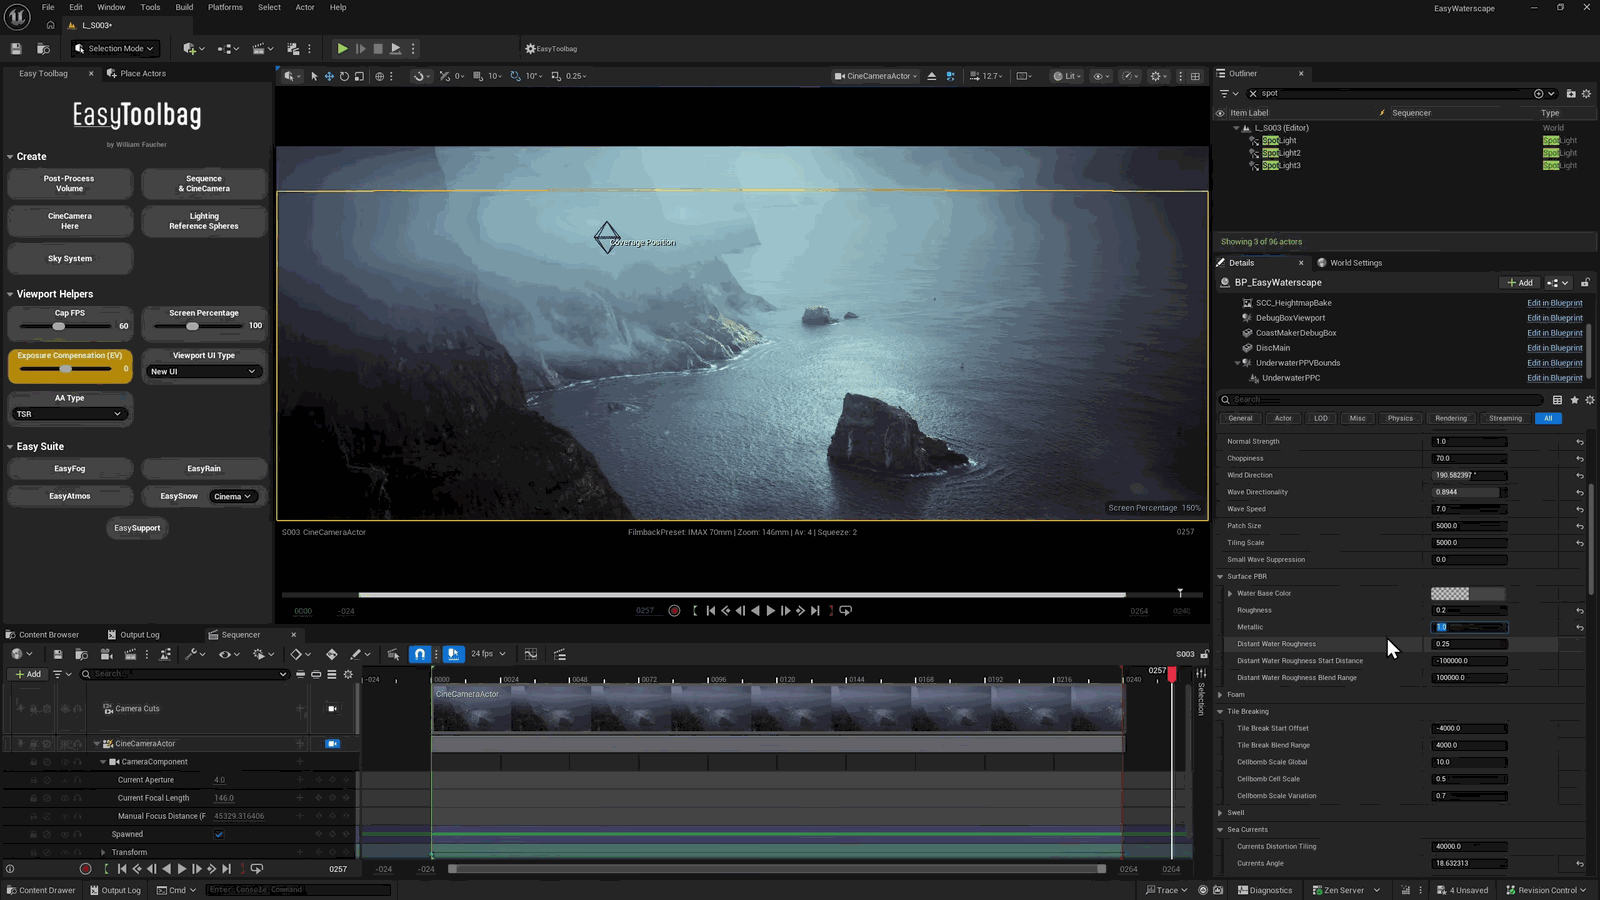
Over to default lit in shots where you don’t actually need translucency can work way better. In this one, I also set the metallic value to one to make it look better. See here — the water in my reference is just kind of dark and deep, and that is exactly the kind of look that lets us get away with default lit.
Slide 60 — 00:18:06
📌 要点汇总
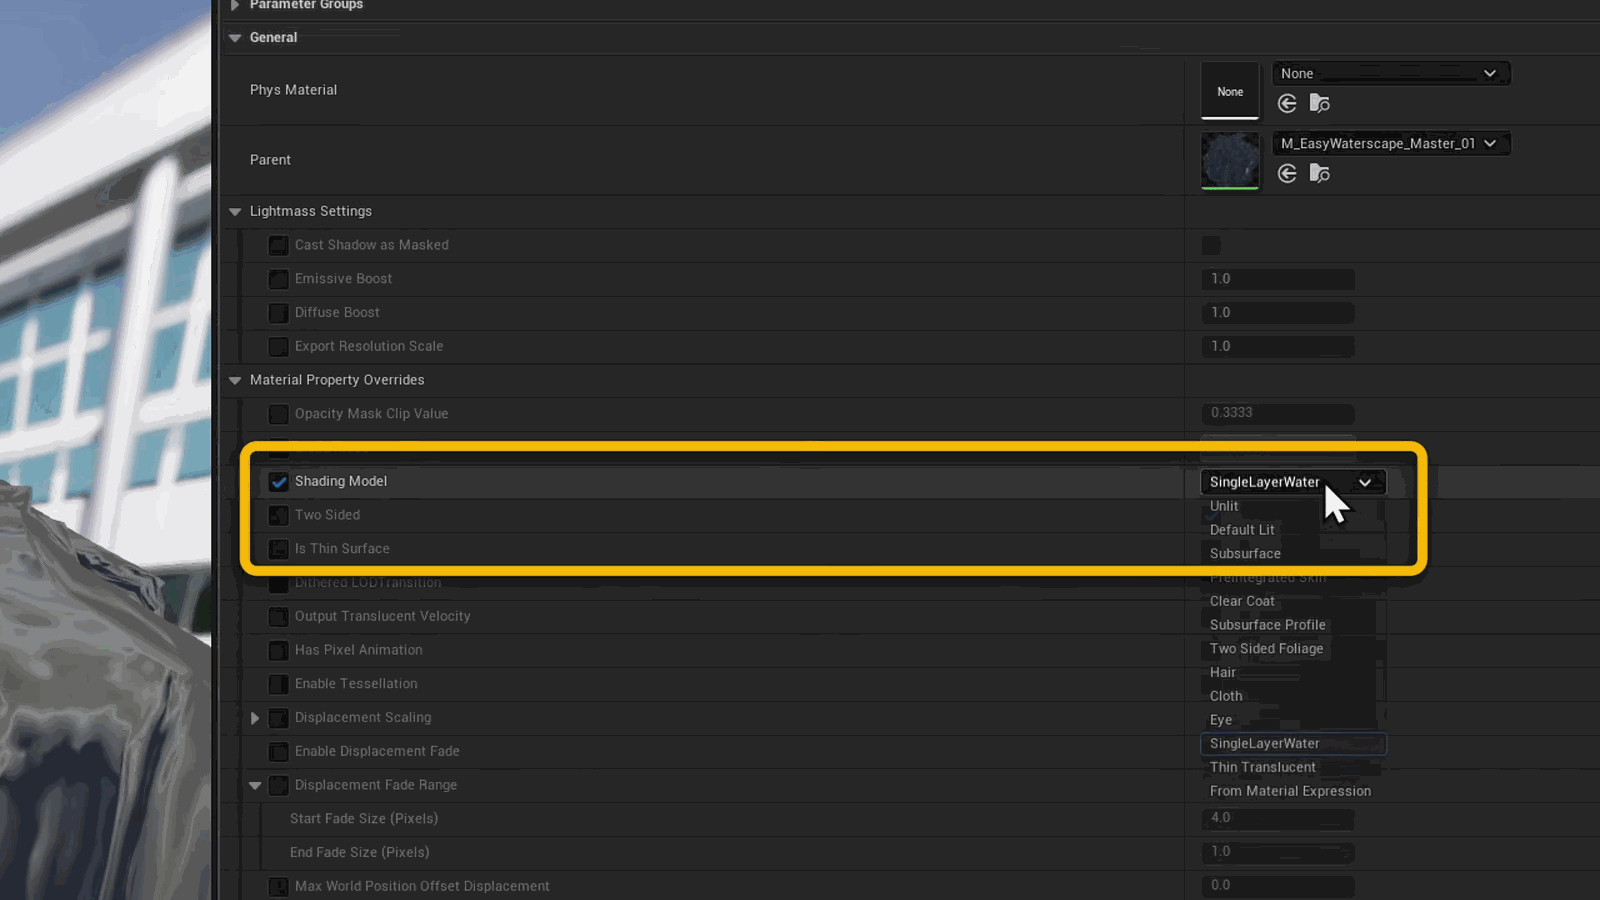
- 通过打开 Easy Waterscape 材质实例并更改着色模型来切换效果
- 该方法已被验证为最优方案,无需其他替代方案
To switch it, open up your Easy Waterscape material instance, search for a shading model, and change it over here. There is no one better.
Slide 61 — 00:18:22
📌 要点汇总
- 可以控制默认光照和单层水体的水面值,便于优化和修复
- 该标签页包含多个复选框,用于在特定情况下进行调整
- 材料实例中新增了优化部分,可快速禁用波浪、洋流等特性以减少指令数量
- 所有切换选项集中在一个位置,避免在不同分类中反复查找
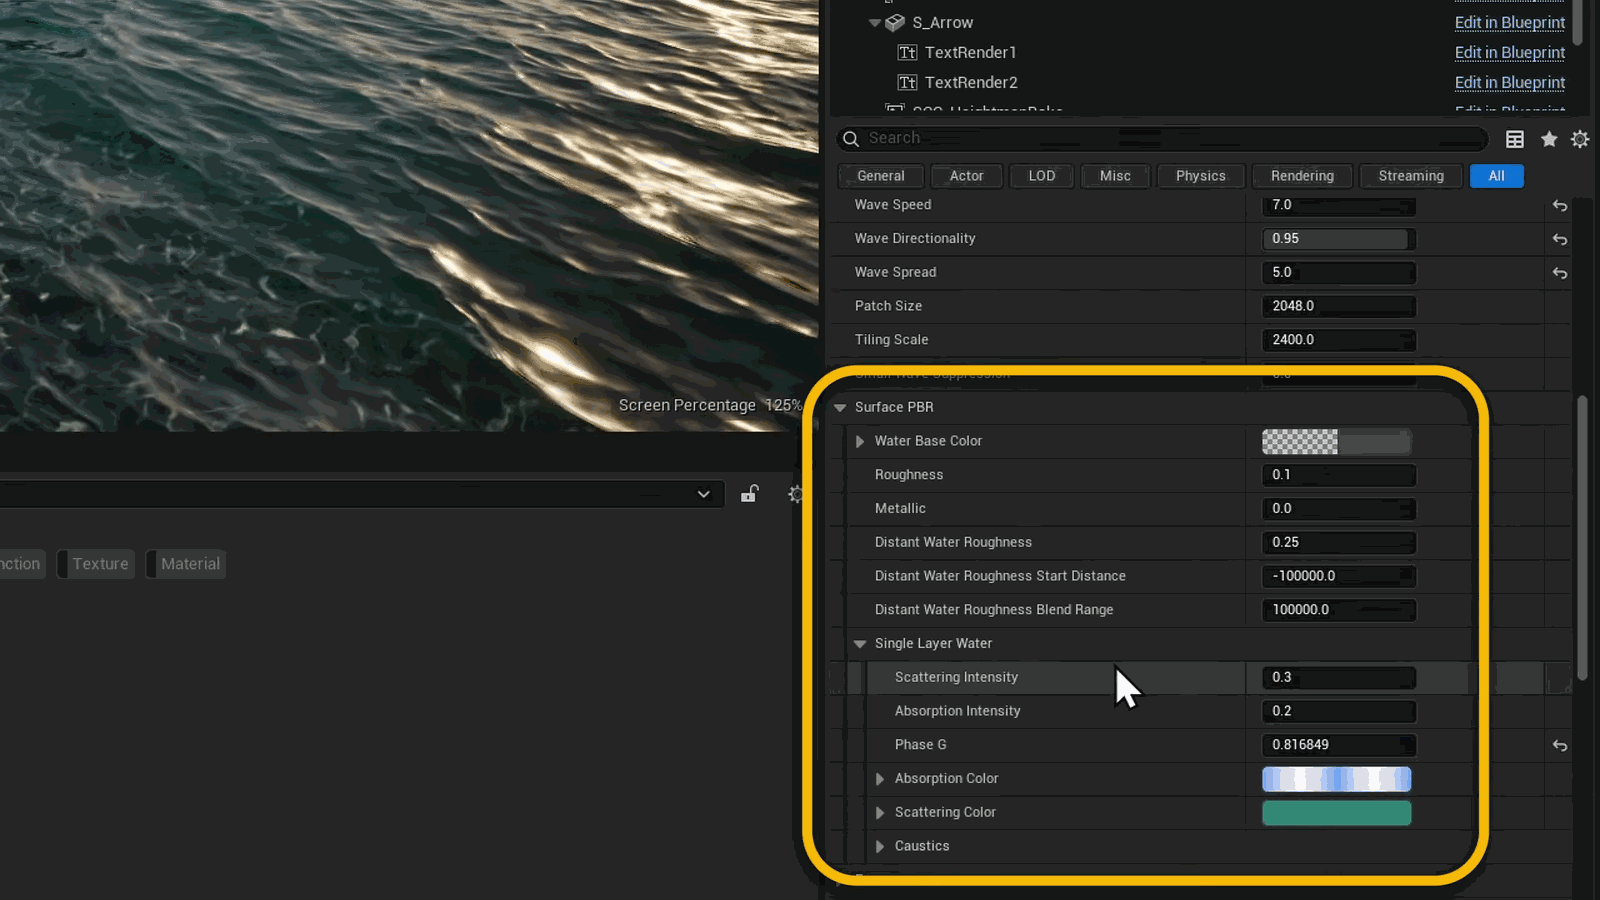
Than the other, it always depends on your shot and what you need. There are pros and cons to both. Worth mentioning, you can control your water surface values for both the default lit and single-layer water right here. I made sure it’s as easy as possible for people to optimize and fix things easily.
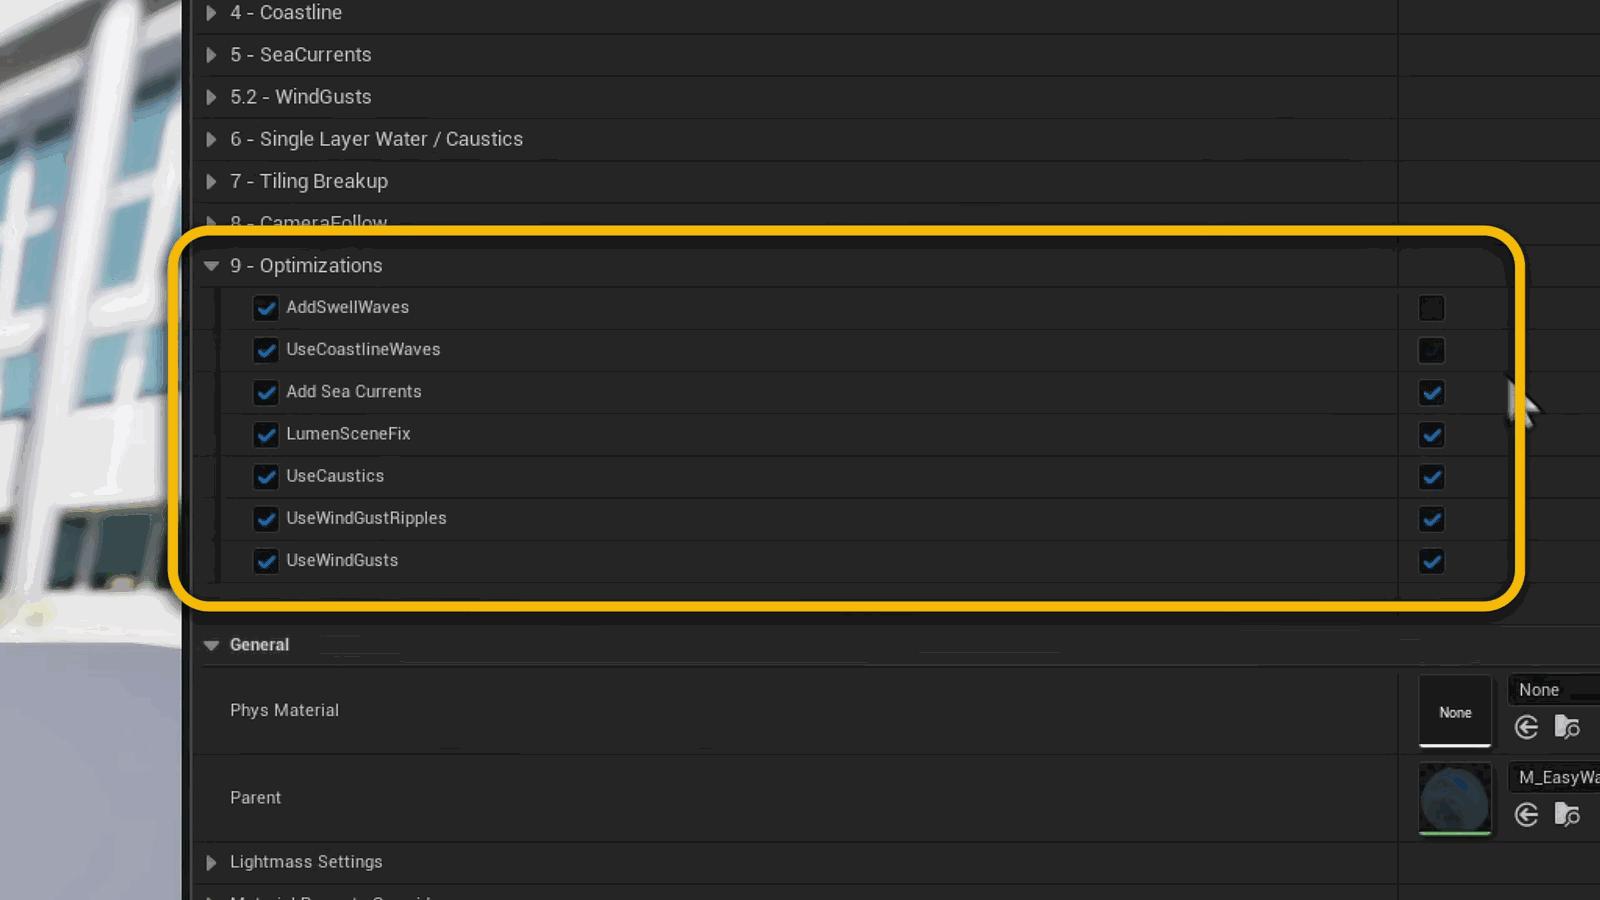
In this tab here, you’ll find a few checkboxes that can help you out in some situations. In the material instance itself, I added a dedicated optimization section where you can quickly find and disable features like swells, currents, and coast waves to drop your instruction count when you need it. I liberally put every toggle in one place, rather than scattered across each category, so you’re not dancing around the groups hunting for them.
Slide 62 — 00:18:56
(该幻灯片时间段内未检测到语音内容)
Slide 63 — 00:19:03
📌 要点汇总
- 帧率应尽可能降低以平衡性能与质量
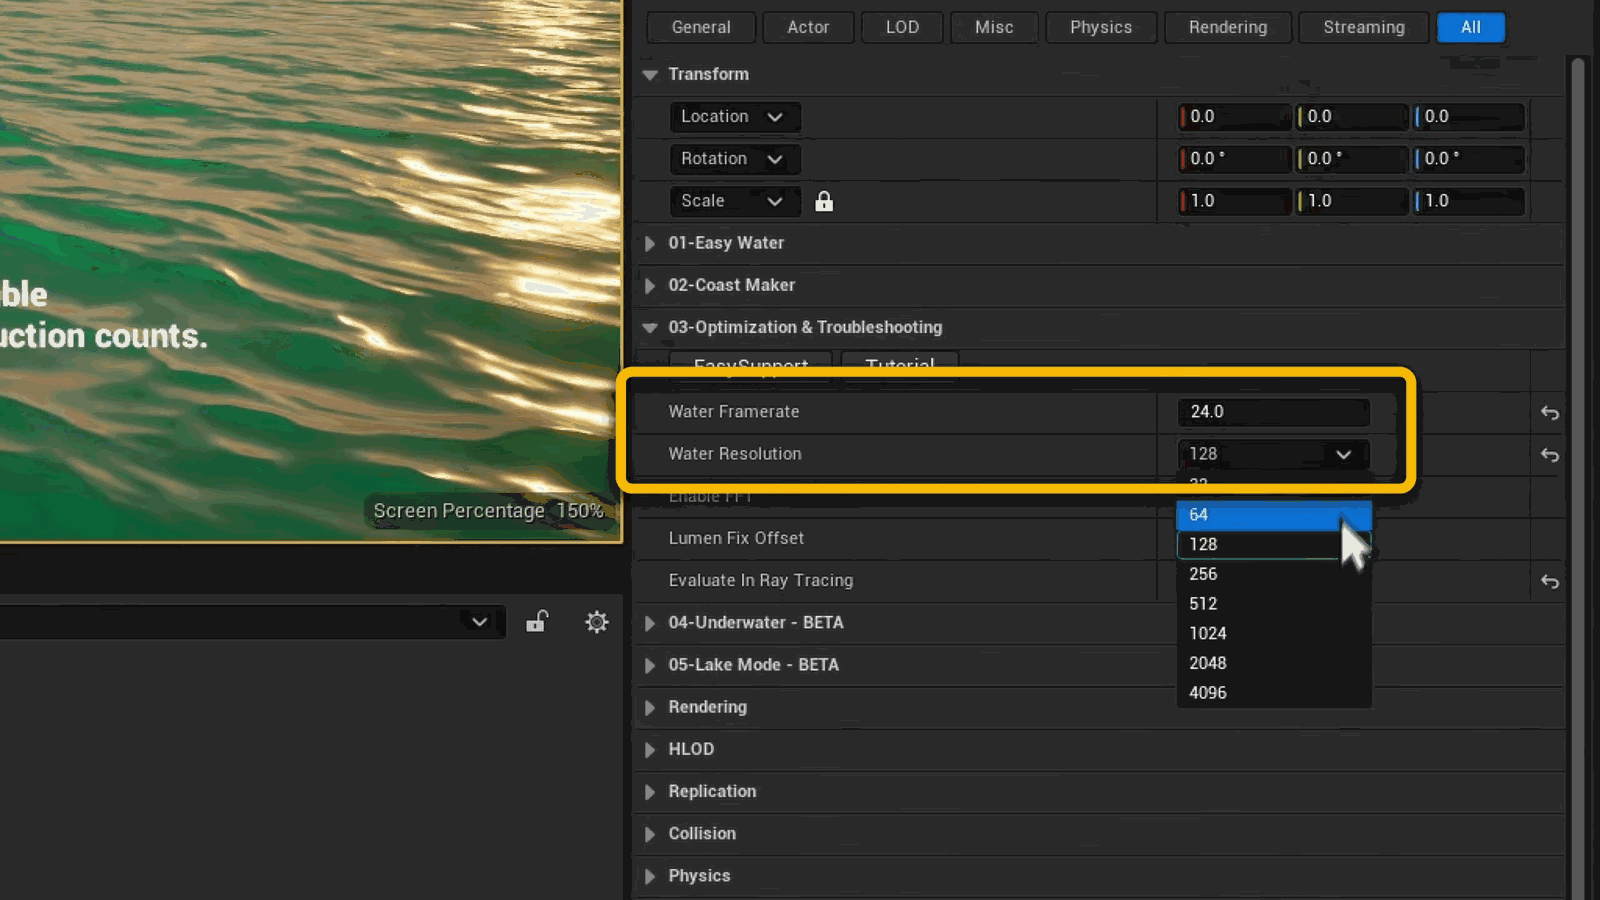
- 分辨率和帧率是影响性能与质量的关键参数
As I talked about in the beginning of the video, resolution and frame rate are the main dials for balancing performance and quality. You’re going to want to keep the frame rate as low as you can get away with.
Slide 64 — 00:19:14
📌 要点汇总
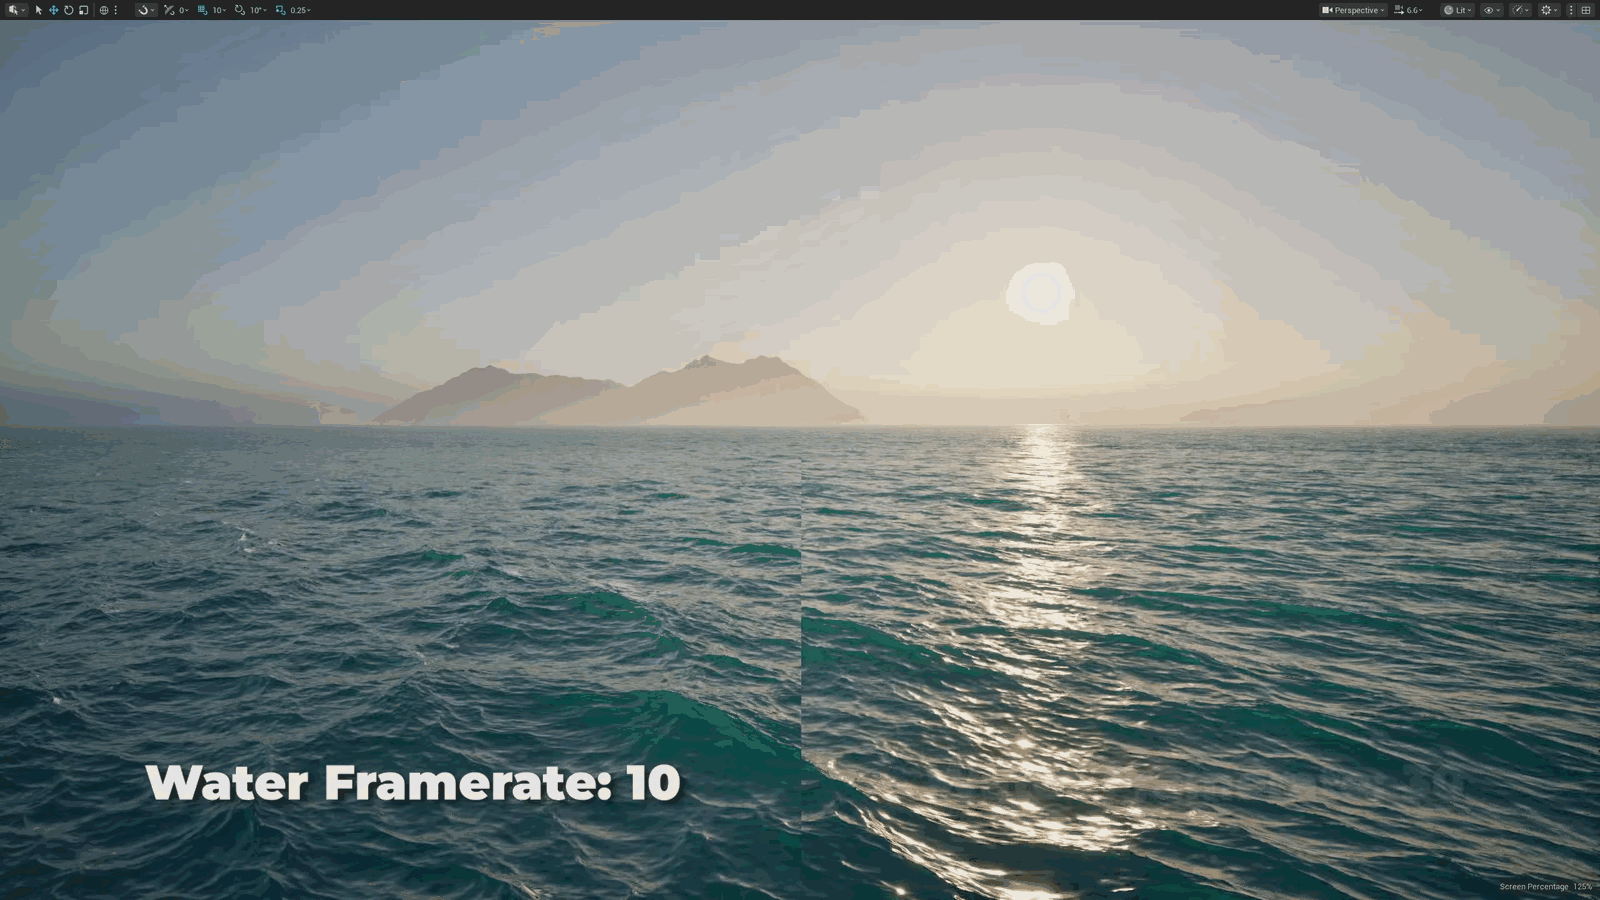
- 水面拍摄时,相机距离较远可能导致水位下降不易察觉
- 航拍时,水位可低至10到15厘米仍可接受
You would be surprised how low it can go before you notice, especially if your camera is far away from the water. For aerial shots, sometimes even 10 to 15 works.
Slide 65 — 00:19:20
📌 要点汇总
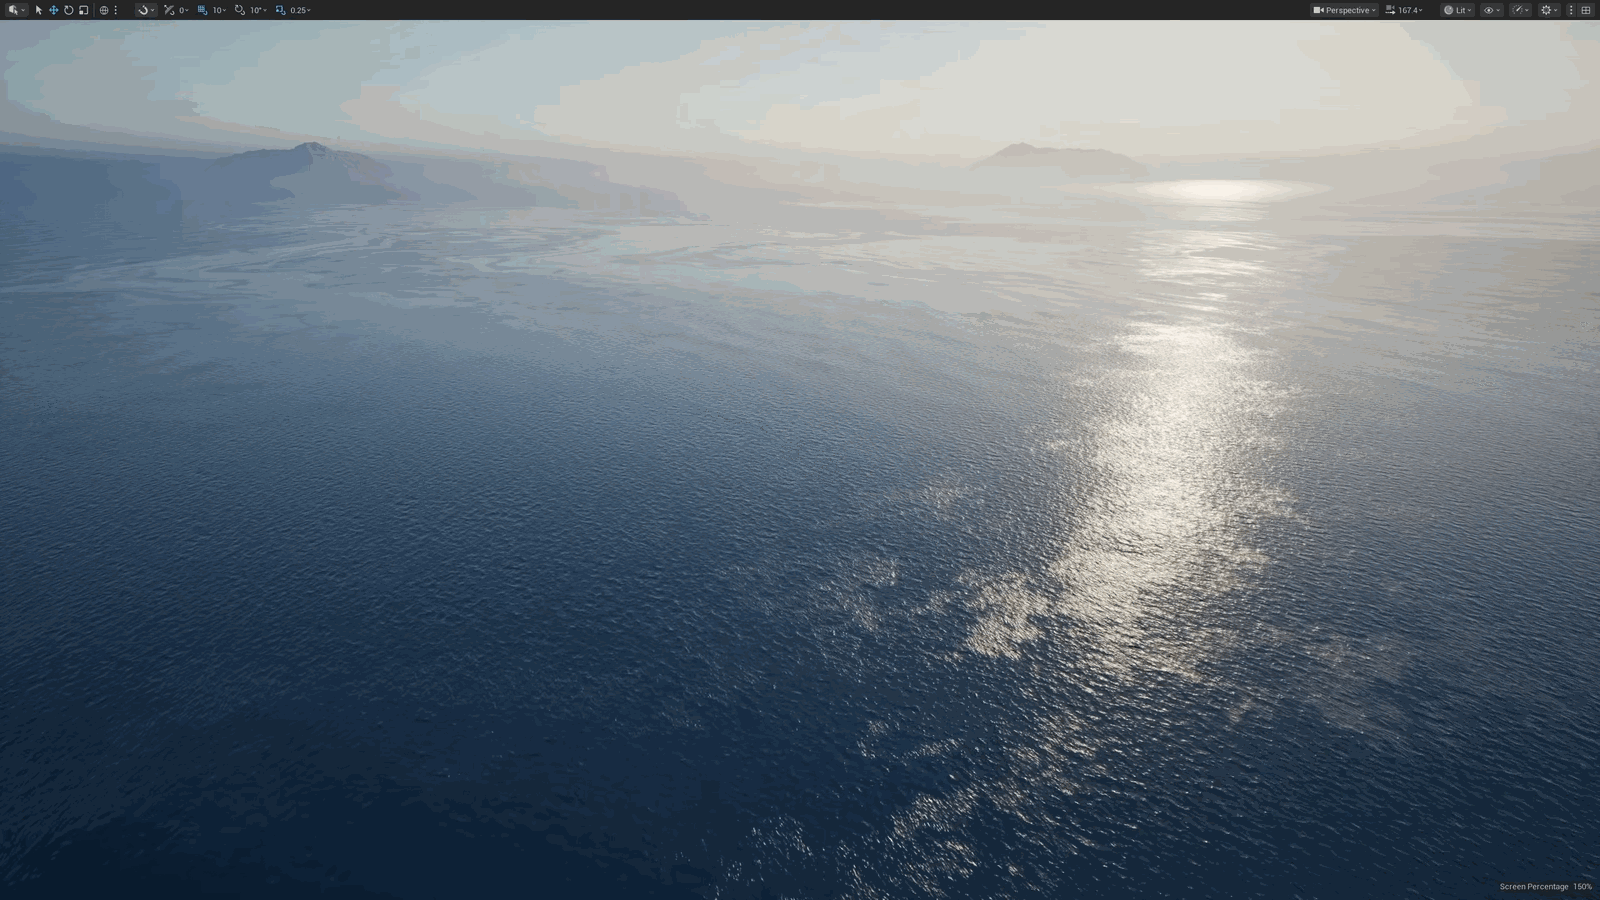
- 支持4K分辨率,显著提升性能表现
This will have a tremendous performance boost for you. For resolution, 4K.
Slide 66 — 00:19:27
📌 要点汇总
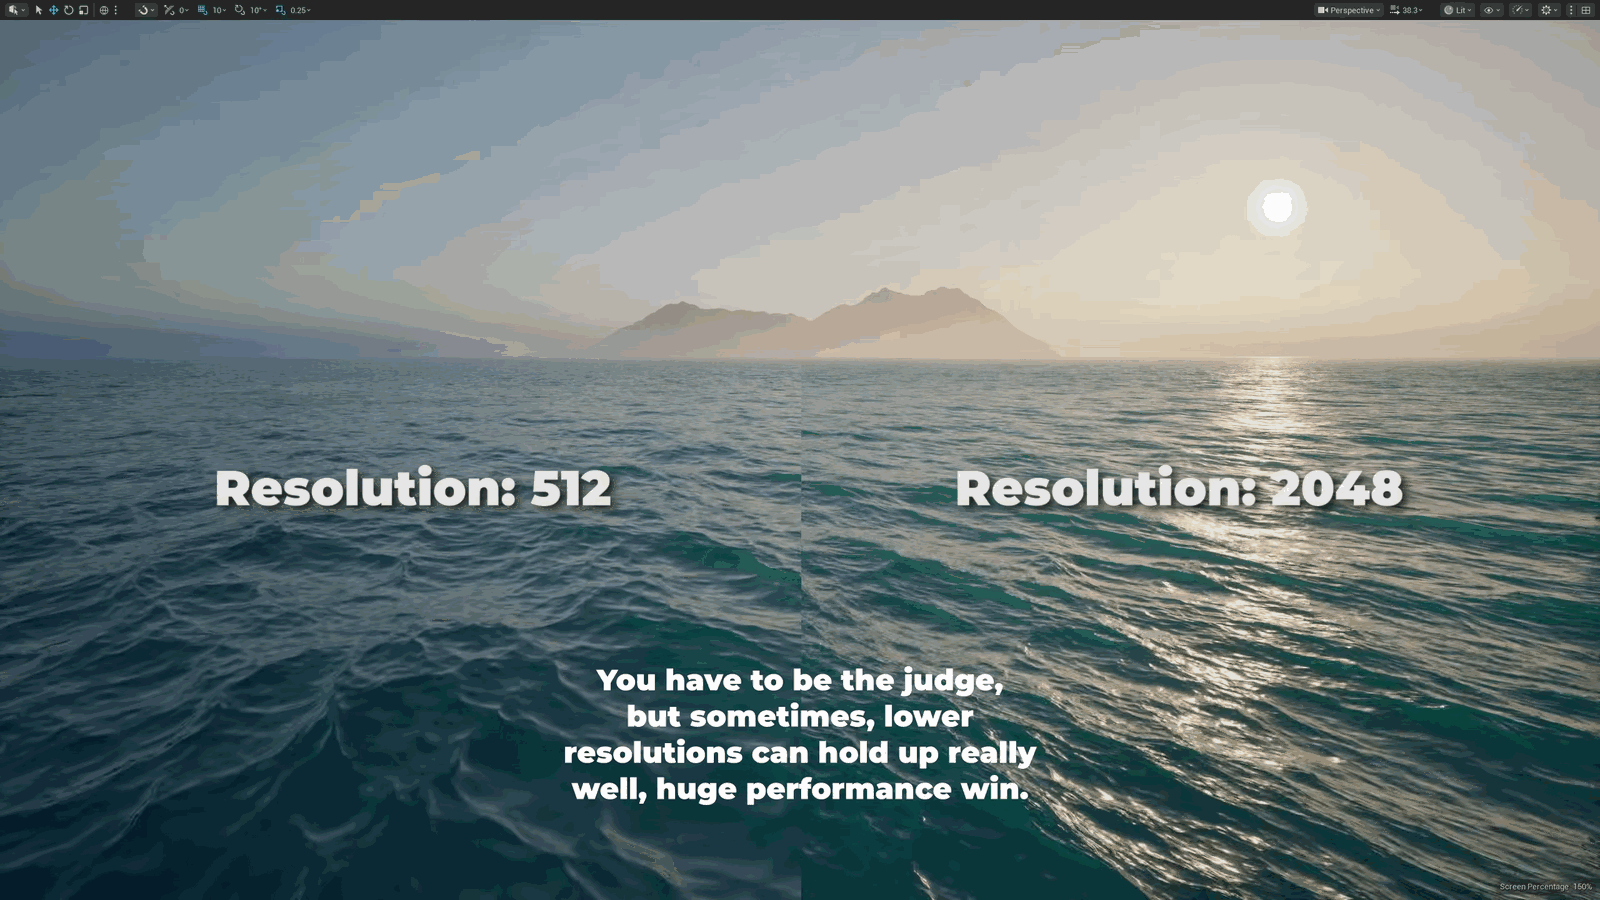
- 表达对某功能的赞赏,但认为在多数情况下过于强大
- 常用参数范围为 256 到 2048
- 提到使用场景的限制条件
Looks amazing, but in most cases, even I find it to be a bit overkill. 256 to 2048 is usually the range that I work with. If you’re not using.
Slide 67 — 00:19:36
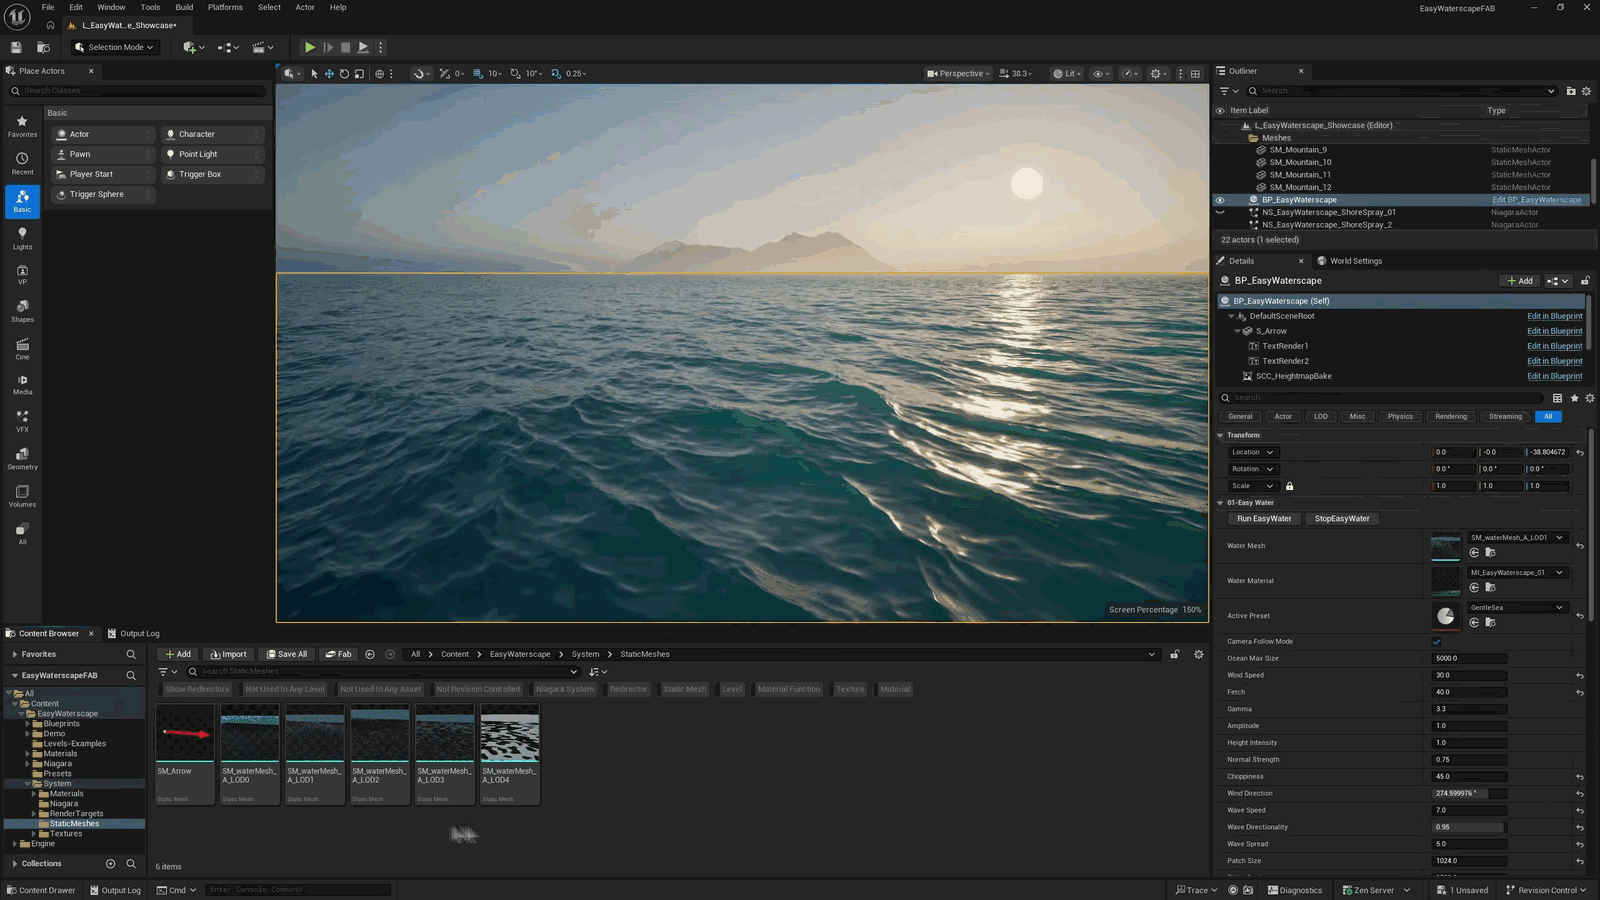
📌 要点汇总
- 默认启用水下特性,建议禁用以提升性能
- 材质实例中应将 two-sided 设置为 false
- 不需要双面渲染时无需启用该功能
- 水网格对性能影响较大
- 双面渲染关闭后视觉差异极小
The underwater feature is enabled by default. I recommend disabling it, and in the material instance, setting two-sided to false. It’s recommended. There is no need to render two-sided if you don’t need it. The water mesh itself, up here, does have quite an impact on performance. There is very little visual difference.
Slide 68 — 00:19:54
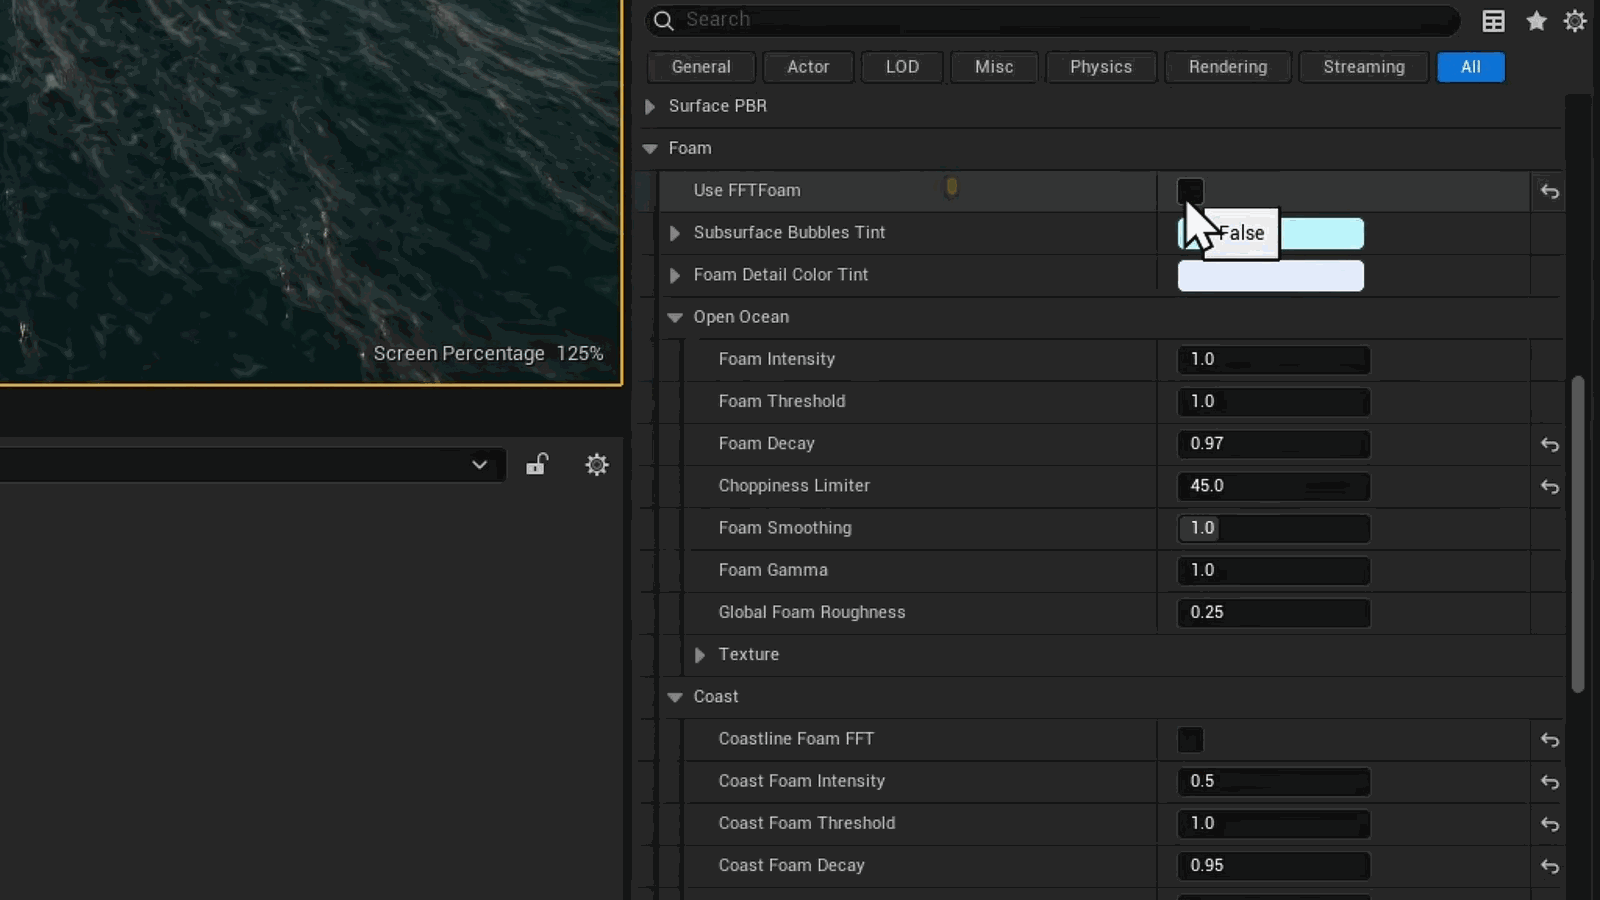
📌 要点汇总
- LOD 0 到 LOD 1 之间,推荐使用 LOD 2 到 LOD 4 用于游戏
- LOD 4 可能过于低,会导致某些波浪大小下的纹理瑕疵
- 禁用海岸线泡沫和开放海洋泡沫可提升性能
- 根据需求调整泡沫效果以优化视觉与性能平衡
Between LOD 0 and LOD 1, 2 to 4 is recommended for games. In fact, LOD 4 is maybe a bit excessively low and does have the occasional artifacts depending on your wave size. For an additional performance boost, if you don’t need the coastline foam or even the open ocean foam, you can disable both check boxes here. Let me take a moment.
Slide 69 — 00:20:16
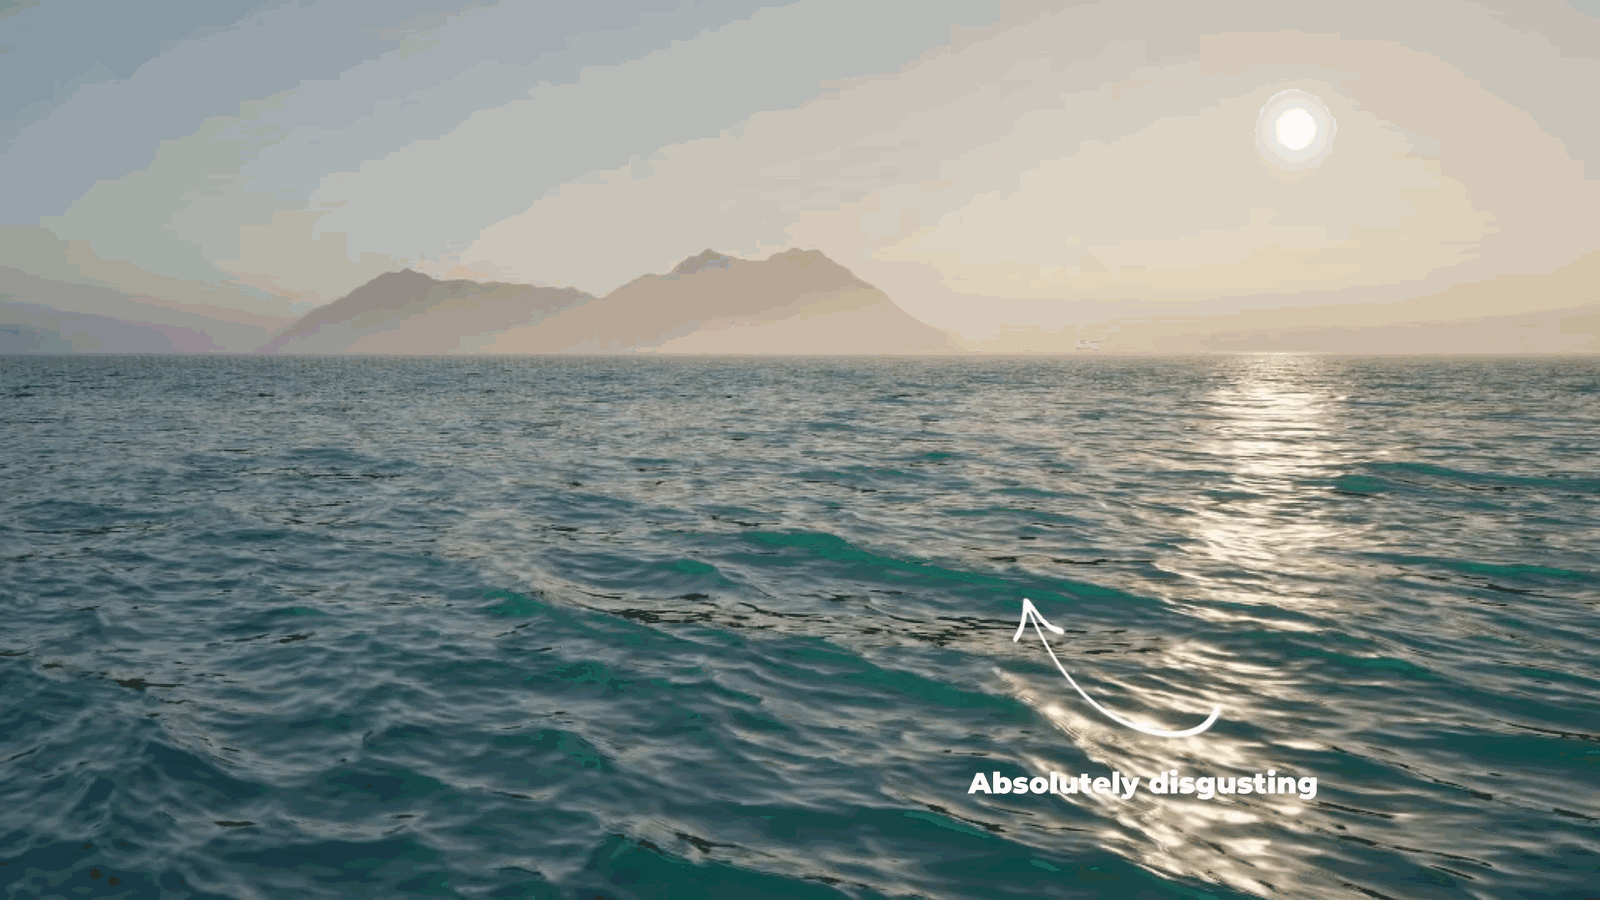
📌 要点汇总
- 使用 Easy Waterscape 时需注意一些已知的 bug 和视觉瑕疵
- 若使用硬件加速 Lumen 或未使用 Lumen,初始体验良好
- 禁用反射(如屏幕空间反射)可能导致出现黑色瑕疵
- 黑色瑕疵可能影响视觉效果,需谨慎处理相关设置
To walk you through some handy things to know when using Easy Waterscape, a few bugs and known artifacts, and how to deal with them. If you’re using hardware-accelerated Lumen, or if you’re not using Lumen at all, you’ll be fine right out of the box. But if you disable things like reflections, screen space reflections, you might run into these weird black artifacts, or worse.
Slide 70 — 00:20:37
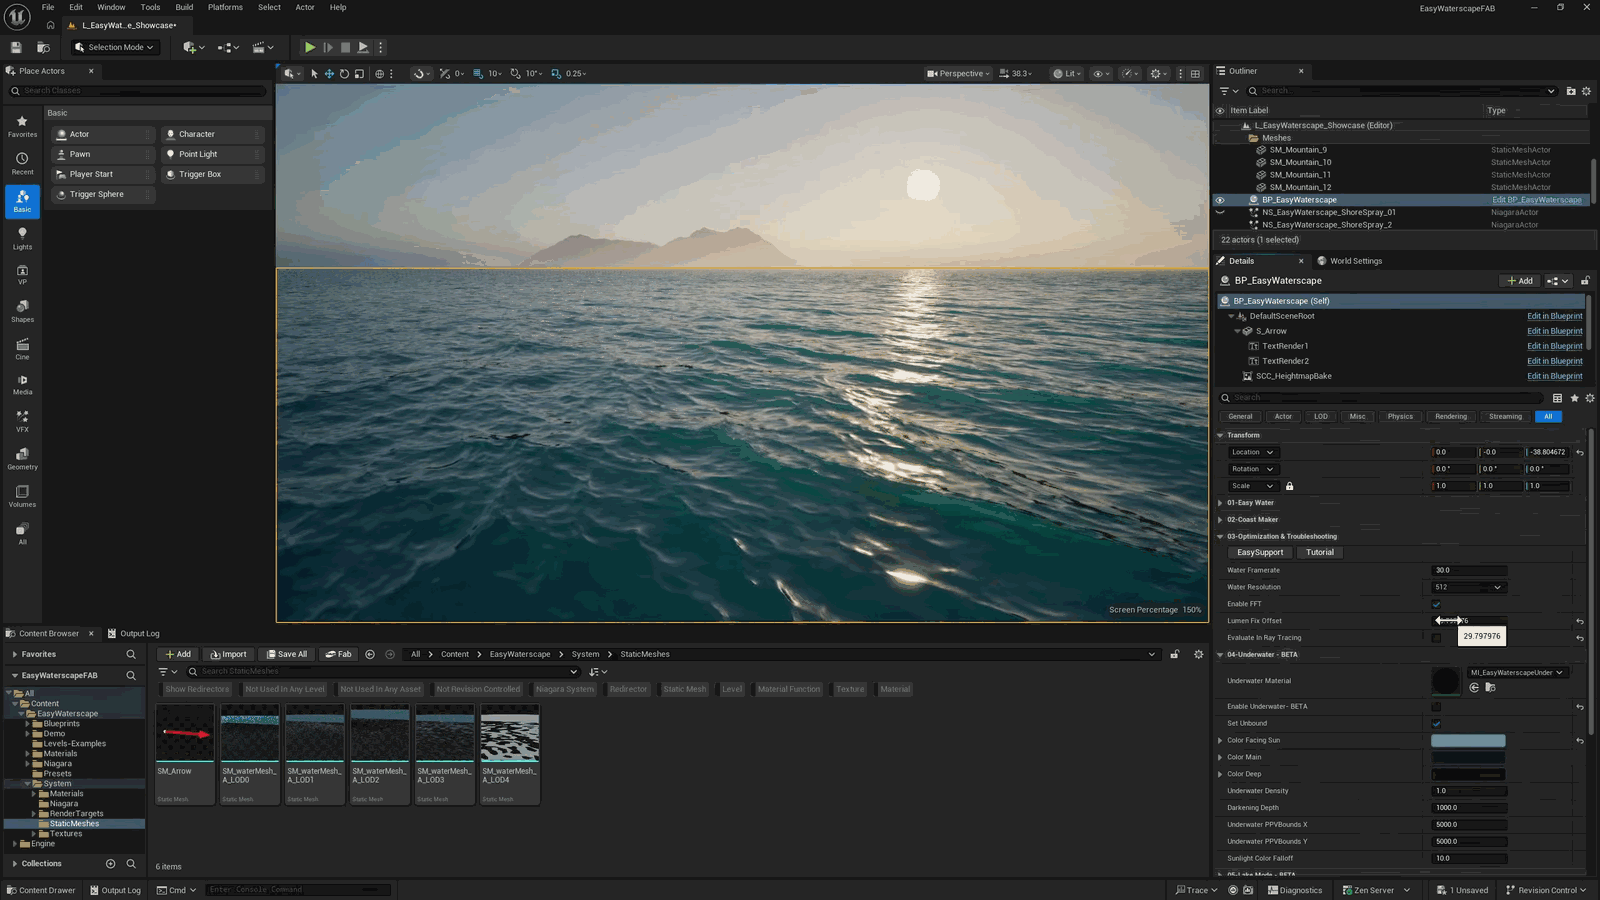
📌 要点汇总
- 需要禁用光线追踪以解决渲染问题
- 应用 Lumen offset 修正以避免负位移值
- 该方法可有效提升模型高度表现
This kind of thing. Don’t worry; it’s an easy fix. First, we just need to disable ray tracing, and then you’ll see this horrible thing. Just apply the Lumen offset fix to push the height above zero, so there’s no negative displacement values.
Slide 71 — 00:20:53
📌 要点汇总
- 建议尽可能使用屏幕追踪(screen traces),效果更佳
- 幻影、拖影和像素化水效果由时间超分辨率(TSR)引起
- 抗锯齿问题是Unreal用户的主要抱怨之一
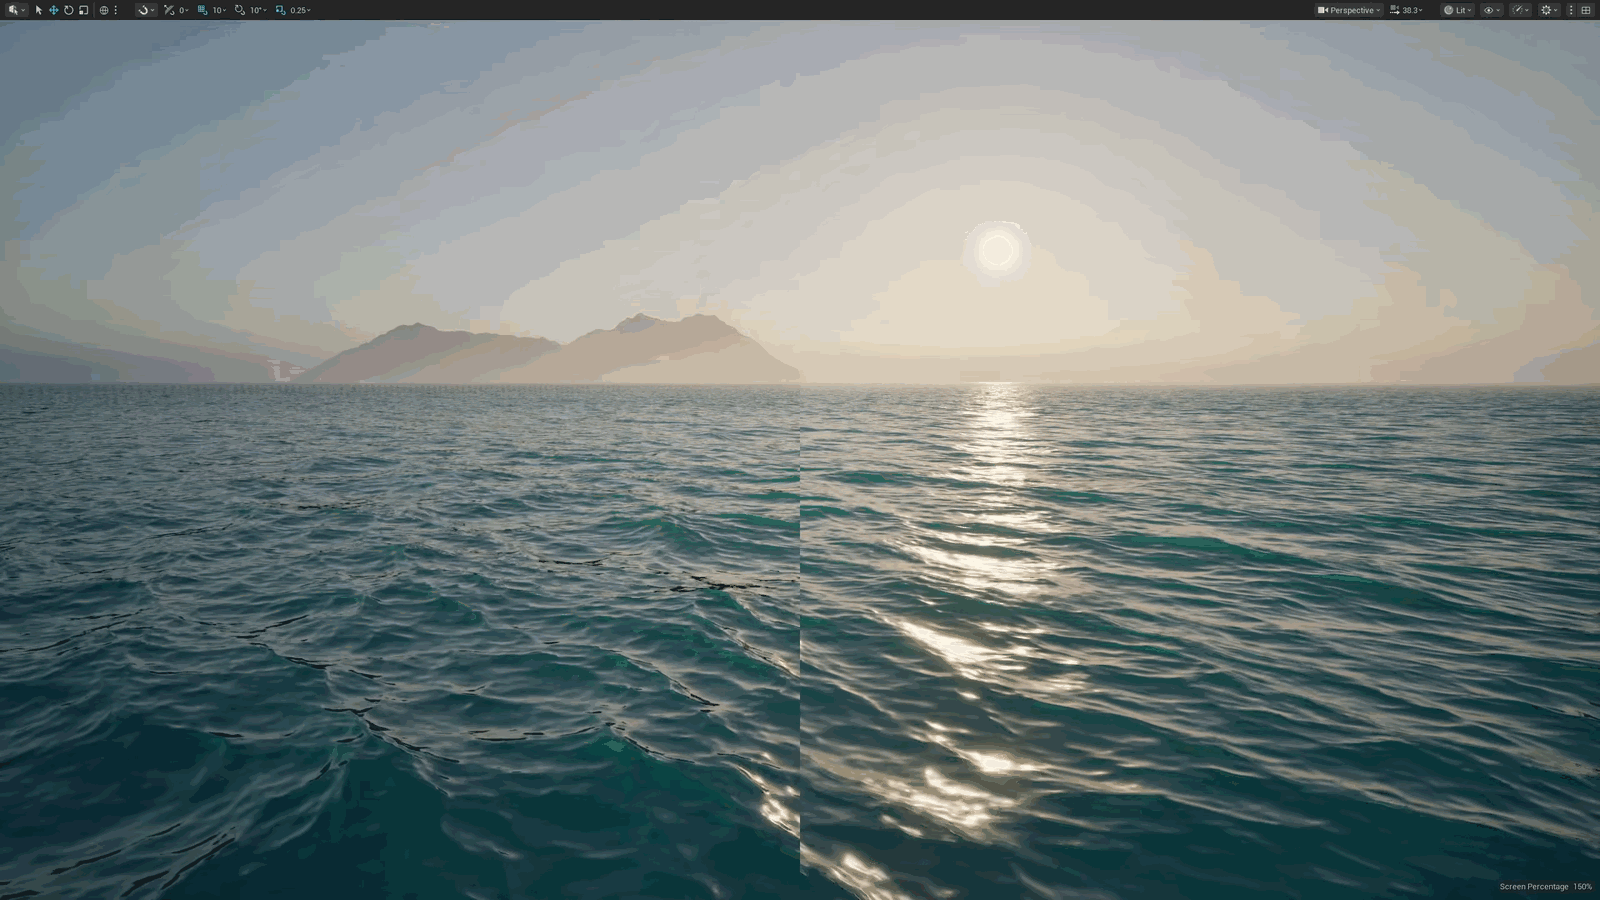
I do recommend using screen traces when possible, as you can see here—the results are a lot better. Ghosting, smearing, and pixelated water are caused by temporal super resolution, or TSR. The anti-aliasing, and it’s a major complaint from just about anyone who uses Unreal.
Slide 72 — 00:21:04
📌 要点汇总
- Ethiwater 在 TSR 下显示效果良好
- 实际渲染分辨率低于屏幕原生分辨率
- 渲染分辨率通常在屏幕的 80% 到 90% 之间
- 画面存在上采样处理,影响画质细节
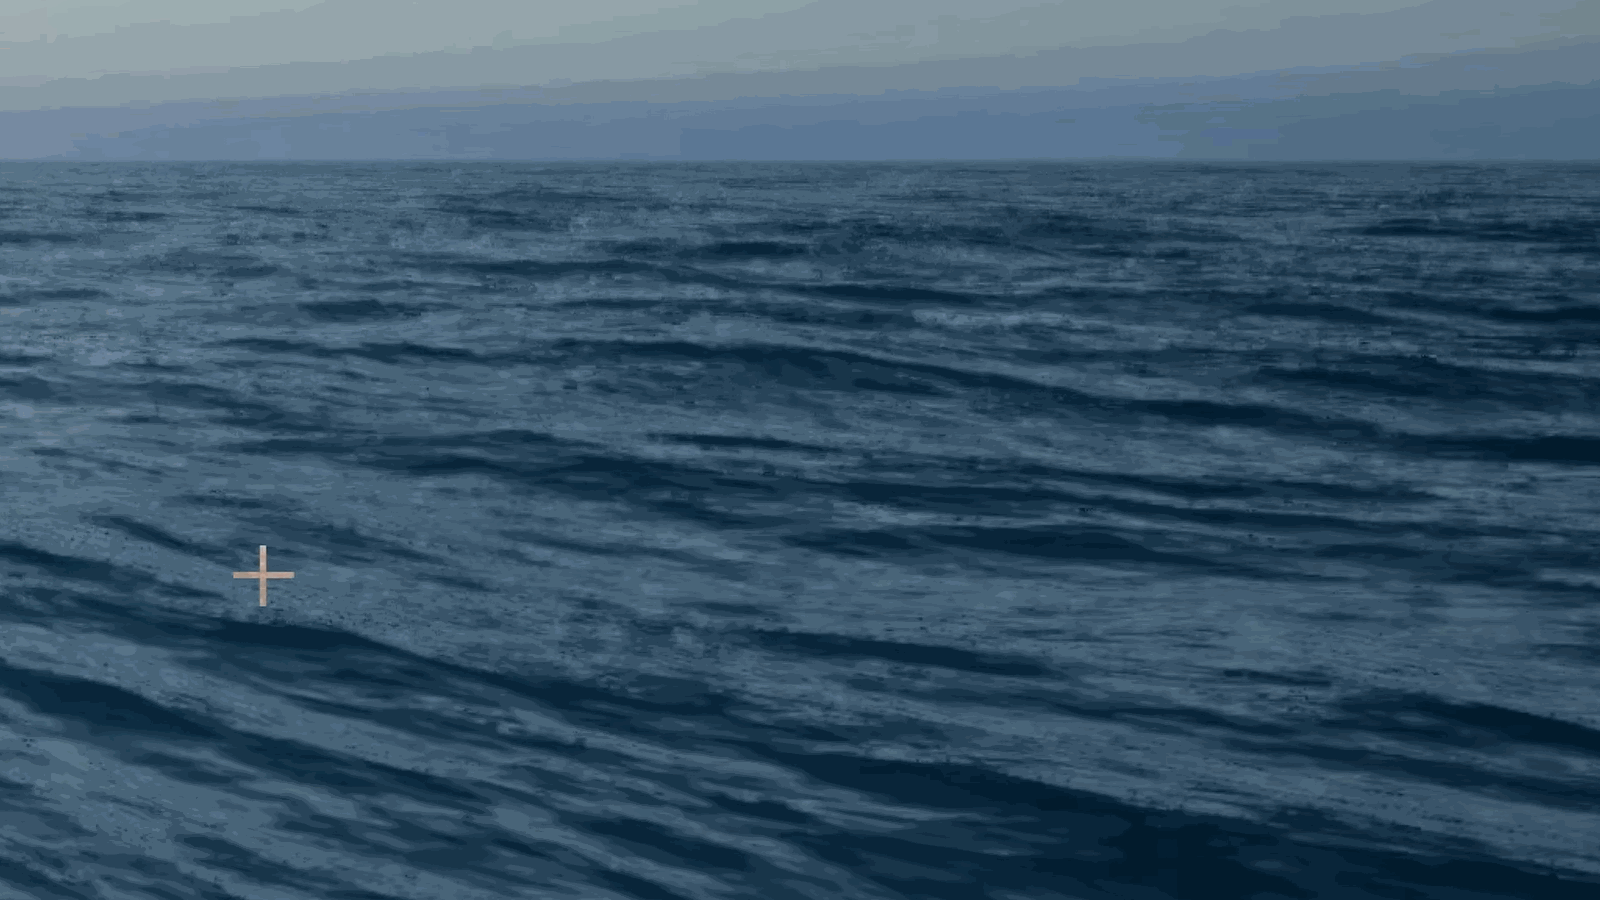
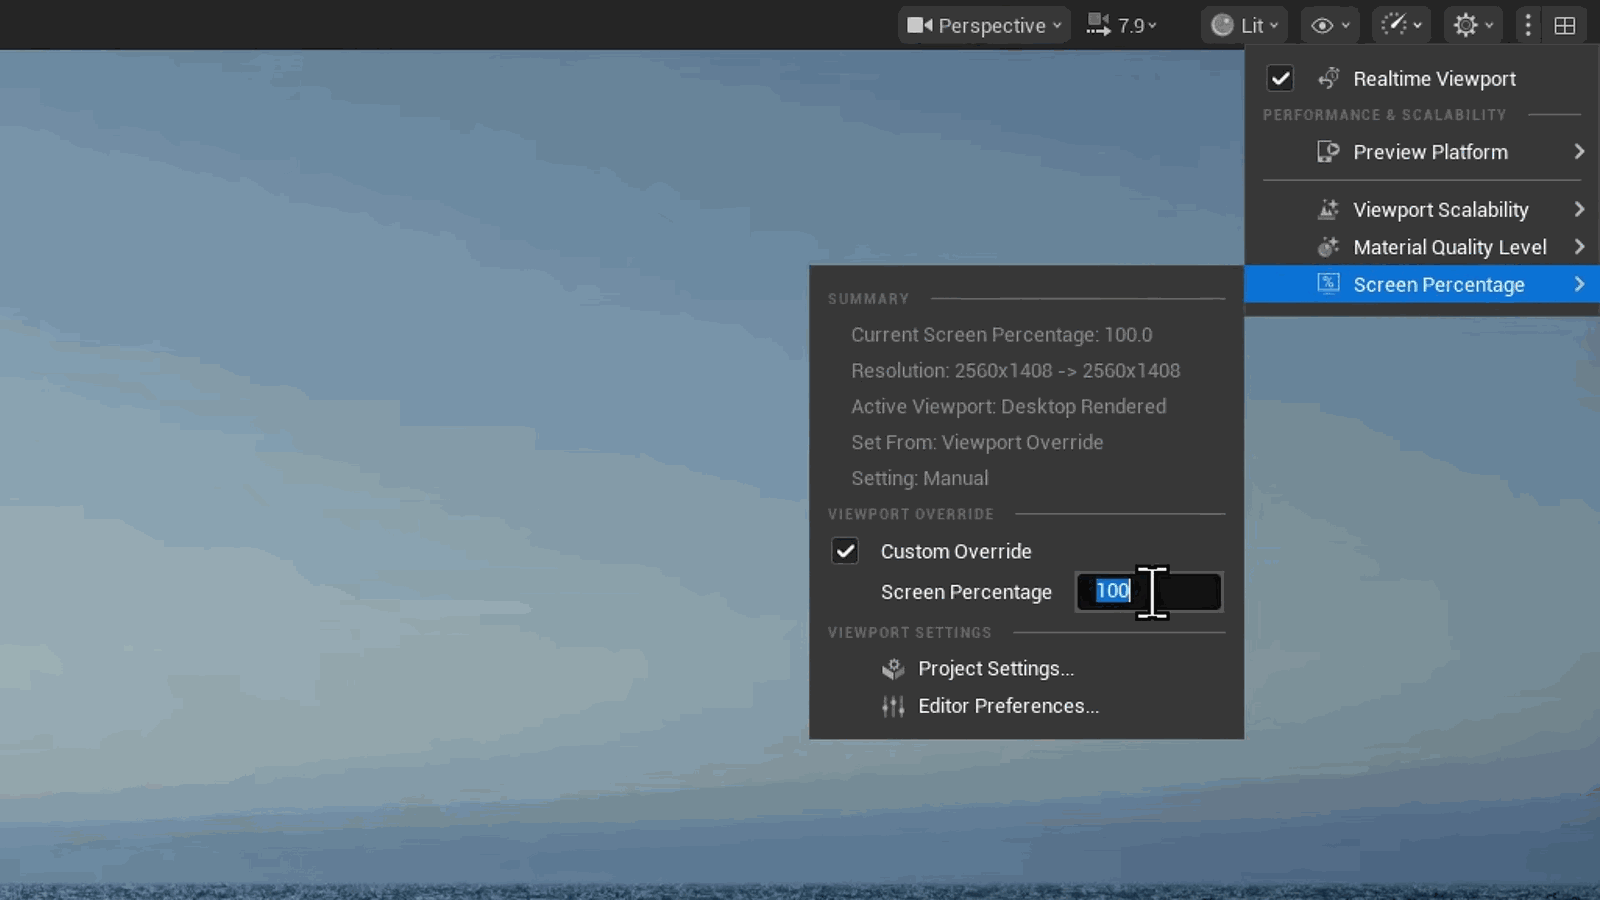
Here’s the thing: Ethiwater can look really good, even with TSR. The real issue is that your viewport is lying to you. It’s not native resolution. It’s probably sitting somewhere between 80 and 90% screen percentage, rarely 100%. That means it is upscaling.
Slide 73 — 00:21:25
📌 要点汇总
- (过渡内容,无关键要点)
And it’s what makes the water look so bad. It is entirely TSLR’s fault. Set it to 100% here, and you’ll see the.
Slide 74 — 00:21:34
📌 要点汇总
- 可将画面缩放至125%或200%以获得更清晰的图像
- 并非所有人都能实现此方案,因此可更改AA(抗锯齿)方法
- 可通过控制台变量或工具包切换至其他五种AA方法
- 还可使用色调映射锐化(tone mapper sharpen)提升画质
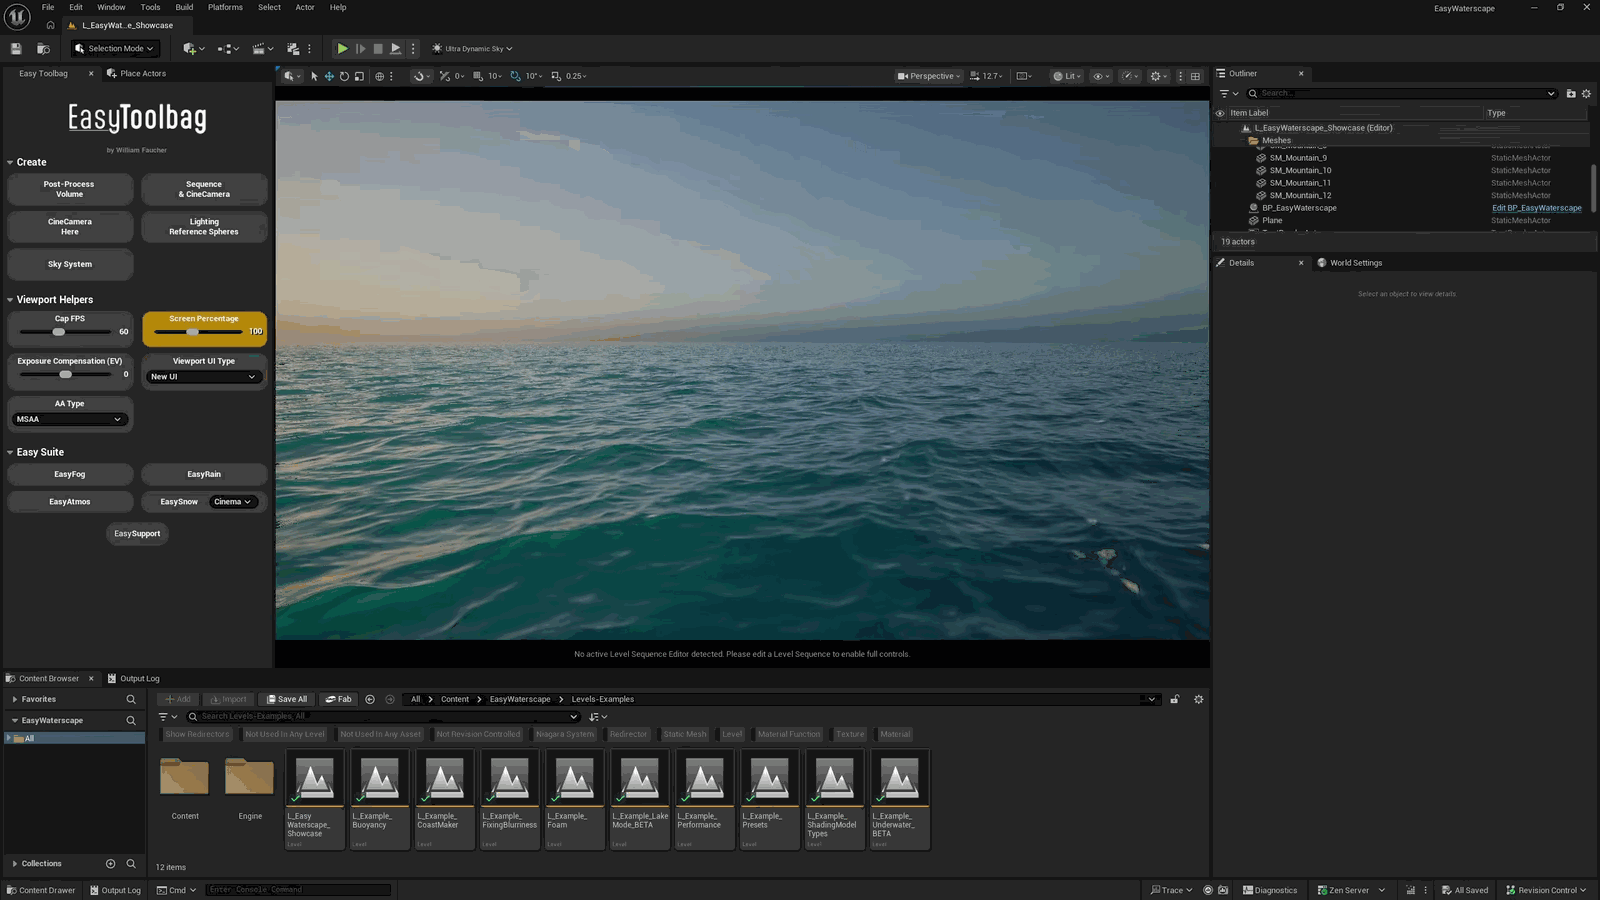
Look way better. Push it to 125 or even 200%, and it’ll be tack sharp. Now, I know that’s not a realistic option for everyone. So, fortunately, you can change the AA method itself. Use this console variable, or if you’re using your tool bag, you can toggle it here, and you’ll see there are five other AA methods to choose from. You can also use the tone mapper sharpen.
Slide 75 — 00:21:58
📌 要点汇总
- 使用 0.5 或 1 的变量值可减少模糊效果
- 避免在渲染或播放前进行任何上采样操作
- 运行时出现“popping”效果时,需在渲染前停止 Easy Water
- 该问题常见于影视画面(cinematics)的处理过程中
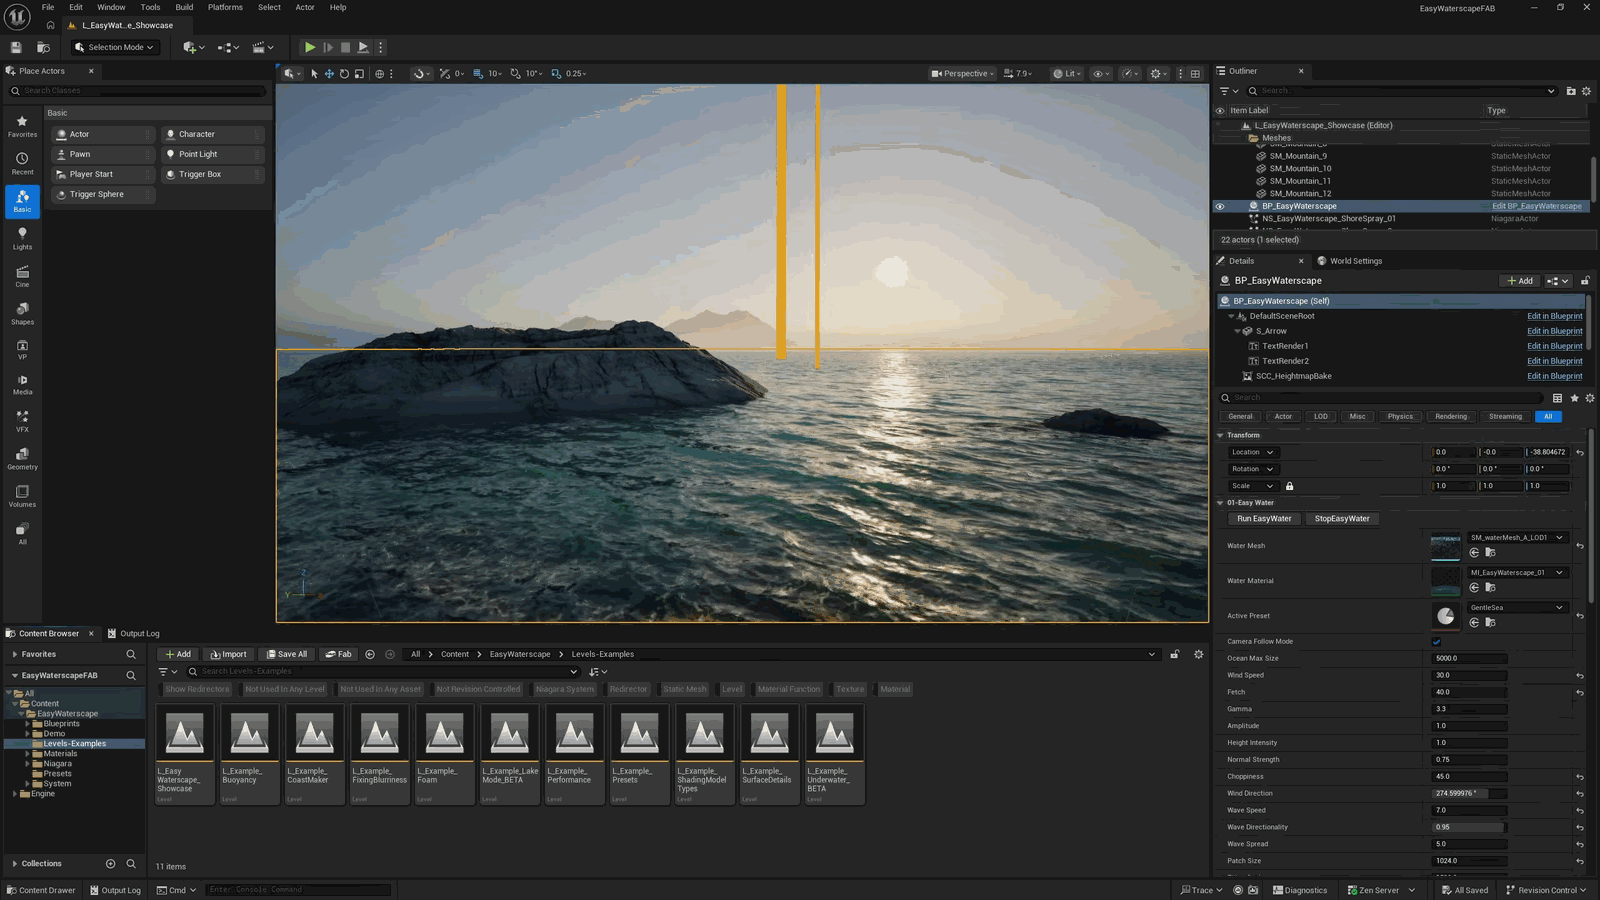
Variable here at zero point five or one to clean up the smearing a little bit more. Every little bit helps. So, bottom line: avoid any kind of upscaling if you can. If you’re seeing this kind of popping effect at runtime, that’s because you need to click stop Easy Water before you render or play. And for the cinematics.
Slide 76 — 00:22:18
📌 要点汇总
- 水的生成方式决定了帧率,即每秒更新的频率
- 设置目标帧率为20时,水的更新频率也应匹配此数值
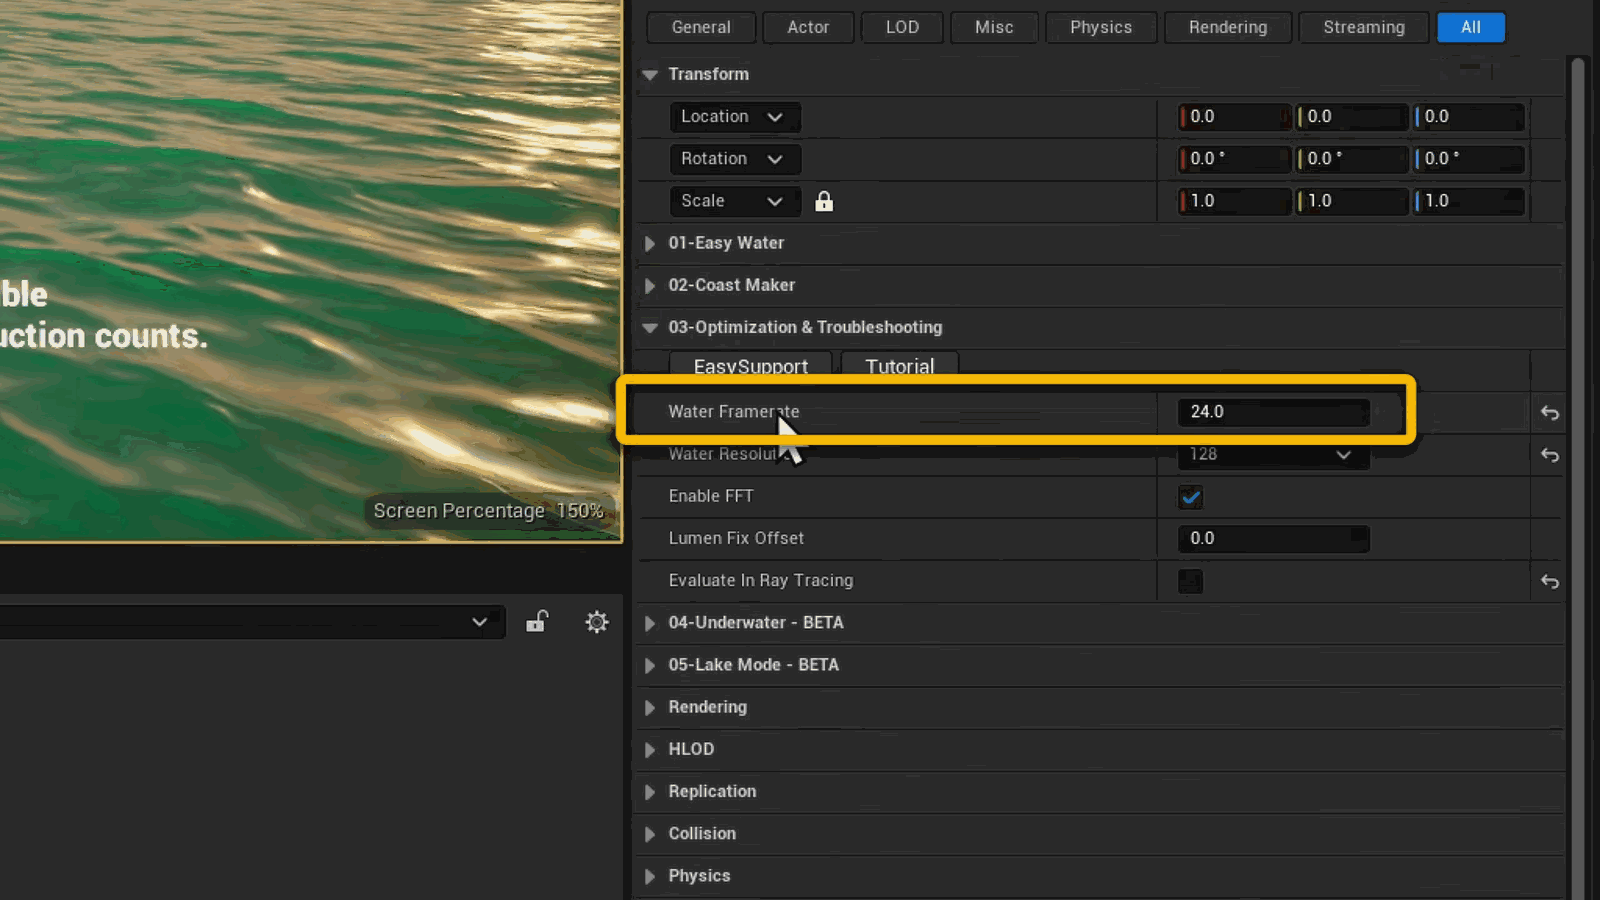
People among you, there’s one thing you really need to know. Due to the way that the water is generated, you determine the frame rate. How often the water updates every second. If you set it to your target frame rate, let’s say 20.
Slide 77 — 00:22:29
📌 要点汇总
- 帧率为4 FPS时,即使使用时间采样,画面也会出现卡顿
- 建议将该参数设置为实际渲染帧率的5到10倍以避免卡顿
- 过低的帧率会导致波浪效果不流畅,影响视觉效果
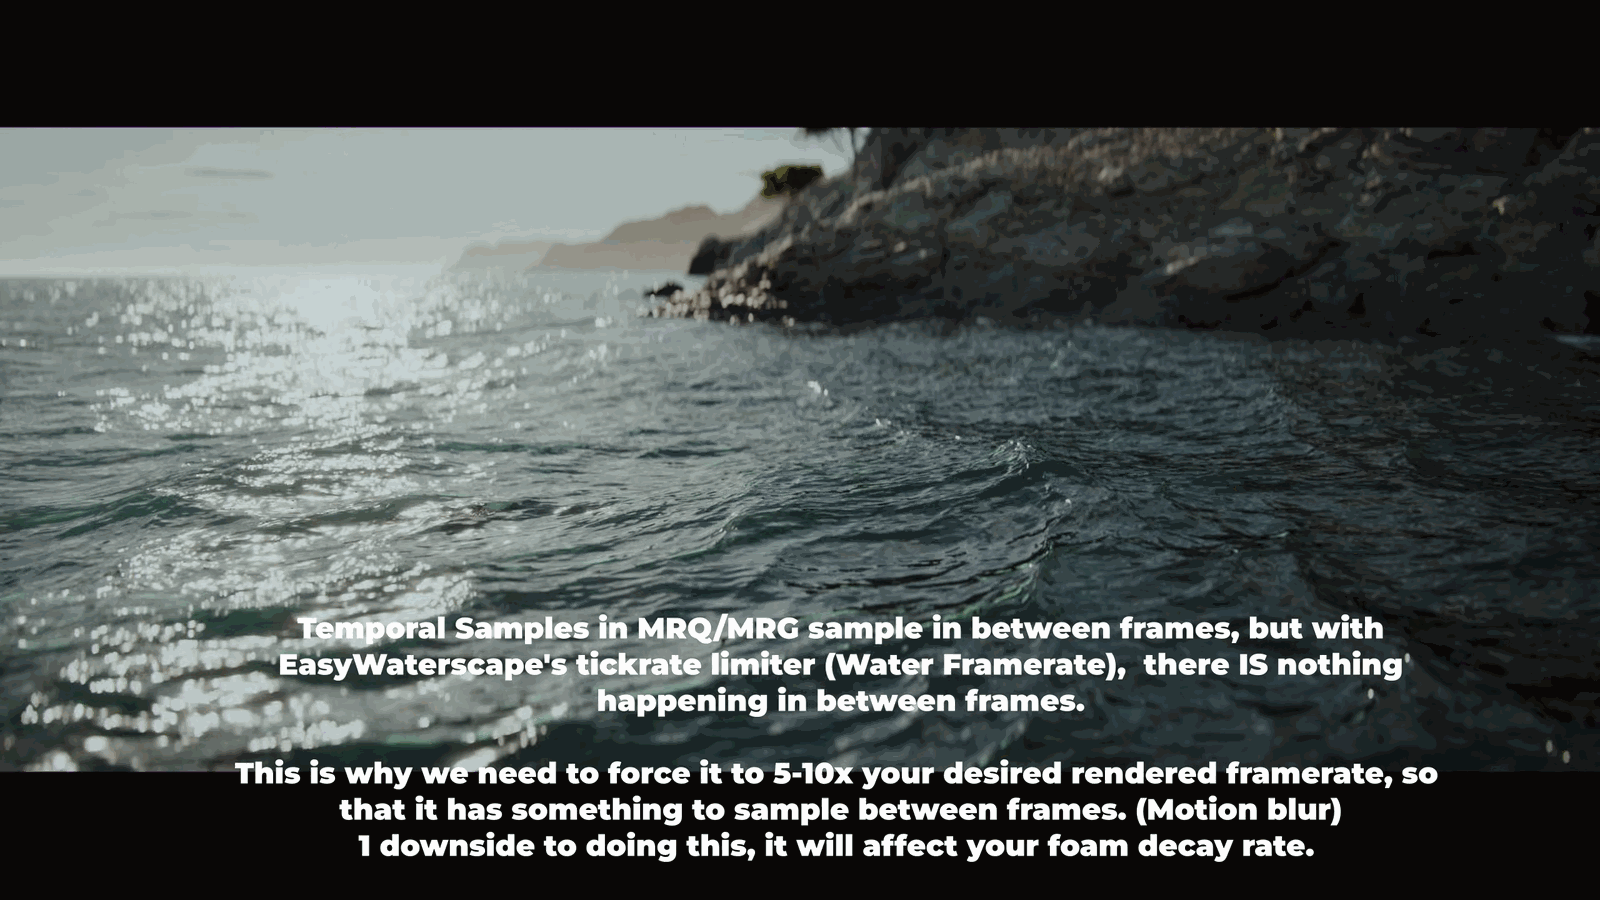
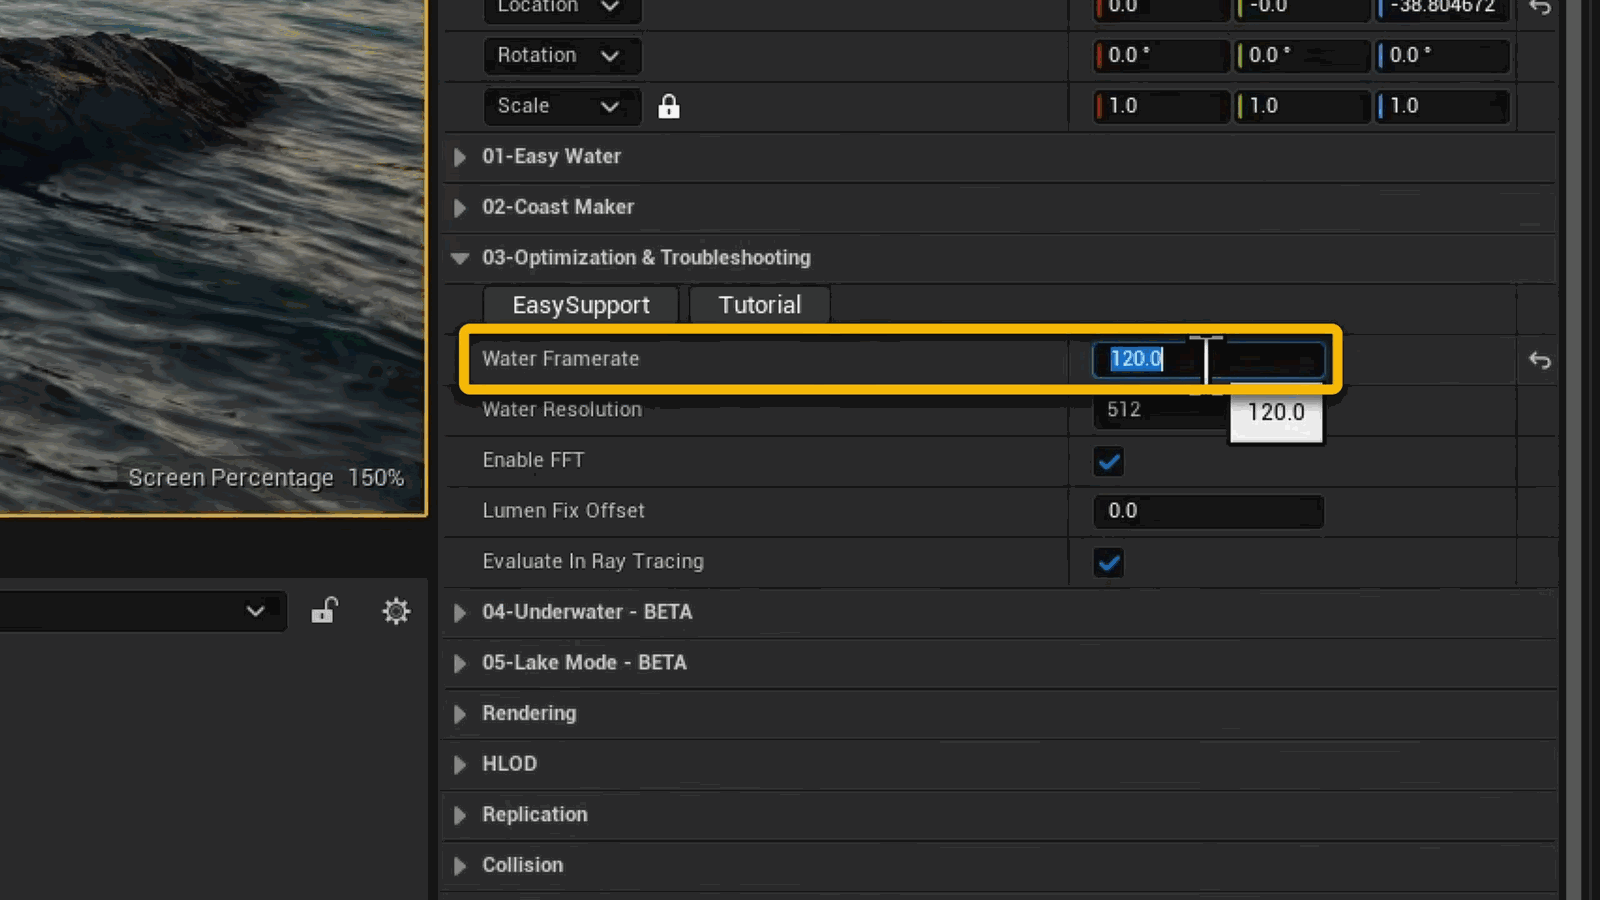
4 FPS. You won’t get any motion blur between frames, even with temporal samples. Your wave will look choppy and not in a good way. Instead, you’ll want to set this to be at least five to ten times your actual rendered frame rate.
Slide 78 — 00:22:37
📌 要点汇总
- 该方法可实现有效采样。
That way, you get sampling in.
Slide 79 — 00:22:44
📌 要点汇总
- 使用帧间插值实现波浪的平滑运动模糊效果
- Easy Waterscape 在 1590 和 3080 Ti 显卡上的性能基准测试结果已展示
- 测试设置为中等偏下,允许进一步优化或提升画质
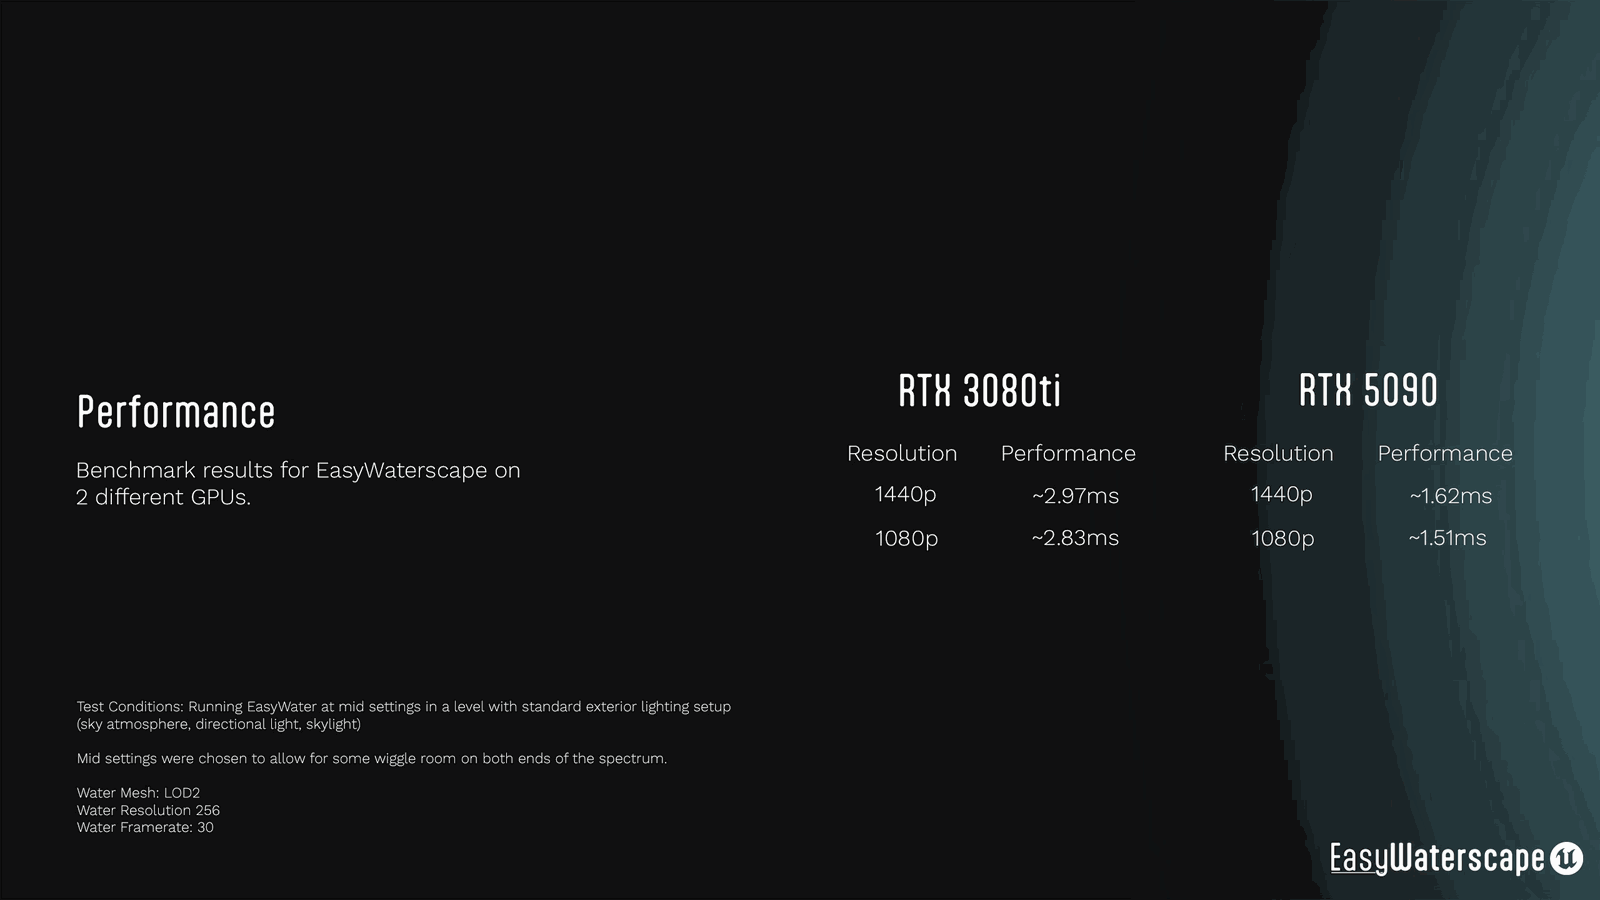
Between the frames, which gives you nice, smooth motion blur on your waves. Many of you will want to know how Easy Waterscape performs, so here are the benchmark results for two GPUs: a 1590 and a 3080 Ti, which is over five years old now. The benchmark settings are very much middle of the road, so there’s wiggle room on both sides. Whether you want to optimize even more or crank the quality up higher, as we’ve covered throughout this video.
Slide 80 — 00:23:07
📌 要点汇总
- 项目性能和画质可通过多个参数精细调整
- 画质表现受光照、反射等设置影响
- 蓝图系统将在UE6之后逐步淘汰
- 蓝图淘汰虽令人遗憾,但影响没有想象中严重
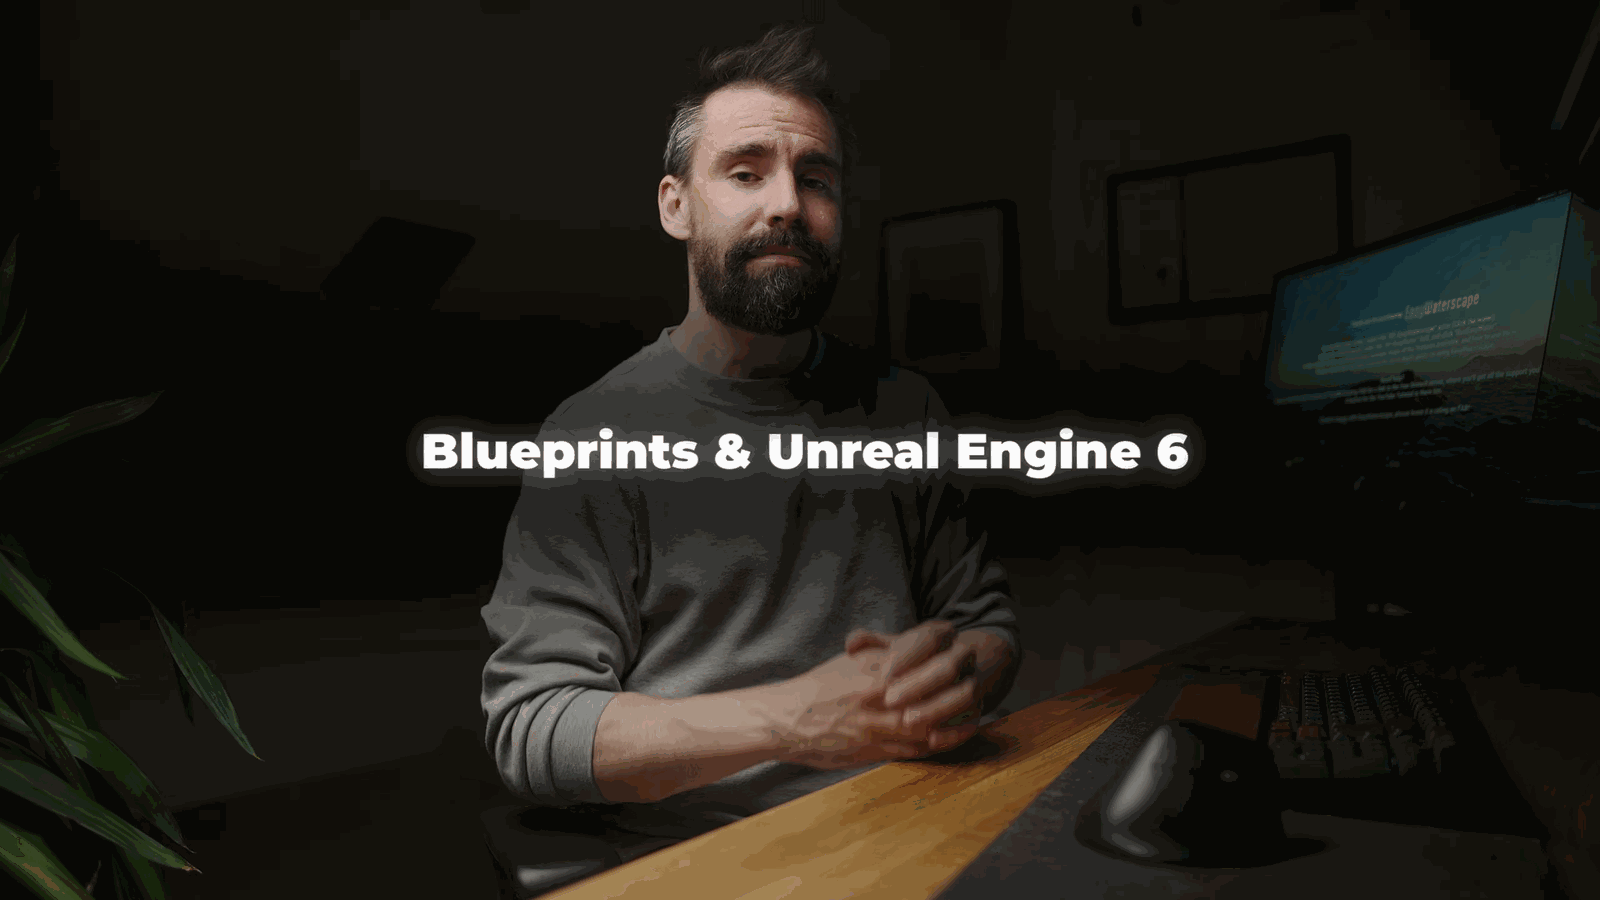
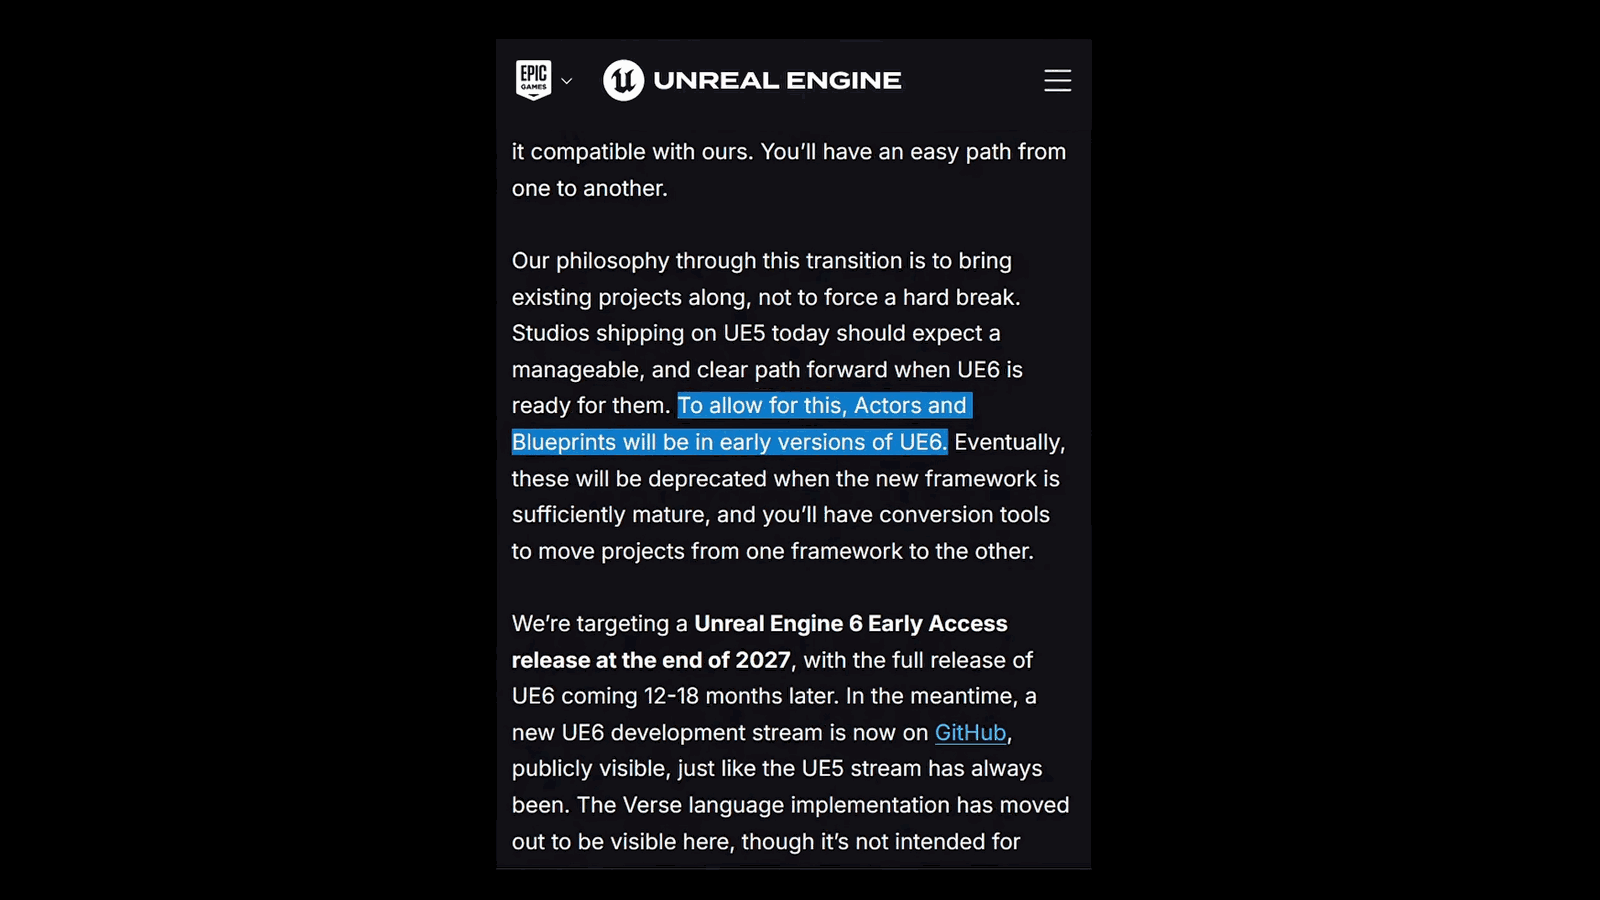
You’ve got tons of dials to fine-tune the performance, the quality ratio for your project. Of course, that can vary based on things out of my control, like whether you use lumens or reflection quality, lighting quality, and so on. Now, you might have heard that blueprints will be deprecated sometime after Unreal Engine 6 comes out. And yeah, that is unfortunate, but it is not as bad as it sounds.
Slide 81 — 00:23:28
📌 要点汇总
- UE6的完整发布预计还需两到三年时间
- Epic表示将在新框架成熟后才会弃用Blueprints,并提供替代方案
First, the full launch of UE6 is not for another two to three years, and second, Epic has stated that once the new framework has matured enough, only then will Blueprints be deprecated, and they will provide alternatives.
Slide 82 — 00:23:42
📌 要点汇总
- 工具迁移至新架构需考虑未来数年的发展
- UE5 和蓝图在未来五年内仍高度相关
- Easy Waterscape 是目前最复杂的 UE5 工具之一
- 作者承诺持续开发并适配 UE6
- 鼓励用户在 Discord 报告 Bug 以协助改进
- 提供投票链接以收集用户对功能路线图的反馈
Tool for migrating to the new architecture. So we’re looking at roughly half a decade in the future here, if not longer. So what does this mean for you? Nothing. UE5 and blueprints are still going to be highly relevant for the next five years, at least. I pledge to keep developing Easy Waterscape, and once UE6 comes out, it will be migrated over and continue working as expected.
Easy Waterscape is a result of months of work. It’s the most complex tool I’ve ever built in UE5 so far, and realistically, there are things I’ve missed or didn’t notice, so help me help you. If you hit a bug, post it in Discord, and you have my word, I’ll fix it as fast as I can.
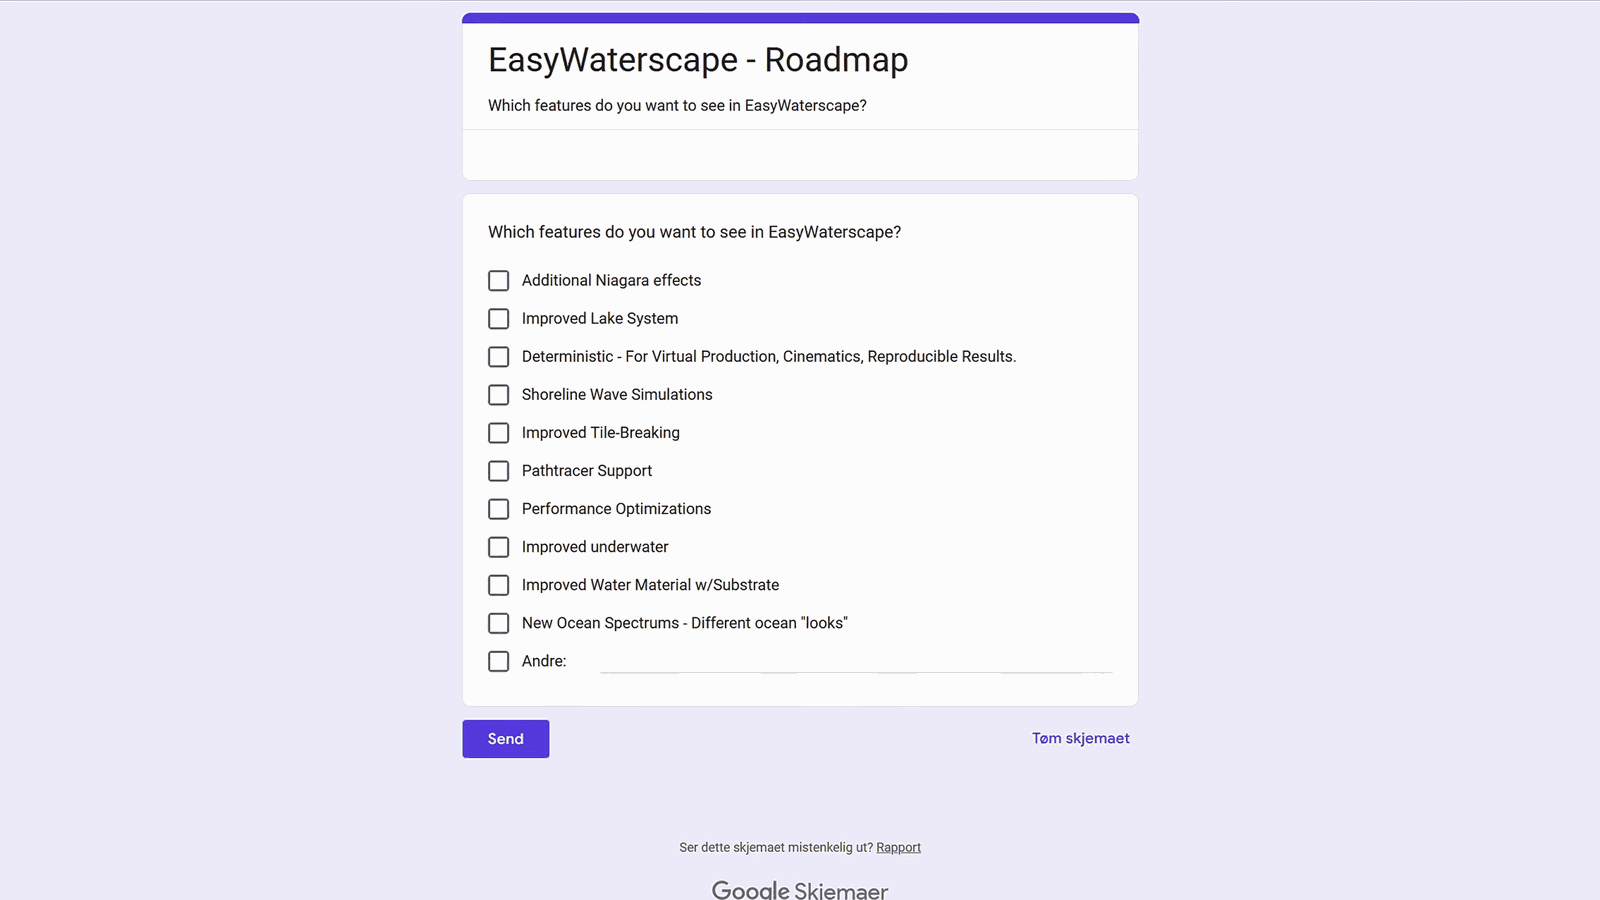
One last thing: down below is a link to a poll where you can vote on which roadmap feature you are most excited to see. Your input will genuinely shape.
Slide 83 — 00:24:29
📌 要点汇总
- (过渡内容,无关键要点)
Where this goes, and that, is covered using Easy Waterscape. You can find it on Fab; the link is down below. I hope you found the video helpful. Remember to join.
Slide 84 — 00:24:38
📌 要点汇总
- (过渡内容,无关键要点)
The Discord server for support, questions, and discussions. Thank you so much for watching, and as always, folks, happy rendering. Easy Waterscape is the must-have. Easy Waterscape. Easy Waterscape. Only then will Blueprint. Only then will Blueprint. Hate this so much. Oh man, that was a long one.